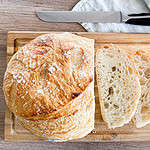
Easy and Simple No-Knead Artisan Sourdough Bread Recipe
This easy and simple no-knead artisan sourdough bread recipe requires very little hands-on time and creates a crusty loaf with a rich sourdough taste and a soft, airy crumb. It is the perfect recipe to use if you don't have time for too many complicated steps. It can be done in one day and baked the next day.
PIN THIS RECIPE!
Ingredients
- 370 grams water 1 ½ cups
- 200 grams active sourdough starter ¾ cup
- 10 grams salt 2 teaspoons
- 550 - 600 grams bread flour or all-purpose flour 4½ - 5 cups
Instructions
- In a large bowl, mix together water and starter and make sure the starter is at least somewhat dissolved. Before you mix the two together, you have a chance to see if the starter floats on the surface of the water. We call this a float test and an active starter should float and not sink.
- Add salt to a started and water mixture. I know, I know, you are not supposed to add salt this early, but trust me, the starter will be just fine. I always add the salt at this stage so it dissolves nicely. That way, I also don't forget it later.
- Add the flour and mix well, you can just use a regular spoon. It does not have to be a wooden spoon, starter can survive a few minutes touching metal. You should end up with a mess that does not exactly resemble a dough yet, because it is likely impossible to shape. Since the flour didn't have a chance to absorb all the water yet, the dough does not yet stay together well.
- Wait 30 minutes to 1 hour for the dough to autolyse on room temperature.
- After the autolysis, try to preform 6 sets of stretch and folds over approximately 2 - 3 hours. Strive for 3 sets of stretch and folds 15 min apart. Then do another 3 sets of stretch and folds 30 min apart. Those are just estimations! The bread will be fine even if you manage to get in two sets. Every set of should be easier because the gluten bonds are becoming stronger. For easier handling, do the stretch and folds with wet hands. The idea is that you remember you have a dough on the counter and show it some love over a 2 - 3 hours period. Watch the bread rise between stretch and folds. Cover it with a plastic wrap or a plastic bag when you are not working the dough.
- Next step is the bulk fermentation. That means you let the dough rise until it doubles in size or at least come close to that. You can do that in the same large mixing bowl. Just make sure to cover it with something to prevent the dough from drying out. It can be a wet tea towel or the same plastic wrap/bag you used in between stretch and folds. The time of the bulk ferment depends on many factors, but mainly it's about how active is your starter and what's the temperature in your house. If you have the dough in the warm place, make sure it does not overproof.
- My favourite rule of thumb is to let the dough rise for 3 hours. If it has almost doubled in size, I move on to the next step. If it is clearly not risen very much, I let it rise for another hour. But I don't like to leave it for more than 4 hours.
- After the bulk fermentation it's time to shape the bread and move it in the proofing basket for the final rise. You don't need an actual proofing basket, any basket that is an appropriate shape will do. At this stage, the bread dough will be wobbly with lots of bubbles. This recipe makes for quite a wet dough, so sprinkle your counter top with a little flour to prevent the dough from sticking to it. Sprinkle some flour onto your tea towel lined basket as well, for the same reason. Now it' time to carefully transfer the dough from your mixing/proofing bowl to the basket.
- My dough is usually too wet to move with my hands, so I just gently scrape it from the bowl to the floured counter top (using a silicone spatula is very helpful). I take two opposite ends and stick them together on the top, and then repeat the same with the remaining two ends. I try to stick the folded ends together, so the dough gets it's final round shape.
- It is important to be very gentle through this process because we want to keep as mush of those beautiful bubbles as possible. Then carefully lift the dough (you can put a dough scraper underneath the dough an easier lift) and transfer it into a proofing basket. Make sure you wrap the basket in something airtight to ensure the dough doesn't dry out. The easiest way to do so is to put it in the plastic bag. Do not try to cover it with a damp kitchen towel because once the towel dries, it no longer prevents the dough from drying out!
- Put it in the fridge overnight or for at least about 8 hours. But for the sake of this recipe, let's say it stays in the fridge for 8 - 12 hours as it does it second rise.
- After the overnight rise, preheat a cast iron dutch oven on 460 F/240 C for at least 30 minutes before you take the dough out of the fridge. When your oven and dutch oven are sufficiently preheated, take a piece of parchment paper and put in on the counter. Turn the proofing basket upside down and let the dough fall on the parchment paper, so the seam side is on the parchment paper.
- At this point, you must score the dough. The purpose of scoring is not purely aesthetic, so even if you don't care for nice scoring, make at least two deep lines over the dough, like a cross. I prefer to score my dough with a razor blade, but a sharp knife will work as well.
- Transfer the parchment paper with your dough on it to a preheated dutch oven. Pour just a little bit of water in, between the side of a dutch oven and parchment paper. Don't let it directly touch the dough. Then over immediately to capture all the steam you just made! This will help with the oven spring.
- Bake your bread for 30 minutes on 460 F/240 C covered. Then uncover it and bake for an additional 15 minutes uncovered on 440 F/230 C.
- Take the bread out of the oven (and out of the hot dutch oven). Put it on the cooling rack (wire rack) to cool down completely.
- Slice and eat your homemade bread! And enjoy the smell of fresh bread in your kitchen.
Notes
- If you are a beginner, I recommend using some kind of white wheat flour or even manitoba flour. They contain more gluten than whole wheat flour or other types of flour. You'll have an easier time stretching and handling the dough in general.
- The fermentation time makes the bread easier to digest, so if you have a sensitive stomach or have trouble eating a lot of gluten, try to ferment the dough for a longer period of time. If you can wait, leave the dough in the fridge after shaping for 2-3 days before baking it.
- You'll need an active sourdough starter for this recipe. If yours is not mature yet, you risk the bread being flatter.
- Allow the bread to cool completely before slicing. If you try to slice it when it's still warm, you risk ending up with a dry, gummy loaf.
Tried this recipe?Please consider Leaving a Review!
Nutrition
Serving: 1slice | Calories: 181kcal | Carbohydrates: 36g | Protein: 6g | Fat: 1g | Saturated Fat: 0.1g | Polyunsaturated Fat: 0.3g | Monounsaturated Fat: 0.1g | Sodium: 326mg | Potassium: 46mg | Fiber: 1g | Sugar: 0.1g | Vitamin A: 1IU | Calcium: 8mg | Iron: 0.4mg
