Extremely Soft Sourdough Sandwich Bread With Milk
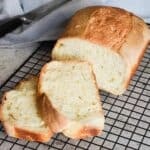
This sourdough sandwich bread with milk will not only have a tender crumb and a subtle tang but will stay VERY soft for at least 2 days! Without further ado, I present you with the ultimate sourdough sandwich bread recipe!
PIN THIS RECIPE!
Ingredients
- 125 grams active sourdough starter (100% hydration) ½ cup
- 210 grams full-fat milk 1 scant cup
- 8 grams salt 1¼ teaspoons
- 40 grams honey 2 generous tablespoons
- 300 grams all purpose flour 2⅓ cups
Instructions
- In a mixing bowl, mix the following ingredients: milk, sourdough starter, salt, and honey. Add all of the flour and mix again. The easiest way to mix this bread dough is by using a danish whisk or a big spoon. You'll end up with a shaggy dough that is quite wet.
- Let the dough rest for at least 20 minutes (autolyze), then do a few rounds of stretch and folds over 1 hour. Let the dough rest for at least 10 minutes in between your sets of stretch and folds. I try to do at least 4 rounds. The idea is to help the gluten development in your dough to reach a point where it passes the windowpane test.
- Cover it with a wet tea towel or something airtight (you can use plastic wrap, aluminum foil, or a plastic bag) to prevent it from drying out, and bulk ferment it for 6 - 8 hours at room temperature. Proofing time will depend mostly on the temperature of your kitchen, so go closer to 6 hours if your kitchen is hot, and closer to 8 hours if it's more chilly.
- After the bulk fermentation (the first rise), your dough should nearly double in size and you should be able to see a few air bubbles on the surface of the dough (see photo). The fermentation process will also make it shiny and wobbly.
- Turn your dough out onto a lightly floured surface and stretch it into a rectangular shape. Rather than rolling it, just fold the upper third toward the center and the bottom third over it. Turn it seam side down into a parchment paper-lined loaf pan. Don't worry if the dough continues to be quite sticky; it is a wet dough and is not the easiest to shape.
- Cover the dough again with a wet tea towel or something airtight and do a second rise for 1 - 2 hours. Then transfer the dough into the fridge and forget about it for about 12 hours (overnight).
- The next morning, take the dough out of the fridge and preheat your oven to 400°F (204°C). Score your dough down the middle with a sharp knife or a razor blade. If you're feeling fancy, you can do an egg wash (I usually don't).
- Bake for 30 minutes at 400°F (204°C) Rotate it once at the 15-minute mark. Take it out of the oven and let it cool on a cooling rack. If you want an especially soft crust, cover it with a damp tea towel.
Notes
- The dough will stick to your hands less if you regularly wet them with water during the shaping. This applies to any bread dough that is a bit stickier.
- Shaping: When you shape your dough, have some flour in a small bowl right next to your work surface. This way, when you need extra flour to prevent sticking, you'll quickly be able to grab some more without leaving dough pieces on your flour containers.
- Bulk rise: Keep an eye on your dough during bulk rise! During the summer months, you'll be surprised how much quicker the starter works through your dough. To avoid over-fermenting your dough, keep a close eye on it. Using honey also reduces the bulk rise time just a bit (because we're providing the yeasts with more sugars to feed on).
- Shaping: When you shape your dough, have some flour in a small bowl right next to your work surface. This way, when you need extra flour to prevent sticking, you'll quickly be able to grab some more without leaving dough pieces on your flour containers.
- Use your dough scraper: When shaping your dough or cleaning up your countertop of sticky dough pieces, a dough scraper can come in handy. If you have it, use it for more than just cutting dough.
- Second rise: Again, keep an eye on it and asses. Although you can trust the recipe to provide you with the approximate amount of time for the second rise, the temperature can speed up or slow down the fermentation process. The second rise can take a few hours to complete if your kitchen is cooler.
- Bake it low and slow: don't crank up the baking temperature to shorten the baking time. Sandwich bread doesn't need a hard dark crust. If you have a very strong oven, even consider lowering your temperature for a few degrees.
- Cool Completely: Allow your sourdough sandwich bread to cool completely on a wire rack after baking. This prevents moisture from getting trapped inside the loaf, which can lead to sogginess or mold.
Tried this recipe?Please consider Leaving a Review!
Nutrition
Serving: 1slice | Calories: 121kcal | Carbohydrates: 25g | Protein: 3g | Fat: 1g | Saturated Fat: 0.4g | Polyunsaturated Fat: 0.1g | Monounsaturated Fat: 0.1g | Cholesterol: 2mg | Sodium: 266mg | Potassium: 55mg | Fiber: 1g | Sugar: 4g | Vitamin A: 28IU | Vitamin C: 0.02mg | Calcium: 26mg | Iron: 1mg
