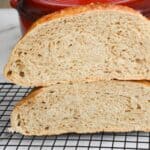
Rustic Whole Wheat Sourdough Bread
Jump to VideoIf you love homemade whole wheat bread but don't want the fuss of kneading, try this no-knead rustic whole wheat sourdough bread recipe. It's easy to make, you can make it in one day and it's packed with whole wheat flavor (60% of flour used is whole wheat flour!). Enjoy the satisfaction of rustic, homemade sourdough bread with a crunchy crust but without the unnecessary extra work.
PIN THIS RECIPE!
Ingredients
- 270 grams water 1⅛ cups
- 120 grams active sourdough starter ½ cup + 1 tablespoon
- 8 grams salt 1¼ teaspoons
- 160 grams bread flour 1¼ cups
- 240 grams whole wheat flour 1¾ cups
Instructions
- In a large bowl, mix your water, starter, and salt. I like mixing those up first so the starter and the salt have a chance to disperse in the water.
- Add both flours and mix well. I usually do this with a spoon and finish with my hands to break up all the flour. You'll end up with a shaggy dough.
- Cover with something airtight (plastic wrap, aluminum foil, plastic bag, even a shower cap works!) and let the dough rest for 30 minutes. I find putting a plastic bag over top is the most practical.
- After 30 minutes, it's time to do some stretch and folds. They'll help with gluten development, which is crucial for the bread's shape and texture. Here's how: grab the dough's edge, stretch it upwards, and fold it over the other side. Turn your bowl 90 degrees and do this three more times. You want to do a total of 4 sets of stretch and folds. Cover the dough again and let it rest for 20 minutes, then do another set of stretch and folds.
- For best results, repeat this process until you've completed 4 sets of stretch and folds, which should take about 1 hour. Keep the dough covered tightly between sets to prevent it from drying out!
- Once you're done with the stretch and folds, cover the dough again (it should now look like a smooth ball) and let it do its first rise at room temperature for about 5 hours. It should nearly double in size during this time.
- Once the bulk fermentation is done, move your dough to a floured surface. Now, it's time to shape your dough. Here's how: take the two opposite ends of the bread dough and pinch them together on top. Do the same with the other two opposite ends.
- Get your bread basket or banneton ready by lining it with a tea towel that has a light dusting of flour. Gently place your dough ball into the basket with the pinched side facing up. If your dough is a bit wobbly, you can use a bench scraper to help you.
- Cover the dough again (I use the same plastic bag as before) and let it do its final rise for 2 hours at room temperature. About an hour in, you can turn your oven on to preheat it with your dutch oven inside.
- Once your dough has puffed up a bit and your Dutch oven and oven are thoroughly preheated, get a piece of parchment paper ready. Carefully move your dough from the basket onto the parchment paper, turning it so the floured bottom becomes the top.
- Use a razor blade or a sharp knife to make a moon-shaped cut on one side of the dough. You can play around with a few shallower cuts on the other side to make the pattern of choice.
- Place your parchment paper with the dough inside a hot Dutch oven.
- Bake the bread in the oven at an oven temperature of 460°F (238°C) for 27 minutes. Remove the lid and continue baking for an extra 8 minutes at 440°F (227°C) to achieve a lovely golden brown color.
- Once out of the oven, transfer the bread to a cooling rack, cover it with a damp kitchen towel, and let it cool for at least an hour before slicing.
Video
Notes
- Use a HEAVY bowl for mixing the dough and doing stretch and folds. That way, when you stretch the dough, the bowl will stay on the counter no matter how dense it is.
- For best results, handle the dough with wet hands to prevent it from sticking to your hands when you handle the dough. It will still stick a bit (because we're dealing with medium to high-hydration dough, but wetting your hands really helps! Use this tip especially when doing the sets of stretch and folds. It is normal for the dough to be very sticky the first time you do stretch and folds.
Tried this recipe?Please consider Leaving a Review!
Nutrition
Serving: 1slice | Calories: 125kcal | Carbohydrates: 26g | Protein: 4g | Fat: 1g | Saturated Fat: 0.1g | Polyunsaturated Fat: 0.3g | Monounsaturated Fat: 0.1g | Sodium: 260mg | Potassium: 86mg | Fiber: 3g | Sugar: 0.1g | Vitamin A: 2IU | Calcium: 10mg | Iron: 1mg
