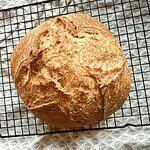
50/50 Fresh Milled Sourdough Bread (Half Freshly Milled Flour, Half All-Purpose Flour)
This 50/50 Whole Grain Sourdough Bread is the loaf I recommend when someone wants the nutrition of freshly milled wheat without giving up a soft, flexible crumb. You get a crackly, golden crust, a mild tang from the sourdough, and a texture that works just as well for toast and sandwiches as it does alongside soup. So if you’ve ever felt stuck choosing between “healthy” bread and bread your family will actually eat, this one bridges that gap beautifully.
PIN THIS RECIPE!
Ingredients
- 205 g freshly milled hard white wheat flour
- 205 g all-purpose flour
- 300 g water
- 80 g active sourdough starter
- 8 g salt
Instructions
- In a large bowl, add the water, starter, and salt. Stir to dissolve the starter. Add both flours and mix with a spoon or your hands until everything is combined and no dry flour remains. The dough should be soft and slightly sticky, but not watery. Cover the bowl with a damp towel or plastic bag.
- Let the dough rest for 30–60 minutes so the flour can hydrate and the gluten can start to relax.
- Do 3 sets of stretch-and-folds, about every 20 minutes. To do this, lift one side of the dough, stretch it upward, and fold it over the center. Repeat this 4–6 times around the bowl for each set. Cover the dough between each set.
- Let the dough rise at warm room temperature (23–25°C / 73–77°F) until it grows by about 30–50% and you see small bubbles around the edges. Depending on your room temperature, this may take about 5–8 hours.
- Lightly flour your counter and place the dough onto it upside down.
- Gently shape it into a loose round by tucking the edges underneath.
- Let it rest uncovered for 15–20 minutes so it can relax before the final shape.
- Use a bench scraper to flip the dough over. Gently stretch it into a rough rectangle. Fold the top third down, then fold the sides toward the center (you can “stitch” if needed). Fold the bottom third up, flip it seam-side down, and tighten the shape slightly by pulling it toward yourself. Place the dough seam-side up in a floured banneton or a bowl lined with a floured towel. Cover and proof at room temperature for 1–2 hours until slightly puffy. (If you prefer, you can skip this room temperature proof and place it in the fridge overnight for a slower, more flavorful second rise.)
- Preheat your Dutch oven to 240°C (465°F). Turn the dough out onto parchment paper, dust the top with flour, and score it. Bake covered for 35 minutes at 240°C (465°F). Then remove the lid, lower the oven to 230°C (445°F), and bake another 10–15 minutes, until the crust is deep golden brown and the inside reaches 96–99°C (205–210°F).
- Transfer the bread to a wire rack and let it cool completely before slicing.
Notes
- When mixing the dough, aim for a texture that is soft and stretchy. It should stick lightly to your fingers, but it should not be runny.
- Because freshly milled flour ferments faster, keep an eye on the dough during bulk rise. It may be ready sooner than bread made only with store-bought flour.
- If the dough feels hard to handle, you can reduce the water by 10–15 g. The loaf will be slightly denser, but it’s easier for beginners.
- A long cold proof (up to 24 hours) will give deeper flavor. If you prefer a milder sour taste, you can skip the cold proof.
- If you don’t have a cooling rack, place the loaf so it sits slightly on the edge of a plate to let air circulate underneath.
Tried this recipe?Please consider Leaving a Review!
Nutrition
Serving: 1g
