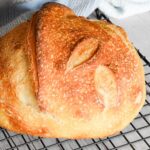
Long Fermented Sourdough Bread Recipe
This long fermented sourdough bread recipe is straightforward and fits easily into a busy life. It has a deep, slightly tangy taste but isn't overwhelming. You don't need to be home all day to manage the dough, which is a real win. I dare say this is the best sourdough recipe if you're looking for something really low maintenance.
PIN THIS RECIPE!
Ingredients
- 75 grams active sourdough starter ⅓cup
- 172 grams water ¾ cup
- 300 grams all-purpose flour 2½ cups
- 8 grams salt 1½ teaspoons
Instructions
- Begin by mixing water, starter, and salt together in a large mixing bowl. Doing this helps the starter and salt spread evenly throughout the water.
- Add the flour and stir it in to make a shaggy dough. I usually start mixing with a wooden spoon or a danish whisk and then switch to my hands to make sure all the flour gets mixed in.
- Cover your large mixing bowl with something airtight; options like plastic wrap, aluminum foil, or even a plastic bag work well. Let the dough rest for 30 minutes. Personally, I've found that using a plastic bag is the most convenient choice.
- Starting the bulk fermentation at room temperature, make about 4 series of folds (either stretch and folds or coil folds) every 20 minutes. The warmer temperatures will help the bread dough make an initial rise that will continue later on in the fridge. The bread dough will become pliant and elastic when the folding is complete.
- After finishing your last folds, put the dough in the fridge and make sure to cover it with something airtight. You can leave it to ferment in the fridge for anywhere between 24 and 72 hours (about 48 works best for me). You should see some changes in your dough during this time: tiny bubbles will appear on the sides of the dough, and it should rise in volume and become puffy.
- After 1, 2, or 3 days, take your fermented dough out of the fridge and transfer it to your work surface to shape it. Simply take opposite ends of the dough, pinch them together at the top, and repeat with the remaining ends. Let your dough rest on the counter for about 30 minutes.
- Prepare your bread basket or banneton by placing a tea towel lightly dusted with flour inside. Carefully position your dough ball into the basket with the pinched side facing upward. You can help yourself by using a bench scraper, but since the dough will be chilly, you shouldn't have any problems. Cover your dough again or put the whole banneton basket into a plastic bag. (At this point, you can let the dough do its final rise in a warm place for about 3 hours if you're in a hurry and it will turn out great!)
- Put the dough into the fridge again for the final rise. This can take anywhere from 12 - 24 hours, depending on when you need fresh bread.
- When you're ready to bake the bread, preheat your dutch oven and prepare a piece of parchment paper. Gently transfer your dough from the basket to the parchment paper, seam side down.
- Take a razor blade or a sharp knife and make a deep cut on one side of the dough. Feel free to experiment with a couple of more shallow cuts on the opposite side to achieve your desired pattern.
- Place your parchment paper with the dough inside a hot Dutch oven.
- Bake the bread in the preheated oven at 460°F (238°C) for 35 minutes. Remove the lid and continue baking for an extra 12 - 15 minutes at 440°F (227°C) to achieve a lovely golden brown color.
- After taking it out of the oven, move the bread to a wire rack. Cover it with a slightly damp kitchen towel and allow it to cool for at least an hour before slicing.
Notes
- Since we're fermenting the dough for a long time, make sure to cover it with something airtight to prevent it from drying out. A damp towel is simply not enough for this situation, because we're letting the dough ferment for quite a long time and the towel will dry out in the meantime. Don't worry about letting air in - sourdough fermentation is mostly an anaerobic process (meaning it mostly doesn't require any oxygen), so there'll be more than enough air for your starter to do its job.
- Although a float test isn't 100% reliable, it is usually a great way of determining if your starter is ready to bake bread. You can do it when you're adding your starter into the bowl with the water and salt (step 1 of the recipe). Drop a bit of starter into the water. If it floats, it's ready to bake with; if it sinks, it needs more time to develop. This ensures your bread will rise well.
- Getting the dough to be just the right consistency is key, though it can pose a challenge. Here's a handy tip: if the dough is so sticky that you can't lift it in one go, it's time to sprinkle in a bit more flour. On the other hand, if it refuses to bind even after kneading for 2 minutes, just add a small dash of water to it.
- Although this is a wetter dough, similar to your usual artisan sourdough bread, it will be easier to handle because it will be chilled most of the time. If you find it too stiff to handle, just leave it at ambient temperature anytime you're handling it to make it more pliant.
- Wet your hands when handling the dough if you find it stick to your fingers.
- Pour a bit of water between the parchment and the Dutch oven to make steam, then quickly cover it to keep the steam in.
- You can use olive oil to coat the bowl you are raising your bread in to avoid the dough sticking.
Tried this recipe?Please consider Leaving a Review!
Nutrition
Serving: 1slice | Calories: 97kcal | Carbohydrates: 20g | Protein: 3g | Fat: 0.3g | Saturated Fat: 0.04g | Polyunsaturated Fat: 0.1g | Monounsaturated Fat: 0.02g | Sodium: 260mg | Potassium: 27mg | Fiber: 1g | Sugar: 0.1g | Calcium: 4mg | Iron: 1mg
