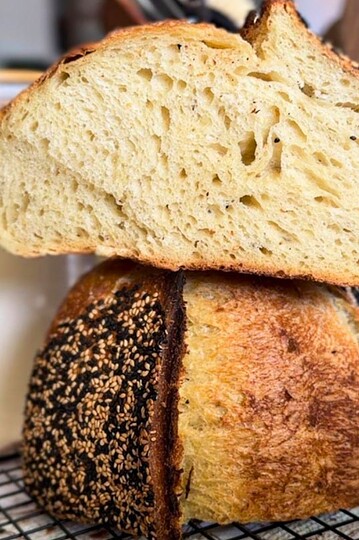
Hybrid Sourdough Bread (With Yeast)
If you've ever wanted the flavor of sourdough without the stress or unpredictability, this hybrid sourdough bread (with yeast) is exactly what you need. It still gives you classic sourdough flavor and airy crumb, but with a little yeast to make the process more reliable and beginner-friendly. This is the loaf I recommend when you want consistent results without the stress.

If you like sourdough, but appreciate how fast yeasted breads can be, you can check out my yeasted bread rolls or sourdough discard bagels with yeast!
Summarize & Save This Recipe On:
Quick Look
- Prep Time: 45-60 minutes
- Bulk Fermentation: 3-4 hours
- Final Proof: 8-18 hours (overnight in the fridge)
- Bake Time: 40-45 minutes
- Total Time: ~12-20 hours
- Servings: 1 loaf (about 8-10 slices)
- Difficulty: Beginner-friendly
- Baking Method: Dutch oven
- Best For: Everyday bread, toast, sandwiches
Jump to:
- Summarize & Save This Recipe On:
- Quick Look
- Important Ingredients
- Substitutions & Variations
- Baking Schedule
- 💭Crucial Success Tips
- Recipe FAQs
- How To Store Hybrid Sourdough Bread (With Yeast)
- Other Delicious Recipes
- Hybrid Sourdough Bread (With Yeast)
- Need Help Tweaking This Recipe?
- Other Sourdough Bread Recipes You'll Love
- Sourdough Pretzel Bagels
- Neapolitan-Style Sourdough Pizza Dough
- Italian Semolina Sourdough Bread
Important Ingredients
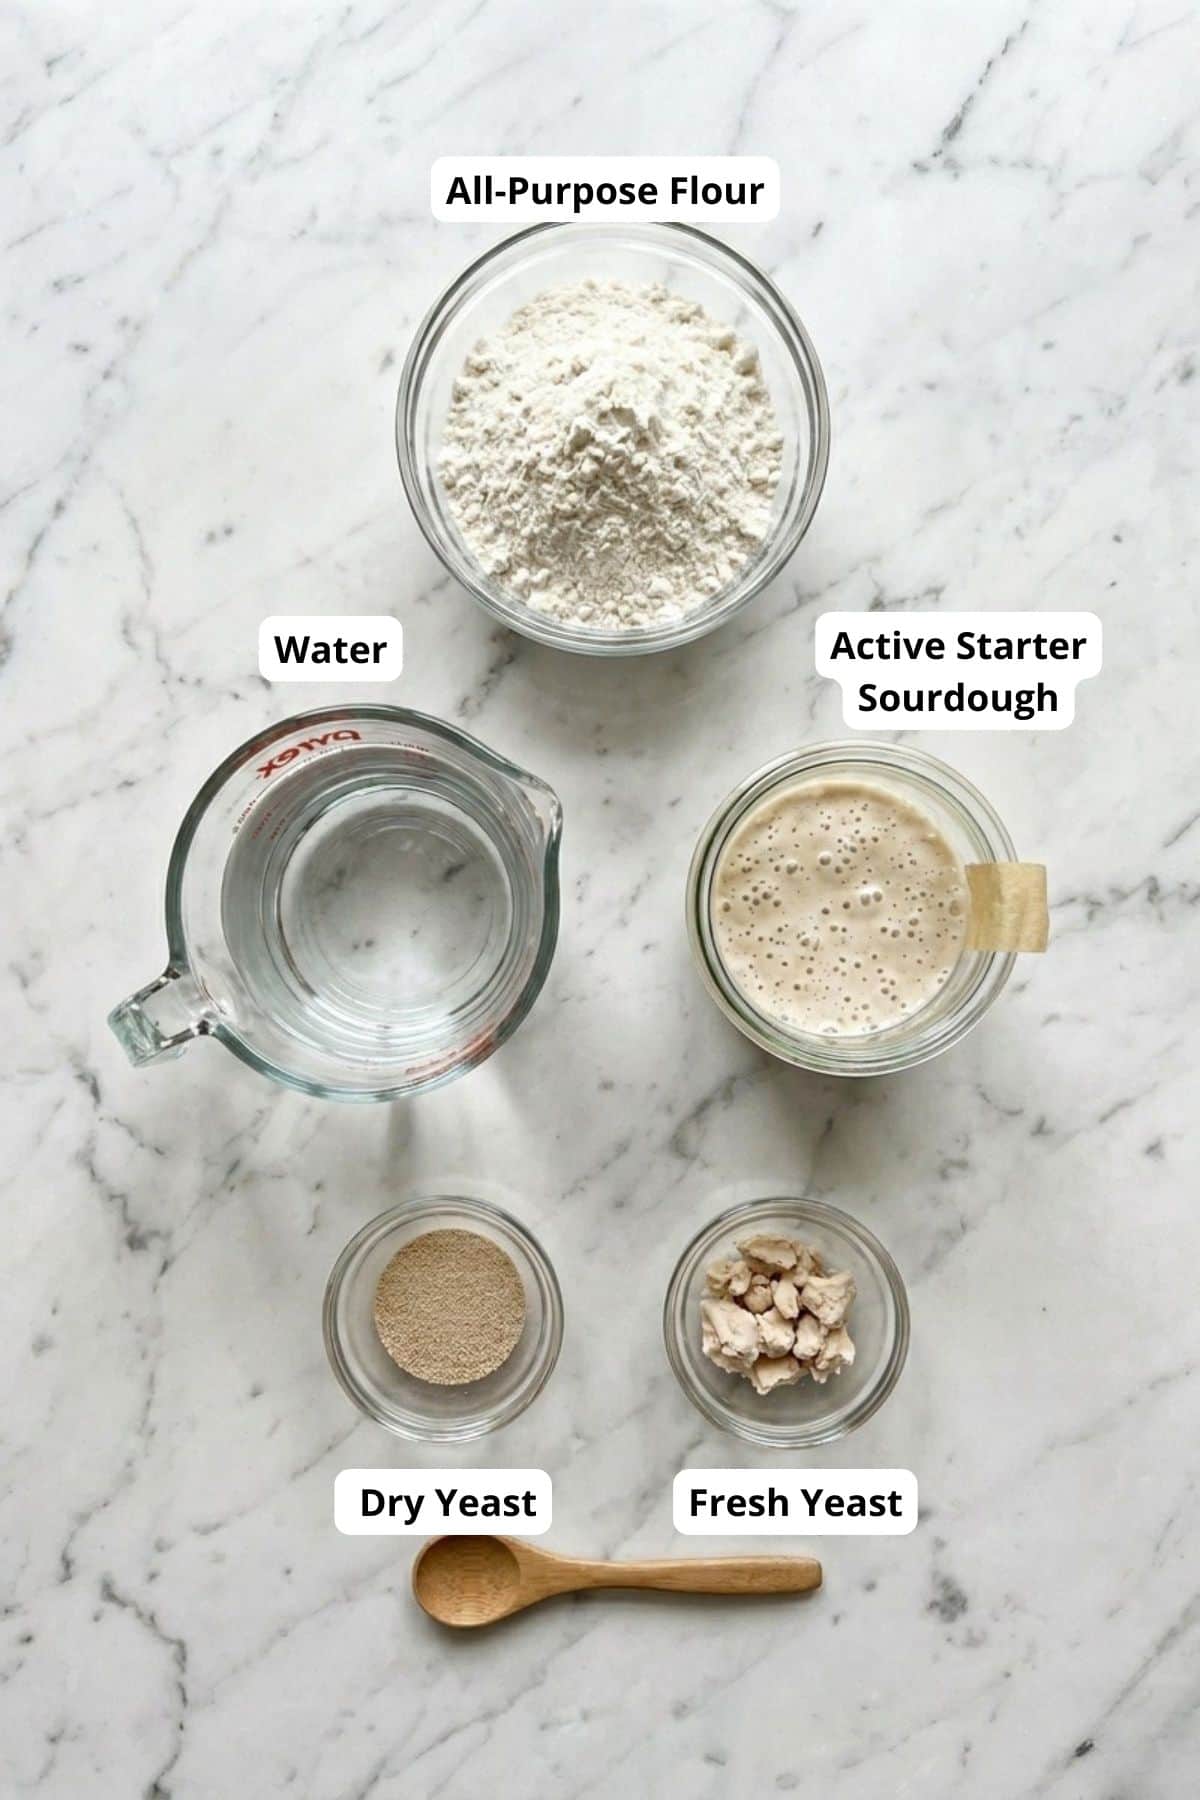
- All-purpose or bread flour makes the loaf as soft as it can be
- Sourdough starter adds flavor and helps with fermentation
- A small amount of yeast makes the process more reliable (and a bit faster!)
- Water
See recipe card for quantities.
Substitutions & Variations
- Use bread flour for a slightly chewier texture
- You can skip the overnight proof if you increase the yeast (but flavor will be lighter)
- Adjust yeast slightly depending on how warm or cold your kitchen is

Free resource
Get all 3 when you subscribe
Bake beautiful bread that fits Your life - not the other way around
Hint: Don't rush the bulk fermentation. Even with added yeast, the dough still needs time to develop structure. Look for a slightly domed surface, visible bubbles, and a dough that feels airy and elastic before shaping.
Baking Schedule
Option 1 (Overnight):
- Day 1: Mix, stretch and folds, bulk ferment, shape
- Night: Place in fridge
- Day 2: Bake
Option 2 (Same Day):
- Morning: Mix and ferment
- Afternoon: Shape and second rise at room temperature
- Evening: Bake
💭Crucial Success Tips
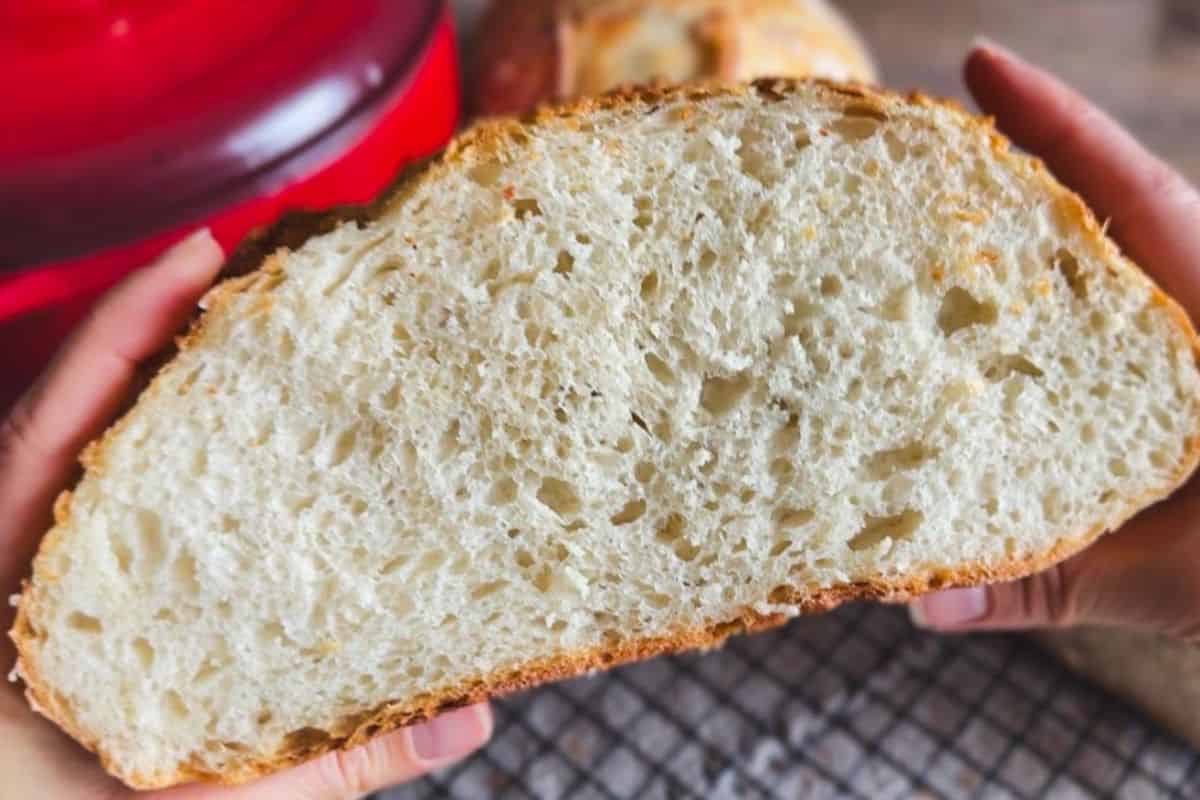
The biggest issue with this recipe is getting the proofing just right. The dough should feel light and slightly jiggly before baking. If it feels dense, it needs more time. If it collapses when you score it, it's likely over-proofed.
Recipe FAQs
Hybrid sourdough bread uses both sourdough starter and commercial yeast. The starter provides flavor, while the yeast ensures a reliable rise.
Yes, but slightly milder. The sourdough starter still develops flavor, especially if you do the overnight proof.
Yes, but it becomes a traditional sourdough recipe. That process takes longer and depends more on starter strength and temperature.
How To Store Hybrid Sourdough Bread (With Yeast)
Store the bread in a container or bag at room temperature for 2-3 days. For longer storage, you can freeze it. Slice it first so it's easier to take out what you need.
This bread freezes well for a few weeks. Just reheat or toast before eating.
Other Delicious Recipes
- Sourdough Pretzel Bagels

- Neapolitan-Style Sourdough Pizza Dough
- Italian Semolina Sourdough Bread
- Sourdough Picnic Rolls (Pull-Apart Bread Rolls)


If you tried this hybrid sourdough bread (with yeast) or any other recipe on my blog please leave a 🌟 star rating and let me know how it went in the 📝 comments below! Happy Baking!
Hybrid Sourdough Bread (With Yeast)
Ingredients
- 400 g all-purpose flour or bread flour
- 280 g water (260g for the dough + 20g for the yeast)
- 8 g active sourdough starter
- 0.5 g dry yeast about ⅛ teaspoon OR
- 1.5 g fresh yeast
Instructions
- In a large bowl, mix together your water (260g of water at this stage!), starter, and salt. I like to mix those first so everything has a chance to disperse evenly before adding the flour. Add the flour and mix well. I usually start with a spoon and then switch to my hands to make sure there are no dry patches left. The dough will feel a bit sticky, and that's exactly what you want. Try to quickly develop the gluten a bit even at this stage, so try to pull the dough up and tuck it under for a few times to get it in a rough ball shape. Cover the bowl with something airtight (a plastic bag works great) and let it rest for 30 minutes.
- Prepare your yeast. If you're using fresh yeast, mix it with 20g of water and add ½ teaspoon of sugar, then wait for about 10 minutes for it to start foaming a little. If you're using dry yeast, measure it out and prepare 20g of water in a separate bowl (the water will just help it incorporate into the dough better in this case).
- After the dough rests for about 30 minutes, add the yeast - pour the water with fresh yeast inside over the dough, or add yeast + 20g water if you're using dry yeast. Incorporate the yeast into the dough well by squeezing in with your hands. Try to get the dough into a rough ball shape again and cover it for another rest period.
- After 30 minutes, do your first set of stretch and folds. Grab one side of the dough, stretch it up, and fold it over to the other side. Rotate the bowl and repeat until you've gone around all sides. Cover again and let it rest for 30 minutes.
- Repeat this process one more time, so you end up doing 2 sets of stretch and folds in total, with 30 minutes of rest in between. By the end, the dough should feel smoother and hold its shape better.
- Once you're done with stretch and folds, cover the dough again and let it bulk ferment at room temperature. This whole process, including the stretch and folds, should take about 3 hours total. That means you're looking at roughly 1.5 hours of rising time after your last stretch and fold. If your kitchen is cooler, this can easily go up to 4 hours total.
- After bulk fermentation, turn the dough out onto a lightly floured surface. Gently bring it together into a ball by folding it into itself. Let it rest for about 10-15 minutes.
- Then turn it over, gently stretch it into a rectangle, and shape it. I usually do a simple boule by rolling it up once, then again from the short edge to create some tension.
- Prepare your banneton basket by lining it with a floured kitchen towel (this saves a lot of cleaning later). Place your dough inside with the seam facing up. Cover again and transfer it to the fridge for an overnight proof, or up to about 18 hours.
- Preheat your oven with a Dutch oven inside to 250°C (480°F). Give it at least 30-45 minutes so everything is properly heated. Once ready, turn your dough out onto a piece of parchment paper so the floured bottom is now facing up. Score it with a sharp knife or razor blade.
- Carefully transfer the dough into the hot Dutch oven, cover with the lid, and bake for 20 minutes at 250°C (480°F).
- Then remove the lid, lower the temperature to 220°C (430°F), and bake for another 20-25 minutes, or until nicely golden brown. Transfer the bread to a cooling rack and let it cool completely before slicing.
Notes
- You'll want to measure your yeast quite carefully here. It's a very small amount, but it makes a difference.
- If you add more or less yeast, adjust your fermentation times accordingly.
- If you add more yeast, I wouldn't suggest doing an overnight fridge proof. Instead, let it do a second rise at room temperature for about an hour and bake the same day.
- The dough will feel a bit sticky at first. Try not to add extra flour unless it's really necessary.
- This is meant to be a simple, reliable dough, so don't overthink it.