No Tools, no Dutch Oven Sourdough Bread Recipe
I'm so excited to share this No Tools, No Dutch Oven Sourdough Bread recipe. It's the easiest way to make sourdough bread without needing a Dutch oven, a mixer, or any of those complicated gadgets. All you need is a bowl, a spoon, your hands, and a baking tray.

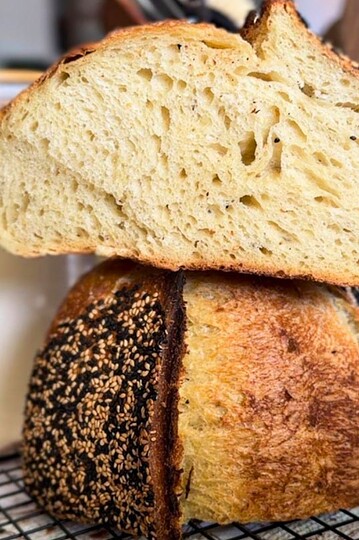
This recipe is perfect for beginner bakers or anyone who wants to make fresh, homemade bread. The dough is firm, making it easy to shape and work with, even if you're a first-timer. The results are so worth it: a golden, crusty loaf with a soft, airy interior that's perfect for sandwiches or served with a bit of butter.
If you're looking for another easy and delicious way to make homemade sourdough, be sure to check out my Easy and Simple No-Knead Artisan Sourdough Bread Recipe. This one is perfect for busy days when you want a hands-off approach to baking bread.

Summarize & Adapt This Recipe On:
Jump to:
- Summarize & Adapt This Recipe On:
- Important Ingredients
- Substitutions & Variations
- How to Make No Tools, no Dutch Oven Sourdough Bread Recipe
- Baking Schedule (Same-Day Bake)
- 💭Crucial Success Tips
- FAQ
- No Tools, no Dutch Oven Sourdough Bread Recipe
- Need Help Tweaking This Recipe?
- How To Store No Tools, no Dutch Oven Sourdough Bread Recipe
- More Sourdough Recipes You'll Love
- Neapolitan-Style Sourdough Pizza Dough
- Sourdough Semolina Pizza Dough (Crispy, Chewy, and Full of Flavor)
- Italian Semolina Sourdough Bread

Free resource
Get all 3 when you subscribe
Bake beautiful bread that fits Your life - not the other way around
Important Ingredients

- All Purpose Flour: Provides structure and texture to your sourdough bread.
- Water: Activates the flour and sourdough starter, helping to bring the dough together.
- Salt: Add flavor and strengthens the gluten in the dough and controls fermentation.
- Active Sourdough Starter: The natural leavening agent, giving the bread its unique, tangy flavor.
See recipe card for quantities.
Substitutions & Variations
- You can substitute whole wheat flour for a portion of the all-purpose flour for a heartier, more rustic loaf. Try 1 cup of whole wheat flour and 2 ½ cups of all-purpose for a lovely variation!
- For flavor additions, add herbs like rosemary or thyme, or throw in some grated cheese for a savory twist.
How to Make No Tools, no Dutch Oven Sourdough Bread Recipe

Step 1: In a large bowl, stir together the water, salt, and sourdough starter first. This helps the starter disperse more easily. Add your flour gradually - start with 3 ¼ cups and add more if the dough seems too wet. Mix with a spoon (Image 1) until it's starting to come together, then switch to your hands and knead lightly just until no big flour patches remain. The dough will feel dry and completely unmanagable - that's okay (Image 2).

Step 2: Cover the dough with something to prevent drying out - I use a shower cap most of the time, but a damp tea towel or even a plastic grocery bag works just fine. Let it rest for 30 minutes to let the flour fully hydrate. After this rest, the dough should be more elastic (Image 3). If you see dry bits, just squish them in with your fingers (Image 4).

Step 3: Do your first round of stretch and folds: grab one side of the dough, stretch it up (Image 5), and fold it over to the other side (Image 6). Turn the bowl and repeat 3 more times, one for each "side." Cover the dough again after each handling.
During the first 2 hours of bulk fermentation, do 2-3 sets of stretch and folds, spacing them out by at least 30 minutes so the gluten can relax between rounds.

Step 4: After you mix in the starter, the dough should ferment at room temperature for about 8 hours (Image 7 is the dough before the bulk fermentation, and image 8 shows the dough after). If your kitchen is cooler, it might take longer; if it's warmer, it might be ready sooner.

Step 5: Once bulk fermentation is done, dump the dough onto your work surface (Image 9). I usually skip the bench rest with this dough because it's firm and easy to handle. If the top of the dough is slightly less sticky (the side that was exposed during fermentation), place that face-down on your surface.
Gently fold each side of the dough toward the center, then flip it over. Slide the dough toward yourself with your hands to create surface tension (Image 10)- this is the key to good oven spring. Don't over-flour the surface; a little stickiness helps create that tension. You can use a bench scraper here, but you really don't need it for this dough.

Step 6: Place the shaped dough upside down into a bowl lined with a lightly floured tea towel (Image 11). Cover it again - this time, I prefer more protection since I usually do an overnight cold ferment in the fridge. You can also leave it at room temperature for 2-4 hours if you'd rather bake the same day.
Preheat your oven to 230°C (450°F). Place a baking tray, cast iron pan, or skillet on the bottom rack - this will be your steam tray.
Line a baking sheet with parchment paper (Image 12). Flip your dough out of the bowl onto the parchment - you want the smooth, rounded side on top.

Step 7: Score the dough with a sharp knife - no need for fancy blades (Image 13). I usually go with a deep cross, and maybe add a few shallow lines for looks. The deep cuts help control where the dough expands during baking.
Pour 1 cup of boiling water into the hot tray in the oven at the same time you place your bread inside (Image 14). This creates steam and helps with oven spring and crust formation. Bake at 230°C (450°F) for 20 minutes.

Step 8: After 20 minutes, carefully remove the steam tray and lower the oven to 210°C (410°F). Bake for another 20-25 minutes, or until the loaf is deep golden brown and sounds hollow when tapped (Image 15).
Transfer your bread to a cooling rack (Image 15). If you don't have one, here's what I used to do: lean the loaf partly on a plate so one side is elevated - that way, the bottom crust doesn't stay soggy from sitting flat. Let the bread cool fully before slicing if you want a clean crumb. If you're planning to eat the whole thing fresh and warm, go ahead and cut in - just know the inside might turn a bit gummy if it's still too hot (Image 16).
Hint: If you're new to baking sourdough, don't worry if the dough feels a little dry or firm. This actually makes it easier to handle, and the final loaf will still turn out beautifully! Just make sure to hydrate the flour properly during the resting time.
Baking Schedule (Same-Day Bake)
- 8:00 AM - Mix the Dough and Rest for 30 Minutes.
- 9:00 AM - Start Stretch and Fold.
- 12:00 PM - Bulk Fermentation. Let it ferment at room temperature for 3-4 hours.
- 3:30 PM - Shape the dough.
- 4:15 PM - Pre-heat your oven.
- 5:00 PM - Bake.
- 6:00 PM - Let the bread cool on a rack.
💭Crucial Success Tips
- Resting time. Let the dough hydrate properly during the first 30-minute rest. This helps the gluten develop and makes it easier to work with.
- Don't skip the steam! Pouring boiling water into a hot tray in the oven creates steam, which helps your bread rise beautifully and form a crisp crust.
- Let the bread cool completely before slicing if you want a clean crumb. If you can resist cutting into it right away, the texture will be perfect once it cools.
FAQ
Yes! After shaping the dough, you can refrigerate it overnight for a cold ferment, which gives the bread even more flavor.
Make sure your starter is active! If it's not bubbly and ready to go, your bread might not rise as much. You can feed your starter and give it a few hours before using it.
The bread should sound hollow when tapped on the bottom, and the crust should be deep golden brown.

No Tools, no Dutch Oven Sourdough Bread Recipe
Ingredients
- 450 grams all-purpose flour about 3 ½ cups, see notes
- 300 grams water about 1¼ cups
- 8 grams salt about 1¼ teaspoons
- 100 grams active sourdough starter about ½ cup
Instructions
- In a large bowl, stir together the water, salt, and sourdough starter first. This helps the starter disperse more easily. Add your flour gradually - start with 3 ¼ cups and add more if the dough seems too wet. Mix with a spoon until it's starting to come together, then switch to your hands and knead lightly just until no big flour patches remain. The dough will feel dry - that's okay.
- Cover the dough with something to prevent drying out - I use a shower cap most of the time, but a damp tea towel or even a plastic grocery bag works just fine. Let it rest for 30 minutes to let the flour fully hydrate. After this rest, the dough should be more elastic. If you see dry bits, just squish them in with your fingers.
- Do your first round of stretch and folds: grab one side of the dough, stretch it up, and fold it over to the other side. Turn the bowl and repeat 3 more times, one for each "side." Cover the dough again after each handling.During the first 2 hours of bulk fermentation, do 2-3 sets of stretch and folds, spacing them out by at least 30 minutes so the gluten can relax between rounds.
- After you mix in the starter, the dough should ferment at room temperature for about 8 hours. If your kitchen is cooler, it might take longer; if warmer, it might be ready sooner.
- Once bulk fermentation is done, dump the dough onto your work surface. I usually skip the bench rest with this dough because it's firm and easy to handle. If the top of the dough is slightly less sticky (the side that was exposed during fermentation), place that face-down on your surface.Gently fold each side of the dough toward the center, then flip it over. Slide the dough toward yourself with your hands to create surface tension - this is the key to good oven spring. Don't over-flour the surface; a little stickiness helps create that tension. You can use a bench scraper here, but you really don't need it for this dough.
- Place the shaped dough upside down into a bowl lined with a lightly floured tea towel. Cover it again - this time, I prefer more protection since I usually do an overnight cold ferment in the fridge. You can also leave it at room temperature for 2-4 hours if you'd rather bake the same day.Preheat your oven to 230°C (450°F). Place a baking tray, cast iron pan, or skillet on the bottom rack - this will be your steam tray.Line a baking sheet with parchment paper. Flip your dough out of the bowl onto the parchment - you want the smooth, rounded side on top.
- Score the dough with a sharp knife - no need for fancy blades. I usually go with a deep cross, and maybe add a few shallow lines for looks. The deep cuts help control where the dough expands during baking.Pour 1 cup of boiling water into the hot tray in the oven at the same time you place your bread inside. This creates steam and helps with oven spring and crust formation. Bake at 230°C (450°F) for 20 minutes.
- After 20 minutes, carefully remove the steam tray and lower the oven to 210°C (410°F). Bake for another 20-25 minutes, or until the loaf is deep golden brown and sounds hollow when tapped. Transfer your bread to a cooling rack. If you don't have one, here's what I used to do: lean the loaf partly on a plate so one side is elevated - that way, the bottom crust doesn't stay soggy from sitting flat. Let the bread cool fully before slicing if you want a clean crumb. If you're planning to eat the whole thing fresh and warm, go ahead and cut in - just know the inside might turn a bit gummy if it's still too hot.
Notes
- Flour Variability: Different flour brands and humidity levels can affect the dough's consistency. Start with 3 ¼ cups of flour and add more as needed until the dough comes together. It should be dry but easily kneadable.
- Sourdough Starter: Always stir your starter down before measuring to avoid using too much. This ensures the right balance of hydration and yeast activity.
- Resting the Dough: Don't skip the resting phase after mixing. This helps the flour fully hydrate and the dough become more elastic, making it easier to shape.
- Stretch and Folds: Be sure to perform the stretch and fold technique during the first 2 hours of bulk fermentation. This develops the dough's structure without the need for extensive kneading.
- Shaping the Dough: When shaping the dough, don't over-flour your surface. A slightly sticky dough helps create tension, which is key to a great rise in the oven.
- Baking: Preheating your oven and placing a tray to create steam is crucial for getting that golden, crispy crust. The steam helps with oven spring and crust formation.
- Cooling: Allow the bread to cool fully before slicing to avoid a gummy interior. If you can resist, it's worth the wait for that perfect crumb!
Nutrition
If you gave these Easy Sourdough Bread a try, I'd love to hear about it! Leave a ⭐️ star rating and drop a comment below to let me know how they turned out.
Need Help Tweaking This Recipe?
How To Store No Tools, no Dutch Oven Sourdough Bread Recipe
After your bread has cooled, store it in a bread box or wrap it in a clean kitchen towel. It'll stay fresh for about 2-3 days at room temperature. If you're not going to finish it within that time, slice it up and freeze individual pieces to toast whenever you're craving a fresh slice.


I used this recipe for my first ever sourdough loaf, and I cannot even believe how perfect and delicious it came out. An excellent recipe, and I enjoyed the process!
Hi Linda, yay, I'm so glad to hear that!
🙂
This recipe really helped me go from "trying" to "success" with my first sourdough starter while studying abroad. Not having my usual kitchen gear and learning a new skill has been an adventure, and this recipe has made it more fun than stressful because I have a way to meet mysefl where I'm at.
I' so so glad to hear that! Sourdough wasn't nearly as popular as it is now when I was studying abroad but I do remember the stress of having a teeny tiny kitchen and I'm impressed you manage to bake your own bread at all. Thank you for leaving a review!
Hi Tina thank you for the no tools sourdough recipe, it was very hard to find any on the internet! I don’t have the funds for a Dutch oven but I am able to bake sourdough bread twice a week thanks to you.
My loaves are more compact than the one in your photo (mine don’t really burst out of their scores) but the taste is amazing and that’s all that matters.
Am I right in thinking your Instagram account is closed?
Anyhow, thank you again
Geri
Hi!
I’m really glad the no-tools recipe is working for you—and baking twice a week is awesome. Compact loaves usually just need a bit of gluten development, or they might not be perfectly proofed if they're dense. Maybe try:
- an extra set of stretch & folds.
- play around with bulk fermentation timing: Shorten it by ~30 minutes if the dough gets very puffy/soft, or extend it a bit if it still feels dense.
- reduce water by 10–20g if your flour doesn’t absorb much.
- bake a bit hotter for the first 10–15 min if your oven allows.
My Instagram isn’t closed—just my username (handle) is now @tinabevkco. I’m not super active there (usually in the kitchen!), but I’m very active on the blog, and I answer comments/emails myself because that’s important to me. So feel free to write to me! I feel it's much more personal than Instagram.
Thanks again for the kind note!