Simplified Sourdough Croissants
These Sourdough Croissants are perfect for when you want to enjoy the flaky, buttery goodness of croissants without the overly complicated process. Yes, we're still laminating the dough, but this simplified method skips the stress of perfection. Don't worry about measuring exactly every time-though I do recommend it on your first try.

The result? A delicious, realistic mid-week treat that you can easily whip up - these croissants don't need to be reserved for special occasions at all!
Ingredients
- All-purpose flour: Provides structure to the dough. The reason I'm using all-purpose and not bread flour is that it yields softer croissants, even if the structure is not 100% perfect.
- Sugar: Adds a touch of sweetness to the croissants and helps with browning.
- Active sourdough starter: Adds a subtle tang and leavens the croissants - we're using no yeast here!
- Unsalted butter: Adds richness and moisture to the dough + helps create a flaky texture. Try to find quality butter - the greater the percentage of fat in it, the better!
- Egg + water: Gives the croissants their golden, glossy finish.
See recipe card for quantities.
How to Make Sourdough Croissants
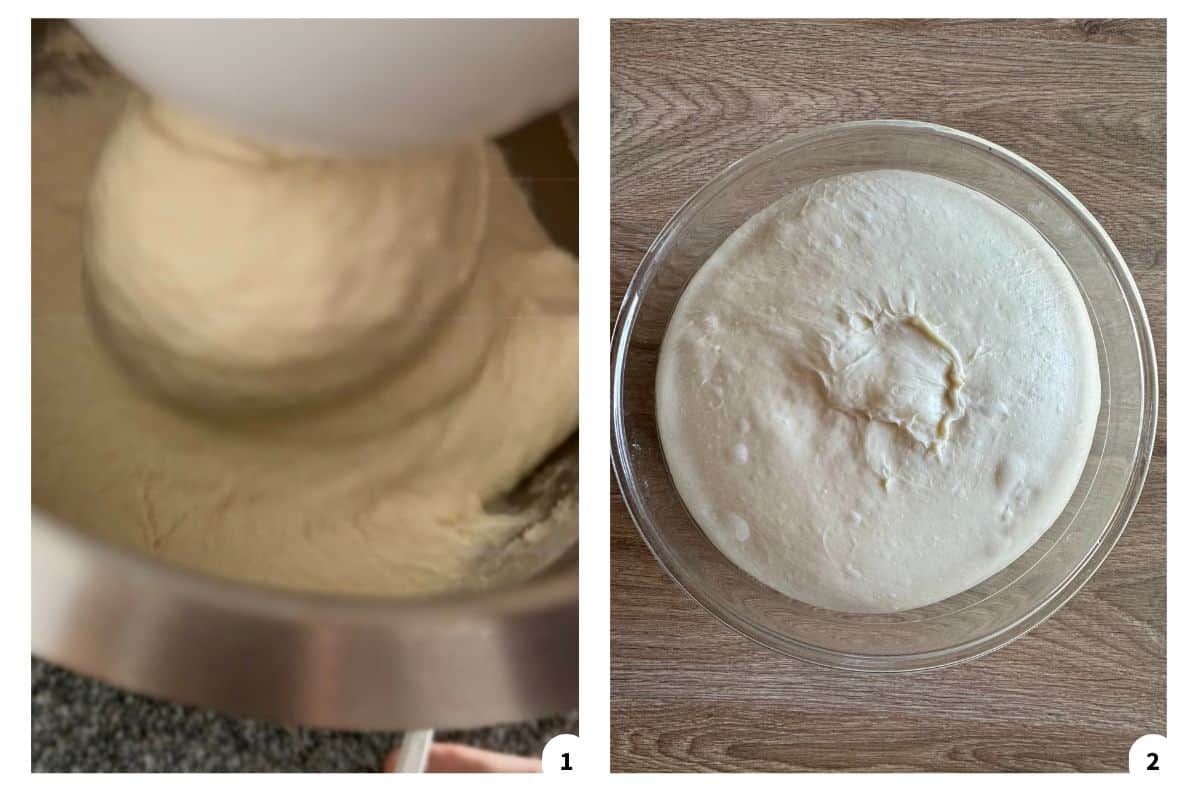
Step 1: Combine all the dough ingredients in a stand mixer and mix for 10-15 minutes until it forms a smooth, slightly sticky ball (Image 1). Place the dough in a bowl, cover it, and let it ferment for 4 to 6 hours at room temperature (Image 2). Go by the dough here, not just the time-it should become noticeably puffier. Warmer kitchens will speed this up; cooler kitchens will slow it down.
During the first 2 hours of bulk fermentation, perform 2-3 sets of stretch and folds. This helps to develop the dough's strength and texture. The dough should pass the windowpane test after that - even if just barely (Image 3).
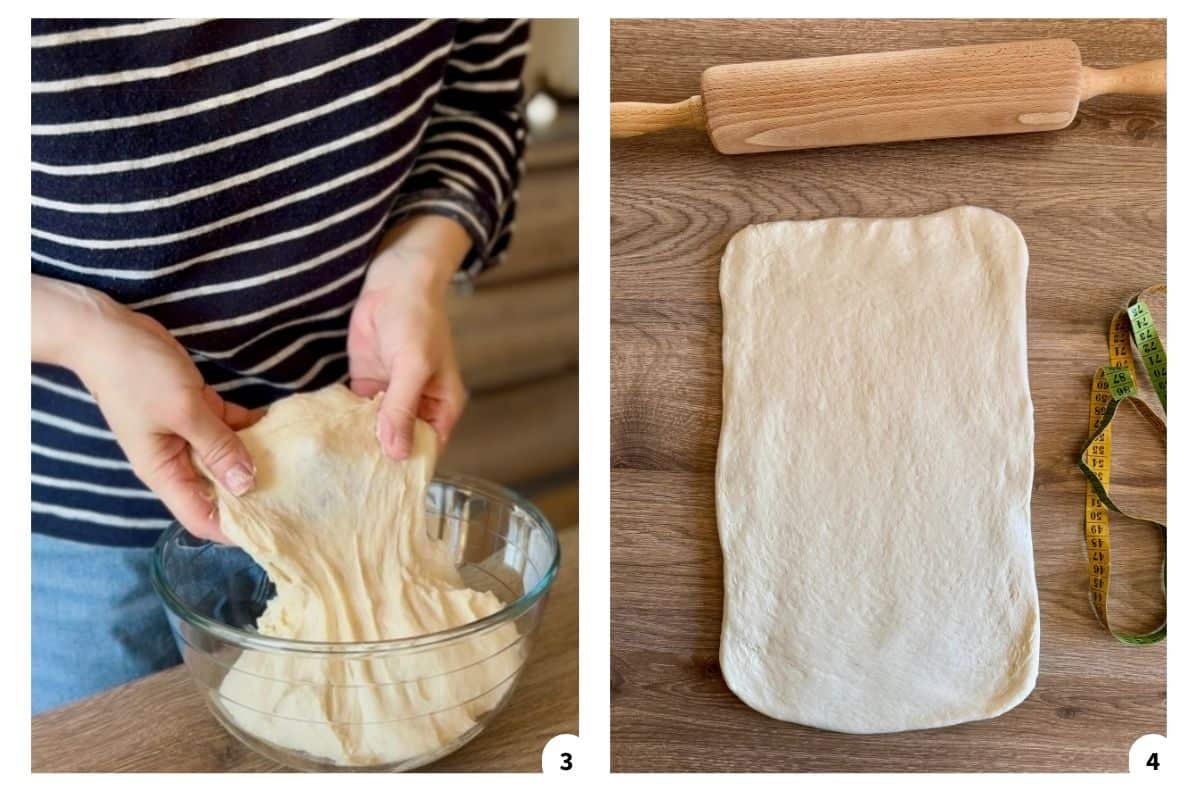
After the the stretch and folds and bulk fermentation, refrigerate overnight. Before you start rolling it out into a 40x20cm (16x8 inch) rectangle (Image 4), you'll want to prepare the butter packet (see Step 2).
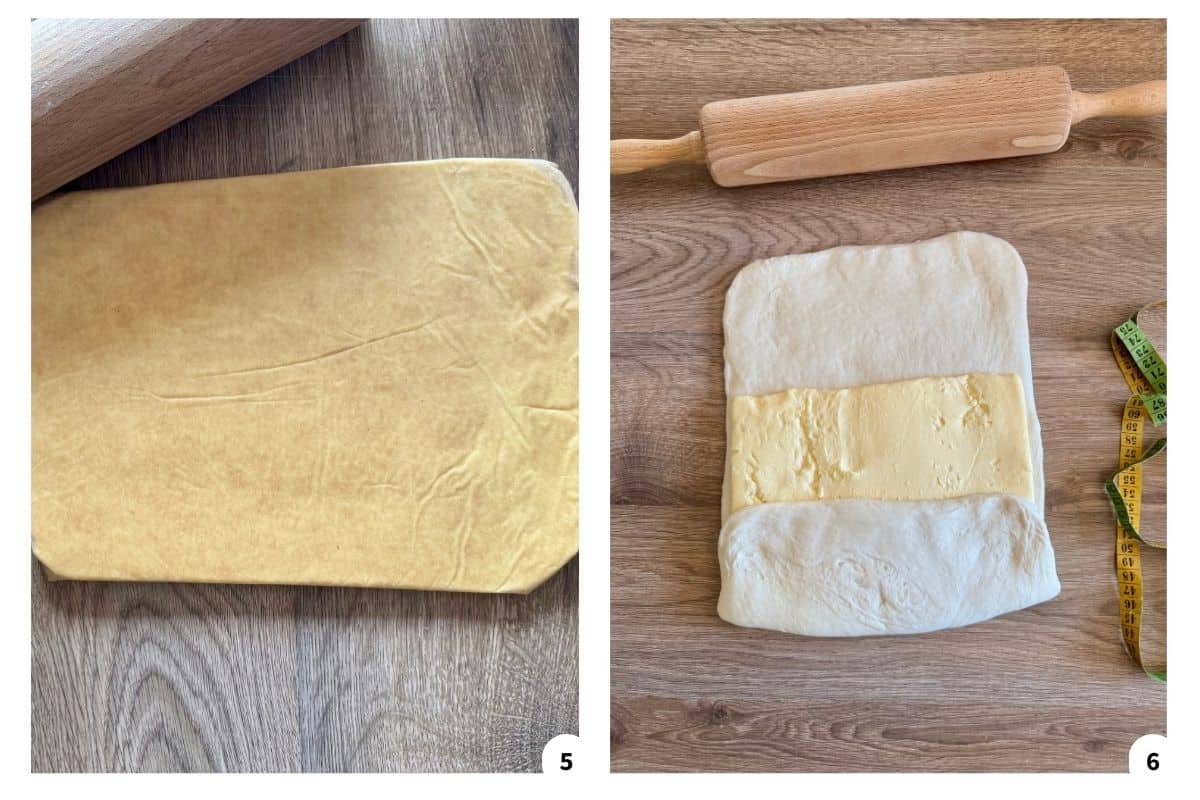
Step 2: Prepare the butter packet: Use room-temperature butter if you can-it's easier to work with, but cold butter works too. Cut the butter into smaller pieces and place them in the center of a large sheet of parchment paper. Fold the parchment around the butter to create a tight rectangle, about 15x20cm (6x8 inches). You'll basically be making an envelope: fold the sides in, then the top and bottom, creasing the edges to seal it. Use a rolling pin to gently flatten the butter and help it spread into the corners (Image 5). Chill until firm but still pliable.
Place the butter packet in the middle (Image 6).
Lamination tip: When laminating (combining the dough and butter), you want both to be about the same softness. If the dough is too firm or the butter too soft (or the other way around), it'll make the lamination messy. Aim for both to feel flexible but cool.

Step 3: Fold the dough over from both sides to cover the butter and pinch the edges together so the butter stays inside (Image 7). Turn the dough 90 degrees and roll it out to 25x50cm (10x20 inches), then fold it into thirds like a letter (Image 8 and 9).
Wrap Tip: Always wrap your dough in plastic wrap or clear foil between laminations. Avoid using parchment paper, especially if you're refrigerating the dough for more than 30 minutes or overnight-it can dry out.
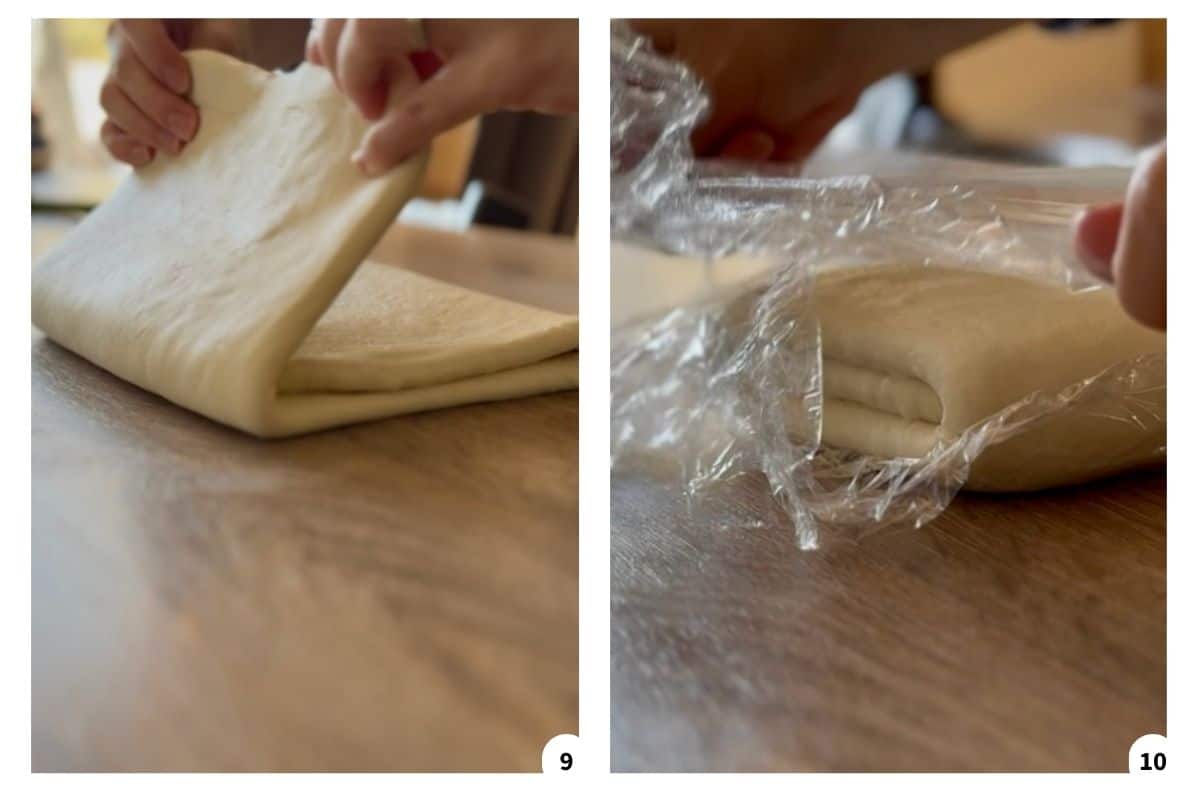
Step 4: Wrap the dough in a plastic foil and refrigerate for 30 minutes (Image 10). Repeat this process two more times, chilling the dough for 30 minutes after each fold.
Chill Option: At any step where you chill the dough, you can extend it to an overnight rest. For example, you can do the first two folds, wrap the dough tightly, and refrigerate overnight. I usually prefer doing all 3 sets of lamination on one day and then chill the dough overnight, so the dough is cold and ready for shaping the next day.
Note on Texture: Dough that's been chilled for longer than 30 minutes-especially overnight-will be a bit tougher to roll out, but it's easier to shape. I personally let it sit out at room temp for a few minutes before rolling, since I don't like rolling rock-hard dough. But if you want perfect-looking croissants, the longer chill is worth it.
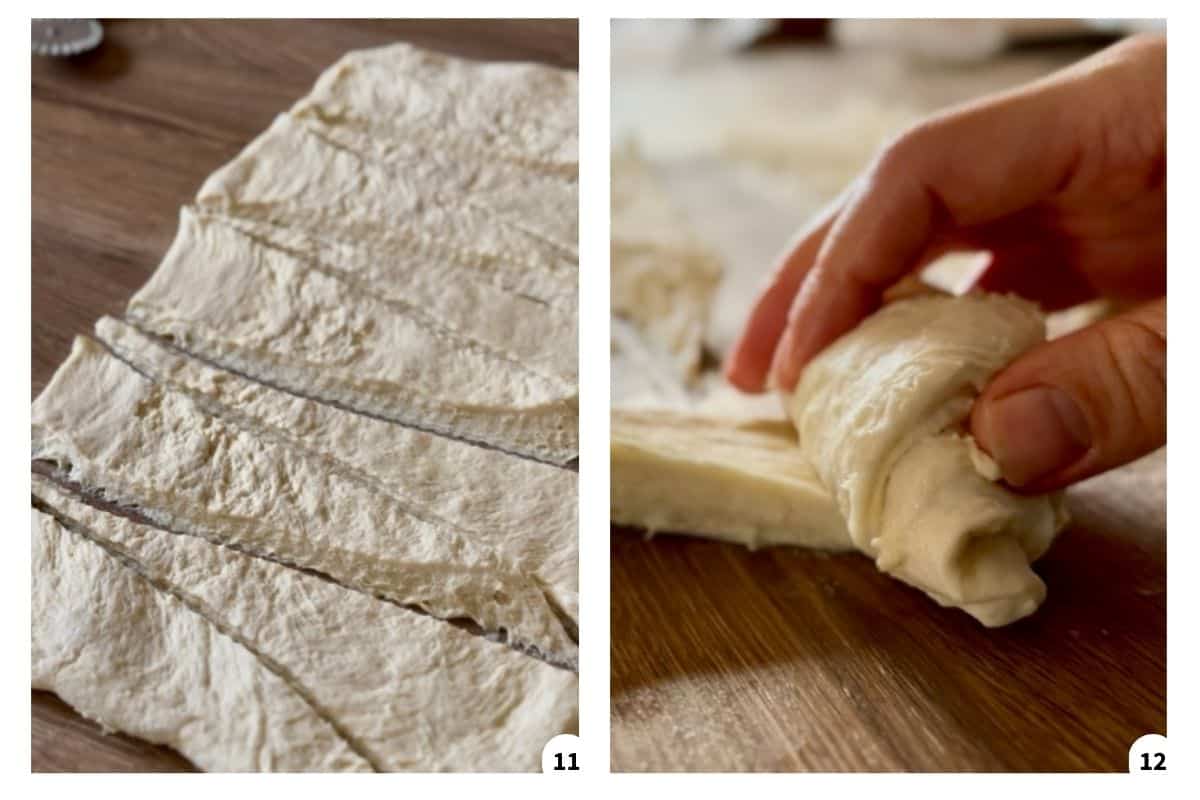
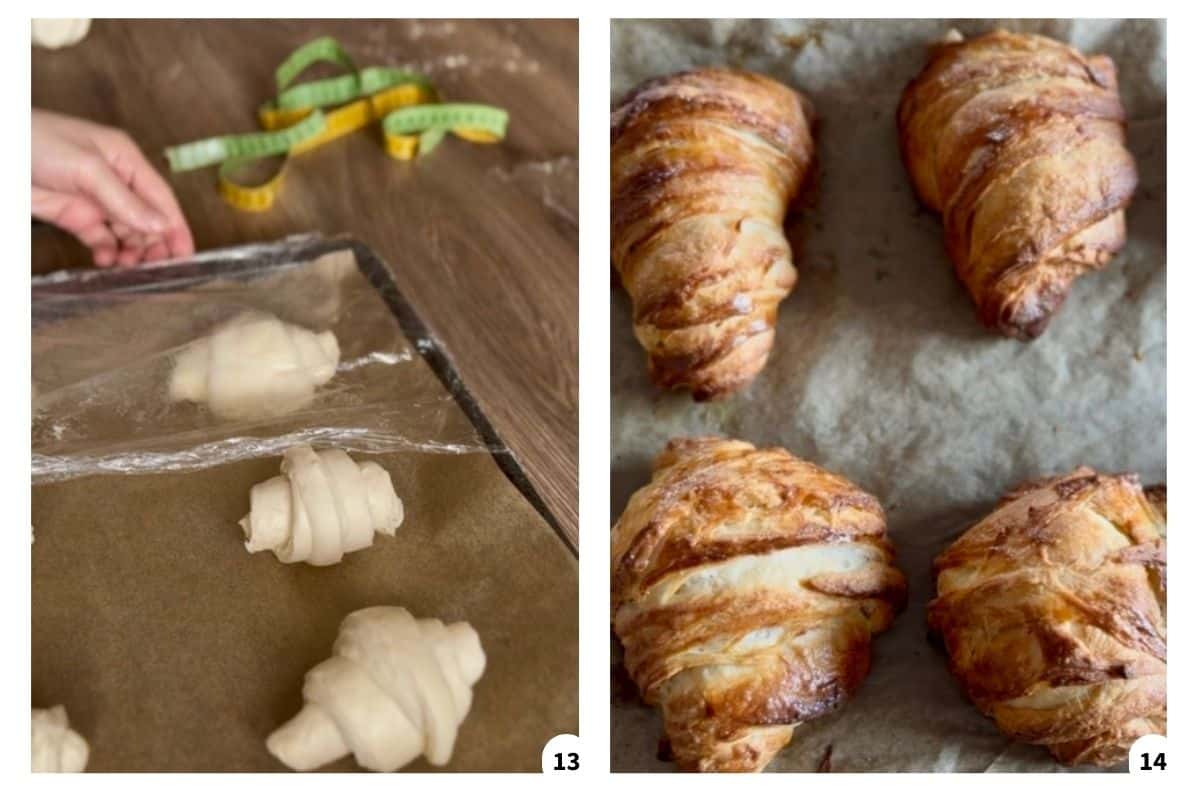
Step 5: Roll the dough out into a rectangle, about 28x50cm (11x20 inches). Mark every 10cm along the long sides, then use a pastry cutter or knife to cut 5 wide vertical strips. Cut diagonally across each strip to form 10 triangles (Image 11). Stretch the base of each triangle slightly, roll from base to tip, and gently stretch and press down the tip so it doesn't lift while baking (Image 12). Curve the ends slightly into a crescent shape if you like.
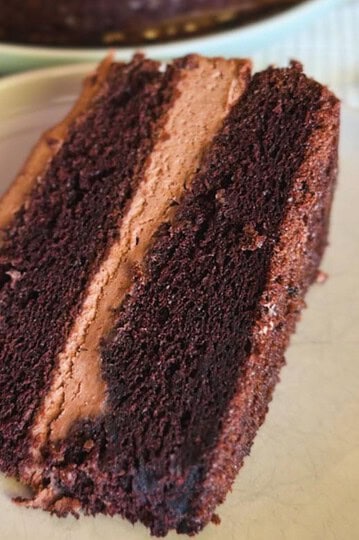
Step 6: Place the shaped croissants on a parchment-lined baking tray and let them proof for at least 4-6 hours at room temperature until they are very puffy and jiggly (Image 13). They really benefit from a long final proof. Preheat the oven to 205°C (400°F).
Whisk together the egg and water, then brush the tops of the croissants. Bake for about 20-25 minutes until deeply golden brown (Image 14).

Step 7: Let them cool slightly (Image 15), then slice one open to check the inside-you should see nice layers and a honeycomb-like texture (Image 16).
Tips:
- For easier shaping and better layering, try chilling the laminated dough for several hours or overnight, depending on your schedule.
- If you're not comfortable with exact measurements, don't stress too much. I recommend measuring the first time to get a feel for the process, but once you've got the hang of it, you can eyeball a lot of the steps.
- It's okay if the butter leaks out a bit during baking, but major leaks are often a sign of underproofing. Try extending the final proof time next time.
- Focus on keeping the dough and butter cool throughout the process. If the butter starts to melt, chill the dough before moving to the next step.
- Always use plastic wrap for refrigerating dough-never parchment paper-to prevent drying out.
Baking Schedule
Option 1: Overnight Dough, Next-Day Bake (Recommended for Best Flavor & Layers)
Day 1: Prep & Fermentation
- 8:00 AM - Mix the dough and let it ferment at room temp (4-6 hours).
- 12:00-2:00 PM - Do 2-3 sets of stretch and folds during the first 2 hours.
- 2:00-4:00 PM - Once dough is puffy, transfer to the fridge to chill overnight.
Day 2: Laminate, Shape & Bake
- 8:00 AM - Prepare butter packet and roll out the dough. Do the first fold.
- 8:30 AM - Chill the dough for 30 minutes.
- 9:00 AM - Second fold → chill.
- 9:30 AM - Third fold → chill again (or chill longer if you want).
- 10:00 AM-12:00 PM - Roll and shape croissants.
- 12:00-4:00 PM - Final proof (4-6 hours or until very puffy and jiggly).
- 4:00 PM - Egg wash and bake.
- 4:30 PM - Cool slightly and enjoy!
Option 2: Same-Day Bake (If You Start Early!)
6:00 AM - Mix dough and start fermentation.
6:30-8:30 AM - Do 2-3 stretch and folds.
10:00 AM - When dough is puffy, move it to the fridge to chill (at least 1-2 hours).
12:00 PM - Begin lamination:
- First fold → chill
- Second fold → chill
- Third fold → chill
2:30 PM - Roll and shape croissants.
3:00-7:00 PM - Final proof (4-6 hours).
7:00 PM - Egg wash and bake.
7:30 PM - Cool and serve..
Substitutions & Variations
- Filled croissants: Before rolling the dough triangles, add a small amount of jam, chocolate, or almond paste for a sweet surprise inside.
💭Crucial Success Tips
Don't worry if the butter leaks out a little or the layers aren't perfect-it happens! And it's usually due to underproofing the dough, so try to leave it to rise a bit more the next time if that happens. Also, focus on keeping the dough and butter cool throughout the process. If the butter starts to melt, chill the dough before proceeding to the next step.
FAQ
Yes! After shaping and proofing, you can freeze the croissants. Simply bake them straight from frozen, adding a few extra minutes to the baking time.
A: Butter leakage usually means the dough wasn't proofed long enough. Make sure the croissants have puffed up and are jiggly before baking.
You can, but letting the dough rest in the fridge overnight enhances the flavor and gives you a better texture. If you're short on time, you can still get great results by letting the dough chill for a few hours instead.

Simplified Sourdough Croissants
Jump to VideoEquipment
- 1 stand mixer
Ingredients
Dough
- 470 grams all-purpose flour
- 1 teaspoon salt
- 40 grams sugar
- 230 grams water
- 150 grams sourdough starter active
- 50 grams butter unsalted
Butter Packet
- 250 grams butter unsalted
Egg Wash
- 1 egg
- 1 tablespoon water
Instructions
- Combine all dough ingredients in a stand mixer. Mix on low, then medium speed for 10-15 minutes until the dough is smooth and slightly sticky.
- Transfer to a bowl, cover, and ferment at room temperature for 4-6 hours, or until noticeably puffy. During the first 2 hours of fermentation, do 2-3 sets of stretch and folds to build structure. The dough should pass the windowpane test after that. After the end of bulk fermentation, refrigerate the dough overnight.
- Cut butter into pieces and arrange them on parchment in a 15x20cm (6x8 inch) rectangle. Fold the parchment over the butter like an envelope to create a rectangle about 15x20cm (6x8 inches)-fold in the sides first, then the top and bottom, creasing to seal. Use a rolling pin to gently flatten the butter, spreading it evenly into the corners. Chill the packet until firm.
- Roll the chilled dough into a 40x20cm (16x8 inch) rectangle. Place the butter packet in the center. Fold the dough over from both sides to enclose the butter and pinch the seams shut.
- Turn the dough 90°, roll it out to 25x50cm (10x20 inches), then fold into thirds like a letter. Wrap in plastic and chill for 30 minutes. Repeat this fold-chill process two more times (3 sets pf lamination total).
- Roll the dough into a 28x50cm (11x20 inch) rectangle. Mark every 10cm on the long side and cut into 5 strips. Cut each strip diagonally to make 10 triangles. Gently stretch the base of each triangle, roll from base to tip, and slightly curve the ends.
- Place croissants on a parchment-lined tray. Cover and proof at room temperature for 4-6 hours, or until puffy and jiggly.
- Preheat oven to 205°C (400°F). Whisk egg with water and gently brush the tops. Bake for 20-25 minutes or until deeply golden.
- Let them cool slightly before slicing to check those layers. Best served fresh!
Video
Notes
- For easier shaping and better layering, try chilling the laminated dough for several hours or overnight, depending on your schedule.
- If you're not comfortable with exact measurements, don't stress too much. I recommend measuring the first time to get a feel for the process, but once you've got the hang of it, you can eyeball a lot of the steps.
- It's okay if the butter leaks out a bit during baking, but major leaks are often a sign of underproofing. Try extending the final proof time next time.
- Focus on keeping the dough and butter cool throughout the process. If the butter starts to melt, chill the dough before moving to the next step.
- Always use plastic wrap for refrigerating dough-never parchment paper-to prevent drying out.
Nutrition
How To Store Sourdough Croissants
Sourdough croissants are best enjoyed fresh on the day of baking, but they can be stored at room temperature in an airtight container for up to 2 days.
You can also freeze them once they are shaped and proofed, then bake them directly from frozen whenever the craving hits!


I have been making sourdough recipes for about 4 months. I decided to try your recipe because the instructions were very clear. Because I needed more time in the lamination process, I kept my dough covered I. The fridge for 4 days and the finished the process of adding the butter. It worked perfectly! I proofed them on 2 sheet pans. I put 1 pan in the freezer to flash freeze and bake in the future. I baked the other pan of croissants and they were some of the best I have ever had!
Thanks so much for the recipe!
Hi Kathy!
Thank YOU for taking the time to leave a comment! I love hearing about people enjoying the recipes, it really means a lot to me 🙂
These were delicious! My family loved them!
Hi Nichole!
I'm glad! They're popular in my family too. Thank you for your response!
These Croissants are absolutely delicious! Thank you for sharing your recipe.
Hi Susan!
Thank you so much for taking the time to comment! I'm glad you enjoyed them =D
These are perfect! I followed the recipe and amounts exactly, and your pictures were helpful 🙂
I would include a picture if I could. It took some muscle to roll the dough out, but that might just be me! I think they'd be great with a cinnamon sugar coating or with a strawberry drizzle. We love them, and my sourdough friends plan to make them now 🙂
Hi Jo,
thank you so much for leaving a review!! This is what keeps me posting recipes - to see that people use them and enjoy them. Thanks again for letting me know and I'll definitely try them with something extra next time - maybe cinnamon sugar coating since I'm a big cinnamon fan =D
Hi Melissa,
I'll surely test the recipe with less! I had no problems laminating 250 grams, but recipes are always work in progress, so I'll need to try less and see how it goes! 🙂