Thanksgiving Sourdough Whole Wheat Dinner Rolls (Soft and Fluffy!)
I always have homemade sourdough rolls on our Thanksgiving table-and these whole wheat sourdough dinner rolls have become a little tradition in our home. They're soft, buttery, and have that perfect mix of nutty whole wheat flavor and subtle sourdough tang.

Honestly, they're the kind of rolls that get more attention than the turkey! We love them with dinner, tucked around sandwich fillings the next day, or just warm with a swipe of butter. If you're looking for a go-to dinner roll, this is it.
I also have the Softest Sourdough Potato Rolls and Soft Sourdough Sandwich Rolls if you're looking for other delicious variations to try.
Jump to:
- Important Ingredients
- Substitutions & Variations
- How to Make Thanksgiving Sourdough Whole Wheat Dinner Rolls
- Baking Schedule
- 💭Crucial Success Tips
- Recipe FAQ
- Other Delicious Recipes
- Sourdough Whole Wheat Dinner Rolls
- Other Sourdough Recipes You'll Love
- Neapolitan-Style Sourdough Pizza Dough
- Sourdough Semolina Pizza Dough (Crispy, Chewy, and Full of Flavor)
- Traditional Ričet (Barley and Bean Stew with Smoked Meat)
Important Ingredients
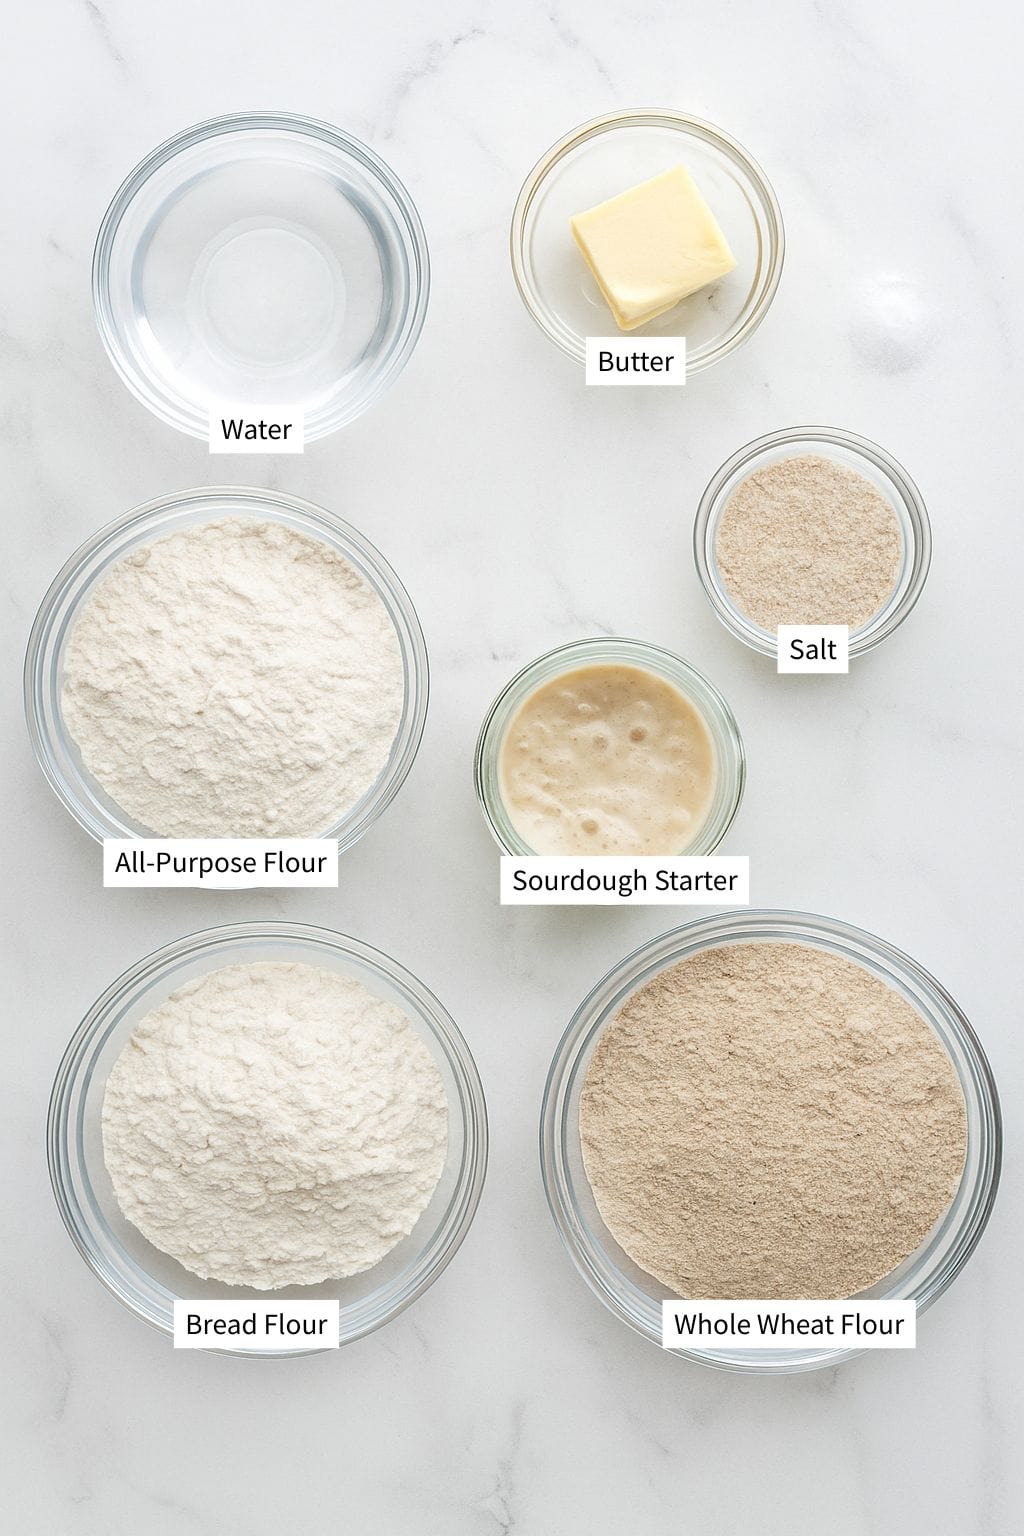
- Butter: Adds richness and a tender crumb to the bread.
- Water: Hydrates the dough and activates the starter for fermentation.
- Sourdough Starter: A natural leavening agent that gives the bread its rise and signature tangy flavor.
- All-Purpose Flour: Provides structure and a balanced texture.
- Whole Wheat Flour: Adds a hearty flavor, extra fiber, and a denser texture.
- Salt: Enhances flavor and helps control the fermentation process.
- Bread Flour: High in protein, it strengthens the dough and improves chewiness.
Substitutions & Variations
- You can substitute honey for the sugar in this recipe. The honey adds a lovely warm flavor and helps soften and strengthen the dough.
- After brushing the tops of the rolls with egg wash, sprinkle on any desired toppings. I like to use oats, sesame seeds, or benne seeds.
And if you love sourdough bread for Thanksgiving dinner, be sure to check out my list of 10 Sourdough Thanksgiving Recipes for Dinner.
How to Make Thanksgiving Sourdough Whole Wheat Dinner Rolls

Step 1. This bread dough comes together in a breeze. Simply combine all of the ingredients together in the bowl of a stand mixer. I like to use the dough hook attachment and start on low speed, gently bringing the dough together. You could also use a paddle attachment.

Step 2. Next, turn up to speed to medium and allow the mixer to knead the dough for 15-25 minutes until the dough no longer clings to the sides of the bowl. Or, if you have a subpar stand mixer like I do, mix until the dough is elastic, stretchy, and smooth.
Alternatively, if you have no stand mixer, combine all the ingredients together in a mixing bowl using a wooden spoon. Then dump the dough onto a lightly floured surface and knead the dough by hand for at least 10 minutes.
Step 3. Shape your dough into a smooth ball and transfer to a large bowl. Seal it securely with plastic wrap, a plastic bag, aluminum foil, or a lid. You can also use a damp towel to cover the dough, but make sure to keep it damp throughout the rising process.

Step 4. Allow the dough to do its first rise at room temperature for about 8-10 hours, depending on the temperature of your kitchen. If you're in a hurry, you can accelerate the sourdough process by placing the bowl in a warm place, though it's unlikely to be ready in less than 8 hours. Sourdough simply takes longer than doughs made with instant yeast.
When the dough has expanded by at least 75%, the first rise is done. You can even leave it overnight to bulk ferment and then shape the next day, especially during cooler seasons. However, during the warmer summer months, the rise time may be shorter.

Step 5. After the bulk rise, use a dough scraper to divide the dough into 10 equal pieces and shape them into dough balls. You don't have to flour your work surface for this recipe, as the dough will be firm and elastic at this stage, and you'll need a bit of stickiness to create tension in the little rolls.

Step 6. Arrange the shaped rolls on a baking sheet or a large baking dish. I like to line my dish with parchment paper or grease it to prevent the rolls from sticking. Allow them to rise until they're puffy and slightly bigger in size. This second rise could take anywhere from 2 - 4 hours, depending on the temperature in your kitchen. You can speed up the process a bit by placing the rolls in a warm location.

Step 7. (Optional: brush the tops of the rolls with an egg wash)
Bake the risen rolls in a preheated oven at 375°F (190°C) for 18 - 20 minutes (depending on the strength of your oven) until they are golden brown.
Step 8. Transfer rolls to a wire rack to cool. I like to throw a clean tea towel over the tops to prevent the crust from hardening.
Hint: You can create some steam in the oven by placing a cast iron pan with boiling water on the bottom rack. This boosts the yeast activity and helps keep the dough moist while it continues to rise.
Baking Schedule
Option 1: Day Start for Evening Rolls
- 8:00 AM - Feed your sourdough starter to ensure it's active and bubbly by the time you start mixing your dough.
- 12:00 PM (Noon) - Mix the dough. Combine all ingredients as per the recipe instructions, ensuring everything is at room temperature for better dough development.
- 12:30 PM - Begin the first rise (bulk fermentation). Allow the dough to sit at room temperature. The bulk fermentation process will take approximately 8-10 hours, but this can vary based on the temperature of your kitchen.
- 8:30 PM - Check the dough. If it has expanded by at least 75% and shows signs of activity, it's ready to shape. If not, give it a bit more time.
- 9:00 PM - Shape the rolls. Divide the dough into equal parts and shape them into balls. Arrange them on a baking sheet prepared with parchment paper or a greased surface.
- 9:30 PM - Start the second rise. Let the shaped rolls proof until they're puffy and have increased slightly in size, about 2-4 hours.
- 11:30 PM - If you're a night owl, you can bake the rolls now, or you can refrigerate them overnight for baking first thing in the morning.
Option 2: Overnight for Next-Day Rolls
- 8:00 PM (Night Before) - Feed your sourdough starter to ensure it's ready for mixing the dough later.
- 10:00 PM - Mix the dough. Follow the recipe to combine all the ingredients, making sure they're all at room temperature.
- 10:30 PM - Begin the first rise (bulk fermentation). Cover the dough and let it sit out at room temperature.
- 6:30 AM (Next Day) - Shape the rolls. After the long overnight fermentation, the dough should be ready. Divide and shape it as instructed.
- 7:00 AM - Start the second rise. Let the rolls rise until they're puffy, which should take around 2-4 hours, depending on your kitchen's temperature.
- 11:00 AM - Preheat your oven. Get it ready for baking the rolls.
- 11:30 AM - Bake the rolls. Follow the baking instructions in the recipe.
- 11:50 AM - 12:00 PM - Remove the rolls from the oven and transfer them to a wire rack to cool. Cover them with a clean tea towel to keep the crust soft.
💭Crucial Success Tips
- It helps to have all of the ingredients at room temperature before combining them together. This little step helps everything blend more smoothly, resulting in a silky dough. Don't worry if you skip this step; it may just take a little more elbow grease to get everything mixed thoroughly.
- A window pane test can help you determine if you've kneaded the dough long enough and it's ready to shape. To do this, take a piece of dough and gently stretch it out. If it stretches into a thin, translucent layer (see-through), you'll know the gluten has developed enough to move to the next step. If the dough won't stretch thin without tearing right away, continue kneading.
- Placing the dough in a greased bowl for the first rise can make it less likely to stick. I personally like using olive oil, but you can use your preferred oil.
- If you're having trouble with sticky dough while shaping the rolls, simply moisten your hands with a little water. This should keep the dough from sticking to your fingers as much.
Recipe FAQ
Yes! Though not quite as fluffy and soft as traditional white flour rolls, these are soft dinner rolls. Especially considering there are whole grains incorporated into the recipe.
Absolutely. I have had success using whole wheat flour in my sourdough baked goods, as well as feeding it to my starter. Though I do like to keep some starter dehydrated in my pantry, just in case I ever need to start a new batch.
Store the rolls in an airtight container at room temperature for up to 3 days, or refrigerate for up to a week-just reheat to bring back their softness. For longer storage, freeze them in a single layer, then transfer to a freezer bag for up to 3 months; thaw and warm before serving to enjoy their best texture.

Other Delicious Recipes
- Neapolitan-Style Sourdough Pizza Dough

- Sourdough Semolina Pizza Dough (Crispy, Chewy, and Full of Flavor)
- Traditional Ričet (Barley and Bean Stew with Smoked Meat)
- Italian Semolina Sourdough Bread


If you tried this Sourdough Whole Wheat Dinner Rolls or any other recipe on my blog please leave a 🌟 star rating and let me know how it went in the 📝 comments below! Happy Baking!

Sourdough Whole Wheat Dinner Rolls
Jump to VideoEquipment
- 1 stand mixer with a hook attachment
- 1 kitchen scale or measuring cups and spoons
- 1 plastic wrap or damp tea towel
- 1 Bench scraper or a very sharp knife for dividing the dough
- 1 Wire rack
- 1 large baking dish
Ingredients
- 200 grams water
- 150 grams all-purpose flour
- 150 grams whole wheat flour
- 100 grams bread flour or manitoba flour
- 90 grams sourdough starter
- 35 grams butter unsalted is best
- 6 grams salt
Instructions
- This bread dough comes together in a breeze. Simply combine all of the ingredients together in the bowl of a stand mixer. I like to use the dough hook attachment and start on low speed, gently bringing the dough together. You could also use a paddle attachment.
- Next, turn up to speed to medium and allow the mixer to knead the dough for 15-25 minutes until the dough no longer clings to the sides of the bowl. Or, if you have a subpar stand mixer like I do, mix until the dough is elastic, stretchy, and smooth.
- Shape your dough into a smooth ball and transfer to a large bowl. Seal it securely with plastic wrap, a plastic bag, aluminum foil, or a lid. You can also use a damp towel to cover the dough, but make sure to keep it damp throughout the rising process.
- Allow the dough to do its first rise at room temperature for about 8-10 hours, depending on the temperature of your kitchen. If you're in a hurry, you can accelerate the sourdough process by placing the bowl in a warm place, though it's unlikely to be ready in less than 8 hours. Sourdough simply takes longer than doughs made with instant yeast.
- After the bulk rise, use a dough scraper to divide the dough into 10 equal pieces and shape them into dough balls. You don't have to flour your work surface for this recipe, as the dough will be firm and elastic at this stage, and you'll need a bit of stickiness to create tension in the little rolls.
- Arrange the shaped rolls on a baking sheet or a large baking dish. I like to line my dish with parchment paper or grease it to prevent the rolls from sticking. Allow them to rise until they're puffy and slightly bigger in size. This second rise could take anywhere from 2 - 4 hours, depending on the temperature in your kitchen. You can speed up the process a bit by placing the rolls in a warm location.
- (Optional: brush the tops of the rolls with an egg wash). Bake the risen rolls in a preheated oven at 375°F (190°C) for 18 - 20 minutes (depending on the strength of your oven) until they are golden brown.
- Transfer rolls to a wire rack to cool. I like to throw a clean tea towel over the tops to prevent the crust from hardening.
Video
Notes
- You can create some steam in the oven by placing a cast iron pan with boiling water on the bottom rack. This boosts the yeast activity and helps keep the dough moist while it continues to rise.
- It helps to have all of the ingredients at room temperature before combining them together. This little step helps everything blend more smoothly, resulting in a silky dough. Don't worry if you skip this step; it may just take a little more elbow grease to get everything mixed thoroughly.
- A window pane test can help you determine if you've kneaded the dough long enough and it's ready to shape. To do this, take a piece of dough and gently stretch it out. If it stretches into a thin, translucent layer (see-through), you'll know the gluten has developed enough to move to the next step. If the dough won't stretch thin without tearing right away, continue kneading.
- Placing the dough in a greased bowl for the first rise can make it less likely to stick. I personally like using olive oil, but you can use your preferred oil.
- If you're having trouble with sticky dough while shaping the rolls, simply moisten your hands with a little water. This should keep the dough from sticking to your fingers as much.
Nutrition
Other Sourdough Recipes You'll Love