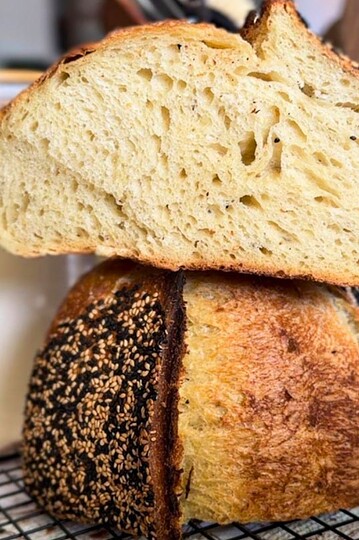
No Knead Sourdough Spelt Bread Recipe

This Sourdough Spelt Bread is perfect for when you want a wholesome, earthy loaf with a light sourdough flavor. With a mix of spelt, all-purpose, and whole wheat flours, this recipe brings a balance of flavor and texture to the table. The best part? It's a no-knead method that's easy to follow and mostly hands-off.

Sourdough bread on the same day? With a bubbly sourdough starter on hand, you can get this bread from start to finish in a day or let it proof overnight for even more depth. Refer to the 'Baking Schedule' section below!
Also, if you like to experiment with different flours in your sourdough, be sure to give my buckwheat sourdough bread a try!

Jump to:

Sourdough Spelt Bread
Equipment
Ingredients
- 240 grams all-purpose flour
- 200 grams water
- 50 grams sourdough starter active
- 50 grams spelt flour
- 20 grams whole wheat flour
- 6 grams salt
Instructions
- In a large bowl, combine the starter, water, and salt, then stir until well mixed. Add the spelt flour, all-purpose flour, and whole wheat flour. Begin mixing with a fork or spoon until a shaggy dough forms, then use your hands to gently bring it together. It will be a bit sticky, but that's normal. Cover the bowl with a damp cloth or a plastic bag.
- Let the dough rest for 1 hour, covered, without disturbing it. This helps the flour absorb the water and start developing gluten.
- After the rest, perform a set of stretch and folds by lifting one side of the dough, stretching it upwards, and folding it over itself. Rotate the bowl and repeat. Do this for about a minute, then cover and let the dough rest for 30 minutes. Repeat this stretch and fold process at least once more, or twice if you have time. After the final set, let the dough rise undisturbed for 5-7 hours, until it's risen about 75% and looks puffy.
- Lightly flour your work surface and gently turn out the dough. Shape it into a round, handling it gently to retain the air bubbles.
- Place the shaped dough, seam-side up, into a floured banneton or a bowl lined with a floured kitchen towel. Cover it, and let it rise for 1 ½ to 2 hours at room temperature or overnight in the fridge for a cold-proof.
- Preheat your oven to 475°F (245°C) with a Dutch oven inside. Once the oven is ready, take the dough out of the fridge (if cold-proofed), or from the counter, and place it on a piece of parchment paper. Score the top and carefully place it in the preheated Dutch oven. Lower the oven temperature to 450°F (230°C) and bake covered for 30 minutes. Remove the lid, lower the heat to 430°F (220°C), and bake for another 5-10 minutes until golden brown and crusty.
- Take the bread out of the oven and let it cool on a wire rack for at least 1 hour before slicing. This resting time allows the crumb to set, so it doesn't end up gummy.
Notes
- The dough may feel sticky, especially with the addition of spelt, but resist the urge to add extra flour. Trust the process-the dough will come together beautifully as it rises and ferments.
- Give the dough time to rise until it's puffy and about 75% larger-this can vary depending on your room temperature, but the appearance and feel of the dough will tell you when it's ready.
Nutrition
Ingredients
- Active sourdough starter: The natural leavening that gives the bread its rise and mild sour flavor.
- Water: Hydrates the dough and helps develop the gluten structure.
- Spelt flour: Adds a nutty, slightly sweet flavor and a more rustic texture.
- All-purpose flour: Helps create a light and airy crumb.
- Whole wheat flour: Adds a hint of earthiness and a bit of structure to balance the lighter all-purpose flour. I also like that it adds more brownish color to the bread.
See recipe card for quantities.
How to Make Sourdough Spelt Bread

Mix the Dough. In a large bowl, combine the starter, water, and salt, then stir until well mixed. Add the spelt flour, all-purpose flour, and whole wheat flour. Begin mixing with a fork or spoon until a shaggy dough forms, then use your hands to gently bring it together. It will be a bit sticky, but that's normal. Cover the bowl with a damp cloth or a plastic bag.

Rest (Autolyse). Let the dough rest for 1 hour, covered, without disturbing it. This helps the flour absorb the water and start developing gluten.

Stretch and Fold. After the rest, perform a set of stretch and folds by lifting one side of the dough, stretching it upwards, and folding it over itself. Rotate the bowl and repeat. Do this for about a minute, then cover and let the dough rest for 30 minutes. Repeat this stretch and fold process at least once more, or twice if you have time. After the final set, let the dough rise undisturbed for 5-7 hours, until it's risen about 75% and looks puffy.

Shape the Dough. Lightly flour your work surface and gently turn out the dough. Shape it into a round, handling it gently to retain the air bubbles.

Final Rise. Place the shaped dough, seam-side up, into a floured banneton or a bowl lined with a floured kitchen towel. Cover it, and let it rise for 1 ½ to 2 hours at room temperature or overnight in the fridge for a cold-proof.

Preheat and Bake. Preheat your oven to 475°F (245°C) with a Dutch oven inside. Once the oven is ready, take the dough out of the fridge (if cold-proofed), or from the counter, and place it on a piece of parchment paper. Score the top and carefully place it in the preheated Dutch oven. Lower the oven temperature to 450°F (230°C) and bake covered for 30 minutes. Remove the lid, lower the heat to 430°F (220°C), and bake for another 5-10 minutes until golden brown and crusty.

Cool the Bread. Take the bread out of the oven and let it cool on a wire rack for at least 1 hour before slicing. This resting time allows the crumb to set, so it doesn't end up gummy.
Hint: the dough may feel sticky, especially with the addition of spelt, but resist the urge to add extra flour. Trust the process-the dough will come together beautifully as it rises and ferments.
Baking Schedule
Option 1: Same-Day Baking
Morning
- 8:00 AM: Feed your sourdough starter so it's bubbly and ready in a few hours.
Late Morning
- 11:00 AM: Mix the dough and begin the autolyse (1 hour rest).
- 12:00 PM: Perform the first set of stretch and folds, then cover and let it rest for 30 minutes.
- 12:30 PM: Do the second set of stretch and folds.
- 1:00 PM: (Optional) Perform a third set of stretch and folds for extra strength in the dough.
Afternoon
- 1:30 PM: Let the dough rise undisturbed for 5-7 hours until it's about 75% larger and puffy.
Evening
8:40 PM: Let the bread cool for at least 1 hour before slicing.
6:30 PM: Shape the dough and let it rise on the counter for the final proof, about 1 ½ to 2 hours.
7:00 PM: Preheat your oven to 475°F (245°C) with a Dutch oven inside.
8:00 PM: Score the dough and bake. Bake covered at 450°F (230°C) for 30 minutes, then uncover and bake for another 5-10 minutes at 430°F (220°C) until golden.
Option 2: Overnight Second Rise
Day 1 (Evening)
- 8:00 PM: Feed your sourdough starter to prepare it for baking the next day.
Day 2 (Morning)
- 7:00 AM: Mix the dough and start the autolyse (1 hour rest).
- 8:00 AM: Perform the first set of stretch and folds, then cover and let it rest for 30 minutes.
- 8:30 AM: Do the second set of stretch and folds.
- 9:00 AM: (Optional) Do a third set of stretch and folds if you'd like.
Late Morning/Afternoon
- 9:30 AM: Let the dough bulk ferment undisturbed for 5-7 hours, until it's about 75% larger and puffy.
Afternoon
- 2:30 PM: Shape the dough, then place it in a floured banneton, cover, and refrigerate overnight for the final proof.
Day 3 (Morning)
- 7:00 AM: Preheat the oven to 475°F (245°C) with a Dutch oven inside.
- 7:30 AM: Take the dough straight from the fridge, score it, and bake. Bake covered at 450°F (230°C) for 30 minutes, then uncover and bake for another 5-10 minutes at 430°F (220°C) until golden.
- 8:10 AM: Let the bread cool for at least 1 hour before slicing.
Substitutions & Variations
- Use whole spelt: Substitute splet flour for whole spelt if you'd like a denser, more rustic loaf.
- Try a cold-proof: If you have time, let the dough rise overnight in the fridge after shaping for an even deeper flavor.
- Add seeds: For extra crunch, toss in some sunflower or flax seeds.
💭Crucial Success Tips
Give the dough time to rise until it's puffy and about 75% larger-this can vary depending on your room temperature, but the appearance and feel of the dough will tell you when it's ready.
FAQ
Yes, but the bread will be a bit denser. Spelt has lower gluten content, so mixing with all-purpose flour helps create a lighter loaf.
Absolutely! A tablespoon of honey pairs well with the nutty spelt flavor.
Gently shape it into a round or oval to keep as much air in the dough as possible. Handle it lightly to retain the bubbles.

More Sourdough Recipes


How To Store Sourdough Spelt Bread
Store your sourdough spelt bread in a paper bag at room temperature for up to 3 days.
For longer storage, slice and freeze it in an airtight bag-toast straight from the freezer for a quick, delicious snack.


I was wondering, can this be made in a loaf pan? I'd love to try this!
Jan. 5, 2025
I tried your recipe today. It turned out great but I do have a couple of questions.
1. How much salt did you add? I could not find a measurement.
2. I am a novice beginner at sourdough and wondering if the proportion of starter to the amount of total flour is correct? Other recipes that I have tried seem to have a higher proportion. Have you experimented with adding around 100 grams of starter? Would that give the final product more volume? My loaf was pretty small but I know the flour amount is half of my normal sourdough recipe. I love your recipe with the spelt and whole wheat flours. Thanks
Hi Diana!
I'm glad you enjoyed the recipe! To answer your questions:
1. I use about 6 grams of salt in this recipe, and I'm so sorry this info was missing! I already corrected the recipe, so thanks for letting me know!
2. The amount of starter can vary based on several factors, like the season and your schedule. In winter, I tend to use closer to 100g of starter, while in summer, I might use about 50g. If you're in a hurry or it's cold in your kitchen, using more starter can help. When I use 100g, I also add about 10-20 grams more flour to balance the extra moisture. Sourdough is flexible, so with practice, you’ll get a feel for adjusting the starter amount to suit your situation. I was testing this recipe during the summer and that's why I went with 50 grams of starter! But you're right, I could easily go up to 100g!
I hope this helps, I know sourdough can be intimidating in the beginning so ask any more questions you have!