Easy Sourdough Sandwich Bread
There's something deeply satisfying about baking your own sandwich bread. Especially one that slices beautifully, stays soft for days, and holds up to peanut butter, melty cheese, or whatever your family is into this week. So, I made this Sourdough Sandwich Bread-no kneading, minimal fuss, and dependable enough for school lunches, toast mornings, or those mid-afternoon snacks.

This version is softer, lightly enriched with oil and a bit of sugar, but still has that gentle tang and natural rise we love from sourdough.
Also, it fits into everyday routines. You can pop it in the fridge overnight or bake it the same day-whatever works for you.
I'm sure you will also love my other sourdough sandwich bread recipes; Tangzhong Sourdough Sandwich Bread, Soft Sourdough Sandwich Bread With Milk or Honey Oat Sourdough Sandwich Loaf!
Video🎥
Important Ingredients
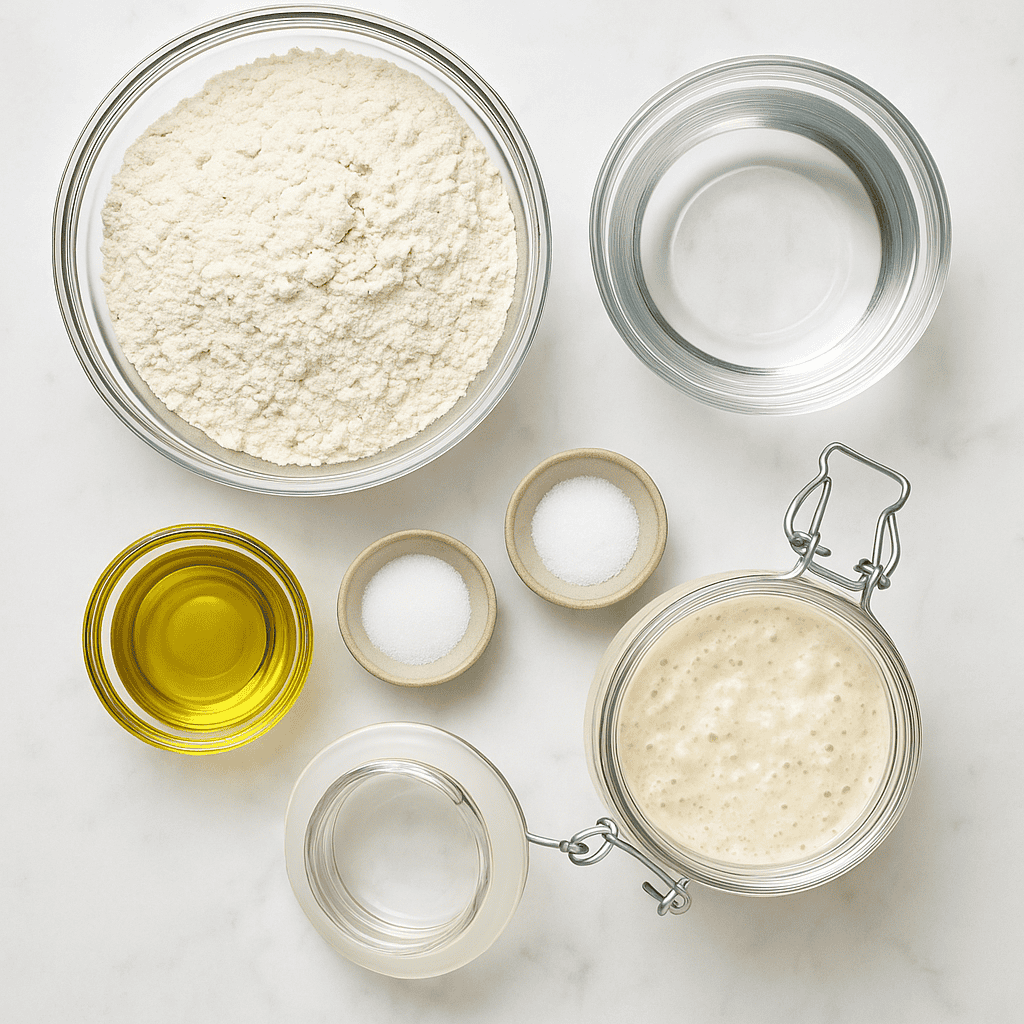
- All Purpose Flour: Gives structure to the dough.
- Water: Hydrates the ingredients and activates the starter.
- Active Sourdough Starter: A bubbly, fermented mix that naturally leavens the dough.
- Avocado Oil or Olive Oil: Adds richness to the bread.
- Sugar: Balances the tang and promotes a beautiful crust.
- Salt: Enhances all the flavors, making for a truly delicious loaf.
See recipe card for quantities.
Substitutions & Variations
- If you don't have all-purpose flour-though it works better-you can swap up to 100g with whole wheat flour for a bit more texture and flavor. If you do, you might need a splash more water.
- Avocado oil makes the crumb extra tender, but olive oil works just as well. For a dairy twist, try melted butter.
- For sweeteners, you can use honey or maple syrup instead of sugar-just keep the amount the same so the dough stays balanced.
- For a savory spin, add a teaspoon of dried herbs or a handful of shredded cheese before shaping. For something lightly sweet, swirl in a bit of cinnamon sugar as you roll the dough.
How to Make Easy Sourdough Sandwich Bread

Step 1: In a large bowl, combine all ingredients using a Danish whisk or spoon (Image 1). Finish mixing with your hands until everything is incorporated (Image 2). No kneading needed-just mix until combined.
Optional: You can use a stand mixer by mixing on low for about 15 minutes until the dough is smooth.
Once mixed, cover the bowl airtight and let it rest for at least 30 minutes.

Step 2: After the rest, do your first round of stretch and folds . Wet your hand, lift one side of the dough, and fold it over. Repeat on all sides. If the dough still feels loose, do one extra fold (Image 3).
Repeat this process 2 to 3 times total, with 30-minute rests between each round (Image 3).
After the last fold, cover the bowl and let the dough rise until it increases by about 50% (Image 4). At 72°F (22°C), this takes about 6 to 8 hours, starting from the time you mixed up all the ingredients. The dough should look puffed and airy, but it won't double in size.

Step 3: Turn the dough out of the bowl with the smooth side down (Image 5). Gently stretch it into a rectangle (Image 6).

Step 4: Roll it tightly from top to bottom, like a jelly roll. Pinch the side seams to seal (Image 7). Then roll the log slightly toward yourself to build surface tension, using your hands or a bench scraper. Place the dough seam-side down in a greased or parchment-lined loaf pan (Image 8).

Step 5: Cover the pan and refrigerate overnight. When ready to bake, place the cold dough straight into the oven-no second rise needed.
If baking the same day, let the dough rise in the pan at room temperature for 2.5 to 3 hours (Image 9).
Right before baking, brush the top lightly with melted butter (Image 10). This gives a soft, golden crust that's great for sandwiches.

Step 6: If using the two-pan covered method:
Preheat the oven to 400°F (205°C).
Place a second loaf pan upside down over your dough pan to cover it completely.
Bake for 40 minutes covered. Then remove the top pan and bake for another 10 minutes to brown the crust (Image 11).
If baking uncovered:
Bake at 400°F (205°C) for 45 to 50 minutes total.
If the crust starts browning too fast (Image 11), loosely tent with foil for the last 10 to 15 minutes.
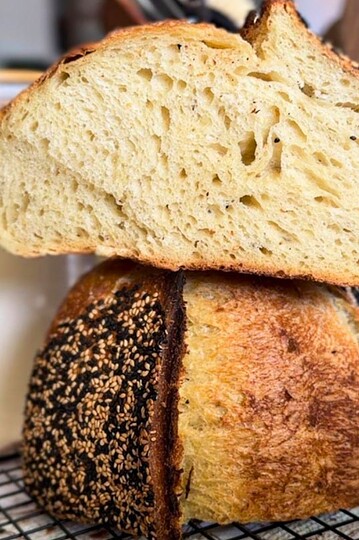
Once done, remove the loaf from the pan right away and let it cool completely (Image 12) before slicing.
Hint: If your kitchen runs a bit chilly, try placing your dough in the oven (turned off) with the light on during the bulk fermentation. It's just warm enough to help things along without overheating the dough.
Baking Schedule (Same Day Bake)
- 7:00 AM - Feed your sourdough starter (if needed)
- 9:00 AM - Mix dough
- 9:10 AM - Rest 30 minutes
- 9:40 AM - Stretch and fold once
- 10:00 AM to 2:00 PM - Bulk ferment at room temp (watch for 50% rise)
- 2:00 PM - Shape and place in loaf pan
- 2:15 PM to 5:00 PM - Final proof in pan (watch for dough rising 1 inch over the rim)
- 5:00 PM - Bake at 375°F for 40-45 minutes
- 5:45 PM - Cool completely before slicing
- 8:00 PM - Ready to slice for tomorrow's breakfast or school lunches
💭Crucial Success Tips
- Make sure your starter is bubbly and recently fed. A sluggish starter will drag out the rise time or result in a dense loaf.
- Don't Rush the Rise: The dough won't double like yeasted bread. Look for about a 50% increase and a puffed, airy feel.
- Cold Bake Option: The overnight fridge rest makes shaping easier and gives the loaf better structure when baked straight from cold.
- If baking the same day, avoid overproofing in the pan. Keep a close eye on the dough-once it rises about an inch over the rim, it's ready to go.
- Let it cool fully for clean, sturdy slices. Slicing into a hot loaf will squish the crumb.
- Use a standard 9x5-inch loaf pan for it works well. Smaller pans will create a taller loaf.
Sourdough Sandwich Bread FAQs
Nope, for this bread you need an active, bubbly starter to help it rise. Discard won't give you the lift needed.
Up to 24 hours is fine. Just make sure it doesn't overproof and spill over the pan.
Yes! It won't double. Look for a 50% increase and a light, puffy texture. If it's been over 10 hours with little movement, check your starter activity.
Yes, but mix in a very large bowl and be sure your oven can handle two pans at once. Rotate halfway through if needed.
How To Store Easy Sourdough Sandwich Bread
Once the bread is completely cooled, keep it in a bread bag or a kitchen towel-wrapped container at room temperature for up to 4 days. It stays soft and springy! After that, slice and freeze it to keep it fresh. Avoid storing in the fridge-it dries the crumb out faster than you'd think.

Other Delicious Recipes
- Neapolitan-Style Sourdough Pizza Dough

- Sourdough Semolina Pizza Dough (Crispy, Chewy, and Full of Flavor)
- Traditional Ričet (Barley and Bean Stew with Smoked Meat)
- Italian Semolina Sourdough Bread


If you tried this Easy Sourdough Sandwich Bread or any other recipe on my blog please leave a 🌟 star rating and let me know how it went in the 📝 comments below! Happy Baking!

Easy Sourdough Sandwich Bread
Jump to VideoEquipment
- 1 Loaf pan
Ingredients
- 500 grams all-purpose flour
- 310 grams water
- 110 grams active sourdough starter
- 20 grams olive oil or avocado oil
- 15 grams sugar
- 8 grams salt
Instructions
- In a large bowl, combine all ingredients using a Danish whisk or spoon. Finish mixing with your hands until everything is incorporated. No kneading needed-just mix until combined.Optional: You can use a stand mixer by mixing on low for about 15 minutes until the dough is smooth.Once mixed, cover the bowl airtight and let it rest for at least 30 minutes.
- After the rest, do your first round of stretch and folds. Wet your hand, lift one side of the dough, and fold it over. Repeat on all sides. If the dough still feels loose, do one extra fold. Repeat this process 2 to 3 times total, with 30-minute rests between each round. After the last fold, cover the bowl and let the dough rise until it increases by about 50%.At 72°F (22°C), this takes about 6 to 8 hours, starting from the time you mixed up all the ingredients. The dough should look puffed and airy, but it won't double in size.
- Turn the dough out of the bowl with the smooth side down. Gently stretch it into a rectangle.
- Roll it tightly from top to bottom, like a jelly roll. Pinch the side seams to seal. Then roll the log slightly toward yourself to build surface tension, using your hands or a bench scraper. Place the dough seam-side down in a greased or parchment-lined loaf pan.
- Cover the pan and refrigerate overnight. When ready to bake, place the cold dough straight into the oven-no second rise needed.If baking the same day, let the dough rise in the pan at room temperature for 2.5 to 3 hours, or until it's puffy.Right before baking, brush the top lightly with melted butter. This gives a soft, golden crust that's great for sandwiches.
- If using the two-pan covered method:Preheat the oven to 400°F (205°C). Place a second loaf pan upside down over your dough pan to cover it completely. Bake for 40 minutes covered. Then remove the top pan and bake for another 10 minutes to brown the crust.If baking uncovered:Bake at 400°F (205°C) for 45 to 50 minutes total. If the crust starts browning too fast, loosely tent with foil for the last 10 to 15 minutes. Once done, remove the loaf from the pan right away and let it cool completely before slicing.
Video
Notes
- This loaf stays soft and moist for several days. It's great for toast, sandwiches, or just spreading with butter and jam.
- The nice thing about this sandwich bread is that it's not as rich as a traditional loaf. It's somewhere between an artisan-style loaf and classic sandwich bread. That means you can load up the slices with more toppings without the whole thing feeling too heavy.


my oven is too hot. bake at 375 for 40 min.
Hi Rita, thanks for the feedback! Home ovens vary a lot, and it's an important thing to keep in mind 🙂
Wha do you recommend, two-pan covered method or uncovered? 😬
Hi Clarisa!
I usually go with the two-pan method just because I know my oven runs a bit hot. But honestly, if you want to skip a step, I'd try uncovered first! If you notice the top browning too quickly, just put a piece of aluminum foil on top partway through baking.