Same Day Sourdough Bread

Are you craving the delightful aroma of freshly baked bread without the wait? Look no further! This easy same day sourdough bread recipe will have you enjoying a delicious loaf of bread in just a matter of hours.
With a few simple ingredients and a little bit of patience, you'll achieve that beautiful golden-brown crust and airy crumb you've been dreaming of- without compromising the taste or the fermentation benefits of sourdough bread. AND it is totally appropriate for a beginner baker- just like my skillet sourdough naan recipe!

Summarize & Adapt This Recipe On:
If you've always been intimidated by the idea of making your own sourdough, you're going to love this recipe. It's really easy to put together, you can plan it around your schedule and is actually quite forgiving too!
If you're super into bread baking and you mill your own flour at home (like I do!), here's a fresh milled same day sourdough bread recipe you need to check out!

Free resource
Get all 3 when you subscribe
Bake beautiful bread that fits Your life - not the other way around
Recipe Quick Look
- Prep time: 2 hours.
- Cook time: 45 mins.
- Servings: 15 slices.
- Main ingredients: Flour, sourdough starter, water, salt.
- Cooking method: Combine water, starter and salt 🡢 add flour 🡢 mix, cover and rest 🡢 do 1 set of stretch and folds 🡢 cover and rest for 20 minutes 🡢 do 1 more set of stretch and folds 🡢 shape into a ball, cover and let rise for 3-4 hours 🡢 shape dough ball 🡢 rise again and score 🡢 transfer to parchment paper and into a Dutch oven 🡢 bake for 30-40 minutes 🡢 cool, slice and serve.
- Difficulty: Medium.
- Serving ideas: Serve a slice of the crusty sourdough with a bowl of your favorite soup, or use it as a bowl to make broccoli cheddar soup in a sourdough bowl.
Jump to:
- Summarize & Adapt This Recipe On:
- Recipe Quick Look
- Important Ingredients
- Substitutions & Variations
- How to Make Same Day Sourdough Bread
- Baking Schedule
- Crucial Success Tips
- Recipe FAQs
- More Easy Sourdough Recipes
- Same Day Sourdough Bread
- Need Help Tweaking This Recipe?
- Other Sourdough Recipes You'll Love
- Neapolitan-Style Sourdough Pizza Dough
- Sourdough Semolina Pizza Dough (Crispy, Chewy, and Full of Flavor)
- Italian Semolina Sourdough Bread
Important Ingredients
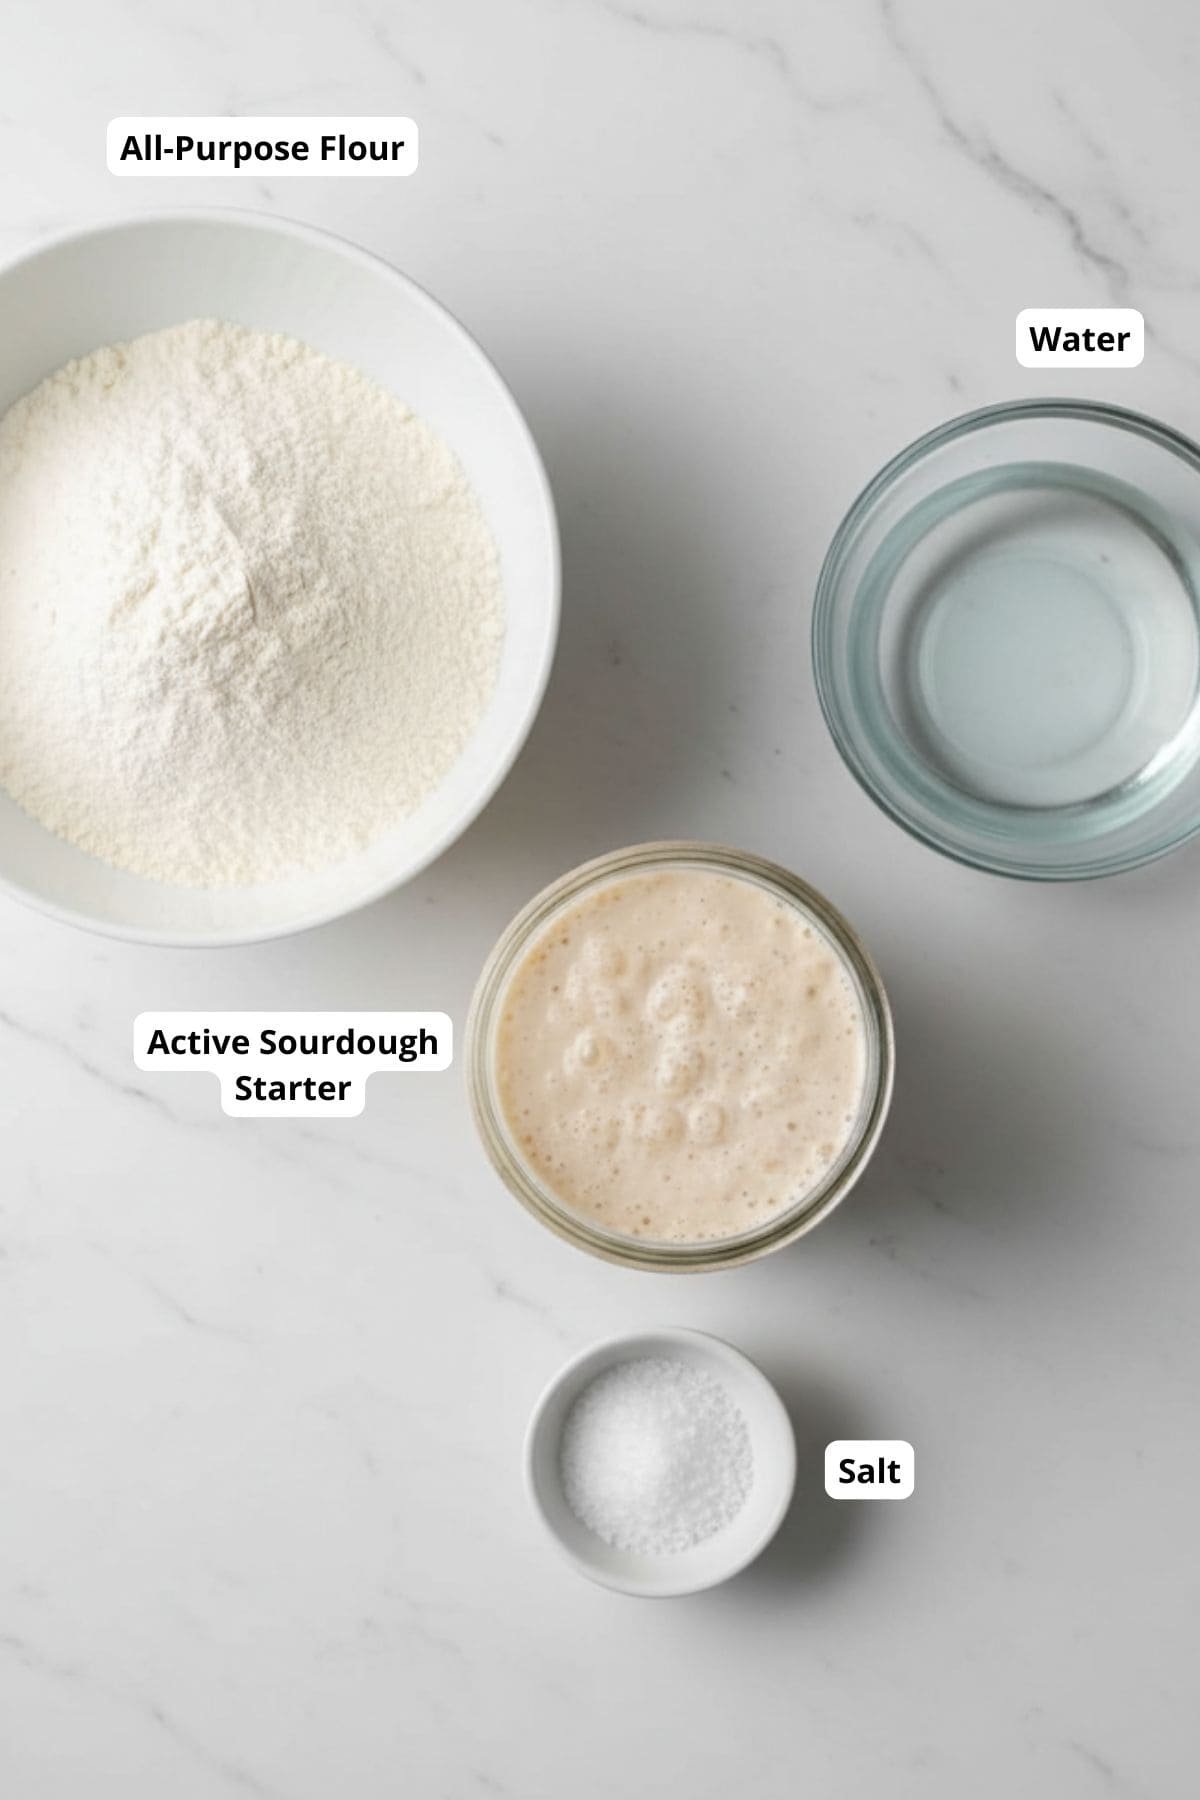
- Active sourdough starter: For that signature tang and lift. If you don't have this at hand, follow my easy recipe that teaches you how to make sourdough starter from scratch.
- Water: To hydrate the dough and activate the starter for fermentation.
- Salt: To enhance the flavor and strengthen the dough structure.
- All-purpose flour: The base of your dough creating structure and texture for the loaf.
See recipe card for quantities. I included a baking schedule at the end, so you'll have an easier time calculating when to feed your starter and start the whole process.
Also, a Dutch oven is a must if you ask me. There are ways of baking bread that don't require you to have it, but having it makes everything much simpler!
Substitutions & Variations
- You can swap up to 20% of the all purpose flour you're using here for a different kind of flour like rye flour or bread flour to create different versions of the bread. If you want to bake your sourdough using whole wheat flour, I suggest you check out my no-knead rustic whole wheat sourdough bread recipe.
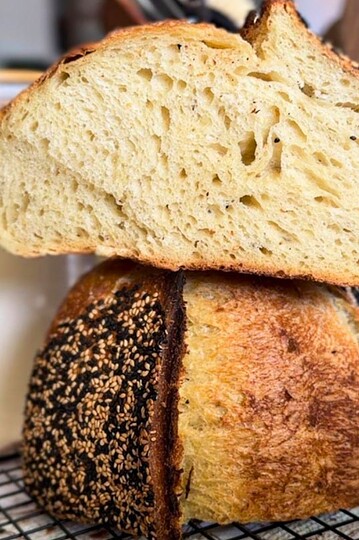
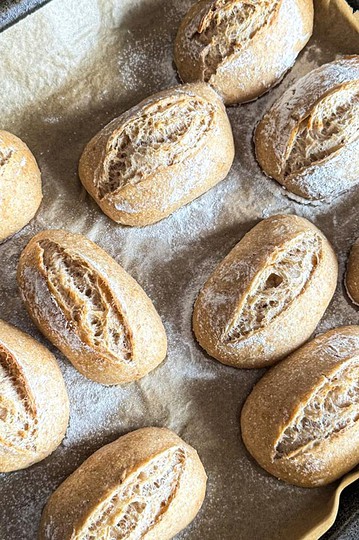
- You can also top the bread with some seeds for a bit of extra texture and deliciousness. Sesame seeds, poppy seeds, pumpkin seeds, and sunflower seeds are all great options.
- For that hint of golden yellow color, you can also add some turmeric powder into the mix. I usually about 1 teaspoon at the beginning to my water, starter, and salt mixture to ensure it is evenly distributed.
- To make a cheesy loaf, add a cup of shredded cheese into the dough during the last series of stretch and folds. This one's sure to be a total crowd pleaser- just like my roasted garlic and Parmesan sourdough bread.
How to Make Same Day Sourdough Bread

In a large bowl, combine water, starter, and salt. I like mixing those up first so the starter and the salt have a chance to disperse in the water

Add the flour and mix well. I usually do this with a spoon and finish with my hands to break up all the flour. Cover with something airtight (plastic wrap, aluminum foil, plastic bag, even a shower cap works!) and let rest for 30 minutes.

After 30 minutes, do a set of stretch and folds. Grab the edge of the dough, stretch it up, and fold it under on the other side. Rotate your bowl for 90 degrees and repeat 3 more times. We're going for 4 sets of stretch and folds in total. Cover again and leave to rest for 20 minutes and do another set of stretch and folds. Repeat this process until you do 4 sets of stretch and folds (which should take 1 hour in total). Be sure to cover your dough with something airtight in-between sets of stretch and folds to prevent the dough from drying out! After that's done, let the dough ball rise for 3 - 4 hours at room temperature.

Once it looks almost double in volume, transfer your dough to a lightly floured surface. It's now time to shape the dough! Grab the opposite ends of the dough and pinch them together on top. Repeat with the other two opposites. Prepare your bread basket (or banneton basket) so that you line it with a lightly floured tea towel.

Carefully transfer your dough ball into a tea towel-lined basket. The pinched parts should be facing upwards. Preheat your oven and prepare a piece of parchment paper. Transfer your dough from the basket to the parchment paper, so the floured bottom of the dough is now the top of the dough up. Score your dough with a razor blade or a sharp knife; make two deep cuts so you get a crisis cross pattern.

Transfer your parchment paper with a dough on it into a hot Dutch oven. Splash just a bit of water between the parchment paper and Dutch oven to create some steam and cover quickly to capture it inside. Put the bread in the oven for 30 minutes at 460°F (238°C). Take the lid off and bake for an additional 10 minutes with the lid off at 440°F (227°C) to get that golden brown color. Transfer to a cooling rack, cover with a damp kitchen towel and cool for at least an hour before you slice into it.
Pro Tip: Use a HEAVY bowl for mixing the dough and doing stretch and folds. I love using this natural ceramic bowl from Amazon (also in the pictures above!). When I stretch the dough, no matter how dense it is, the bowl stays on the counter. And I can make big amounts of dough in it when I'm batch baking sourdough bread.
Baking Schedule
OPTION 1: Feed the starter the day before, have bread for dinner the next day.
- 8.00: Mix up the dough.
- 8.30: Start stretch and folds.
- 9.30 - 12.30: Bulk rise.
- 12.30: Shaping and second rise.
- 13.30: Bread goes in the oven.
- 14.15: Bread comes out of the oven to cool down.
OPTION 2: Feed the starter in the morning, have bread for late dinner or the next day.
- 8.00: Feed starter.
- 13.00: Mix up the dough.
- 13.30: Start stretch and folds.
- 14.30 - 17.30: Bulk rise.
- 17.30: Shaping and second rise.
- 18.30: Bread goes in the oven.
- 19.15: Bread comes out of the oven to cool down.
Crucial Success Tips
- The temperature of your kitchen plays a big role in how fast your dough will rise. If you want to speed your process up a little, proof your dough in a warmer spot if you have one.
- For best results, wet your fingers with water to prevent the dough from sticking to your hands when you handle the dough. It will still stick a bit (because we're dealing with medium to high-hydration dough, but wetting your hands really helps! Use this tip especially when doing the sets of stretch and folds.
- It is normal for the dough to be very sticky the first time you do stretch and folds- don't panic. Just keep going.
- If you're adding seeds to your same day sourdough bread, sprinkle them in during the last series of stretch and folds.
- Wrap your cooled sourdough bread in a clean cloth or paper bag. This allows the bread to breathe slightly and helps maintain its crust's texture.
- Avoid storing sourdough bread in plastic bags, as they can trap moisture and make the crust soft. However, if you want to keep the crust softer for a longer time, you can use a plastic bag but leave it open or puncture a few holes in it.
- If you have a bread box, it can be an excellent option for storing your sourdough bread. A bread box provides a slightly humid environment that can help keep the bread's crust from becoming too hard.
Recipe FAQs
Check the size of the dough. If it has nearly doubled in size, it has proofed. You can also perform a "poke test." When you poke the bread dough, your finger should leave a dent behind, but the dent should slowly start to fill up again.
Absolutely! A (mature) starter is usually ready to use in baking after 4 - 6 hours after feeding. If you look at the first baking schedule below, you'll see that it calls for feeding your starter in the morning and having the bread baked in the late afternoon.
Although sourdough bread can last up to a week at room temperature, it's best to eat it within the first three days.
After three days, consider freezing it. If it goes stale before you have a chance to eat or freeze it, you can always turn it into bread pudding, stuffing, breadcrumbs, etc.
More Easy Sourdough Recipes
Looking for other recipes like this? Try these:


If you tried this same day sourdough bread or any other recipe on my blog please leave a 🌟 star rating and let me know how it went in the 📝 comments below! Happy Baking!

Same Day Sourdough Bread
Jump to VideoEquipment
Ingredients
- 410 grams all-purpose flour
- 290 grams water
- 160 grams starter
- 8 grams salt
Instructions
- In a large bowl, mix together your water, starter, and salt. I like mixing those up first so the starter and the salt have a chance to disperse in the water.
- Add the flour and mix well. I usually do this with a spoon and finish with my hands to break up all the flour. Cover with something airtight (plastic wrap, aluminum foil, plastic bag, even a shower cap works!) and let rest for 30 minutes. I find putting a plastic bag over top is the most practical.
- After 30 minutes, do a set of stretch and folds. That means that you grab the edge of the dough, stretch it up, and fold it under on the other side. Rotate your bowl for 90 degrees and repeat 3 more times. We're going for 4 sets of stretch and folds in total. Cover again and leave to rest for 20 minutes and so another set of stretch and folds.
- Repeat this process until you do 4 sets of stretch and folds (which should take 1 hour in total). Be sure to cover your dough with something airtight in-between sets of stretch and folds to prevent the dough from drying out!
- After you are finished with stretch and folds, cover the dough again (it should resemble a smooth ball by now) and let the dough rise for 3 - 4 hours at room temperature (I usually just leave it on the counter). It should almost double in volume.
- After the bulk fermentation, transfer your dough to a lightly floured surface. We are going to shape your dough. The way to do that is to grab the opposite ends of the dough and pinch them together on top. Repeat with the other two opposites.
- Prepare your bread basket (or banneton basket) so that you line it with a lightly floured tea towel. Carefully transfer your dough ball into a tea towel-lined basket. The pinched parts should be facing upwards. If your dough is extra wobbly, you can help yourself with a dough scraper.
- Cover the dough again (I use the same plastic bag as before) and let it do its final rise for 2 hours at room temperature. About an hour in, you can turn your oven on to preheat it.
- When your dough puffed up a bit and your dutch oven and oven are both sufficiently preheated, prepare a piece of parchment paper. Transfer your dough from the basket to the parchment paper, so the floured bottom of the dough is now the top of the dough. Score your dough with a razor blade or a sharp knife; make two deep cuts so you get a crisis cross pattern.
- Transfer your parchment paper with a dough on it into a hot dutch oven. Splash just a bit of water between the parchment paper and dutch oven to create some steam and cover quickly to capture it inside. Put the bread in the oven for 30 minutes at 460°F (238°C). Take the lid off and bake for an additional 10 minutes with the lid off at 440°F (227°C) to get that golden brown color. Bake time depends on the strength of your oven, so you can adjust it a bit after. After taking the bread out of the oven, put it on a cooling rack, cover it with a damp kitchen towel and leave it to cool for at least an hour before you slice into it.
Video
Notes
- Wet your fingers with water before doing the stretch and folds. This will help prevent the dough from sticking to your fingers.
- Allow the dough to proof until almost double in size.
- Add your mix-ins like seeds, spices and cheese during the last series of stretch and folds.


Hi! I love how easy this is to follow along. This is my first time making sourdough bread and I read through other comments you answered. I am currently doing the final proofing but I noticed it wasn’t holding any shape and then only way I was able to transfer the dough was to cover in flour. In another comment you mentioned humidity and gluten formation. I know I have high humidity in my home so when I attempt again should I only back off on the water or should I try extra stretch and folds as well?
Hi Serenity!
Yes, sourdough is quite sensitive to temperature and humidity. Since your dough was too wet to hold shape, reducing the water content sounds like a good move. Try cutting back by 20-30 grams on your next batch. This should help compensate for the high humidity in your home without needing to add extra stretch and folds.
Hope that helps, and good luck with your next bake!
Hi,
So I used your suggestion of adding a few more stretch and folds, and it seemed to help some and made scoring easier.
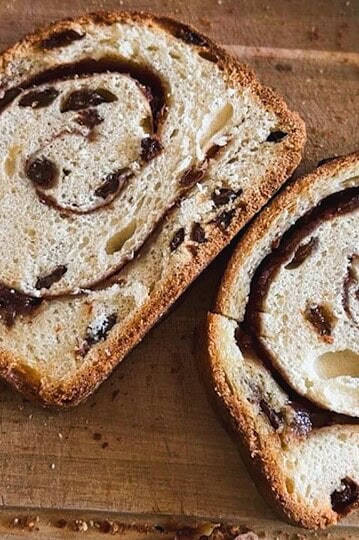
I made a cinnamon and brown sugar loaf and a cheddar and everything bagel loaf. Both taste amazing but it's a little on the gummy side.
1. I usually feed my starter at night and then the next morning start my bread, this time I fed it and 3.5 hours later started my bread.
2. I use a speedy recipe called same day sourdough and usually bulk ferment at room temperature for 3.5 to 4 hours, this time I let the dough bulk ferment at room temp for 2 hours then put it in the fridge overnight and in the morning I shaped it and let it do it's final rise.
3. I usually put inclusions in during stretch and folds, this time I did it after bulk fermentation before I shaped it.
Are any or all of the things I did different this time wrong?
Also, do you take the temperature of your dough?
Hi Ashley!
It sounds like you’re really experimenting with your sourdough process, which is great! Adding more stretch and folds and adjusting the timing can definitely impact the final texture, as you noticed with easier scoring.
Regarding the gumminess, a few things could be contributing:
1. Feeding your starter just 3.5 hours before starting your bread might not give it enough time to reach its peak activity, depending on the strength and speed of your starter.
2. Shortening the room temperature fermentation and then refrigerating overnight could affect the dough development differently compared to your usual method. This can influence gluten development and gas retention. Keep in mind that the fermentation almost needs to happen at room temp - in the fridge, it's slows down sooo much! So changing your time of bulk fermenting on the counter for 1 hour can have a huge impact, whereas leaving your dough in the fridge for 2 hours or 30 hours doesn't do much of a difference.
3. Adding them after bulk fermentation rather than during stretch and folds might slightly alter how the dough holds together and ferments. But it shouldn't affect it too much I think!
None of the changes you tried are inherently "wrong"; they just produce different results. Experimenting is key to finding what works best for you.
As for taking the temperature of the dough, I actually don’t use a thermometer myself. Over time, I’ve gotten a good feel for the dough by its look, smell, and texture. When I started learning about sourdough, I didn’t even know you could measure dough temperature, but looking back, I think it could have been helpful to invest in one for more precision, especially early on.
So I’ve made this recipe 3 times now and I love it! But every time the loaf seems to be a bigger circle and a little flatter than I’d like. Do you have any idea why this might be? Maybe the bulk fermentation was too long?? Each time I did it for 4 hours
Hi Ashley
Glad you like the recipe! If your loaves are coming out flatter and wider, it might be one of a few things:
1. Overfermentation: Sometimes the dough gets a bit too much fermentation time. Try cutting back the bulk fermentation to about 3.5 hours and see if that helps.
2. Gluten Development: If reducing the fermentation time doesn't do the trick, you might need to work the dough a bit more. Adding an extra stretch and fold or two could strengthen the gluten, which helps the loaf hold its shape.
3. Hydration and Humidity: Changes in weather, especially as it gets warmer and more humid, can affect your dough. If it's still not holding up, consider reducing the water in your dough by 10-20 grams.
Test these adjustments one at a time to see what impacts the outcome. Let me know how it goes!
Hi,
Thanks for replying to my question about add ins, I LOVE this recipe, so much quicker than most. So I’ve read that if you are having trouble with scoring that after proofing you can put the dough in the freezer in the banneton basket for about 20 minutes, then take out and score. Do you know if this will work for this recipe or not?
Hi Ashley! I'm glad you found my reply helpful!
Yes, putting your dough in the freezer for about 20 minutes after proofing to make scoring easier can definitely work for this recipe.
Another method I like is to generously flour the tea towel when placing the dough in the banneton. It helps a lot with scoring!
Maybe try both and see what works best for you?
Hi I am interested in making SPEEDY SAME DAY SD BREAD RECIPE but I don't have a dutch oven. Can I follow this same recipe and bake it on a sheet pan? Any tips would help.This is my first SD bake.
Hi Lynda,
You can definitely bake the this bread on a sheet pan if you don’t have a Dutch oven. While a Dutch oven helps by trapping steam and giving the bread a better rise, you can still achieve great results without one.
When baking without a Dutch oven, it’s often referred to as open baking. My top tip is to ensure there's enough moisture in the oven. One effective way to do this is by placing a cast iron skillet filled with boiling water on the lower rack of your oven while your bread bakes. This will help create a steamy environment that's ideal for bread baking.
You might also want to lower the oven temperature slightly and extend the baking time. How much to adjust these will depend on your specific oven, as each one can vary a bit. Give it a try and see how it goes. Feel free to reach out if you have any more questions!
Would it be possible to bake this in a loaf pan without a lid?
Hi Sarah!
Yes, you can bake the bread in a loaf pan without a lid, but it might not rise as much due to the lack of steam. Consider lowering the baking temperature and extending the time a bit. Adding a pan of water in the oven can also help create steam and improve the rise.
Let me know how it goes!
Can you use add ins in this recipe? Like jalapeño and cheddar? If so, how much and when do you put it in?
Hi Ashley!
Of course, adding extras like jalapeño and cheddar is great in this speedy sourdough! For me, a good amount without overpowering the sourdough taste is about 1/2 cup of shredded cheddar and 1 to 2 tablespoons of finely diced jalapeño. I usually just incorporate these into your dough before I shape it for baking. This way, the cheddar gets all melty and gooey, and the jalapeños distribute their spice nicely throughout.
Can you do the final proofing in the refrigerator overnight and bake in the morning?
I love this recipe!
Hi Susan!
Yes, I actually do it that way more often than not because it fits my schedule better! The way to go about it is to shape the bread after the bulk rise, put it ina a floured, tea towel lined banneton basket, cover with something airtight (shower cap or plastic bag) and put in the fridge. You can then leave it there anywhere between 8 - 48 hours, though the taste will be slightly more sour if you leave it over 24 hours. Then you bake it directly from the fridge!
If I double the recipe, do I split the dough in half? If so, do I do it before or after the final rise?
Hi Jordan!
Yes, you can double the recipe and split it in half after the bulk ferment. Then you shape both halves and put each in a separate banneton basket! 🙂 I actually do that quite often. Then you can bake one right away (or the next morning), and the other one the day after that!
Hi! First time sourdough maker here. Everything was fine until I went to move the dough from the bowl with the towel to the parchment paper and it totally stuck to my towel and ripped apart!
Oh, I'm so sorry to hear it!! Did you manage so save it?
Next time, try to flour the towel a bit more heavily, although if you get the dough to be just the right consistency, it doesn't even need flouring in my experience. But it takes practice to know your dough, so just be patient and don't let the fails along the way turn you away from sourdough baking. Contact me if you have any questions! 🙂
First timer here! I’m at the 3-4 hour rise phase and I don’t think I want to bake at 8 or 9 pm. I see from previous comments I can put in the refrigerator overnight. I will do the pinch at the top part with shaping and the floured part. Then cover and refrigerate overnight. Is there an amount of time to bring to room temperature before baking? Can I bake it out of the fridge?
I appreciate your advice.
Hi Robbin!
Yes, you can definitely leave it in the fridge overnight, up to two days actually if that suits your schedule better.
And no, I actually don't recommend bringing it to room temperature before you bake it. The scoring and baking is so much easier on a cold loaf, and I notice the oven spring is a tad better if I bake straight from the fridge. Plus s easier to plan 🙂 I hope that answers your questions and I'm sure the loaf will come out great =D
If I can’t bake immediately after the final rise, can I store it in the refrigerator for a few hours until I am able to bake it?
Hi Christin,
yes, you can absolutely do that! I often do it, and sometimes I leave it in the fridge up to 48 hours (if I do longer than than, the bread does become a bit too sour for my taste). A few hours or overnight doesn't really make much difference. + scoring is actually easier if you score straight from the fridge 🙂
If I do the version where I feed the starter the night before do I leave it out of the fridge overnight! Then start the schedule for fed starter you’ve posted?
Hi Lyn!
I'm sorry, I don't know exactly what you mean, but if you're asking if you're supposed to leave you starter on the counter overnight after you feed it, that's correct! About 8-12 hours is what starters need to become really active, so feeding them in he evening and start baking in the morning works for lot of people 🙂
If you wanted to add something to this recipe as people have above (jalapeño & cheddar, herbs, etc) when would you add those in ?
Hi Brittany!
That's a great question, and the answer really depends on both personal preference and the specific addition you're looking to add. I've actually written a whole article about incorporating fillings and add-ins into your sourdough bread, which you can check out here for a comprehensive guide: https://stretchandfolds.com/learn-how-to-add-fillings-and-add-ins-to-your-sourdough-bread/
But to give you the short answer, there are typically two optimal times to add ingredients:
1. During the stretch and folds process, which is perfect for ingredients like raisins, seeds, and herbs.
2. After the first rise and before the second rise, so basically when you're shaping the bread. This timing works well for additions like jalapeño & cheddar or chocolate chips (if you're making a chocolate loaf), etc.
In general, adding during the shaping phase is always a safe bet, whereas adding during the stretch and folds is a bit easier but might not be ideal for some types of additions. If you have a specific ingredient in mind, feel free to let me know, and I can offer more specific advice on when and how to include it in your dough!
Have you ever had an issue with splashing water into the hot Dutch oven? Mine cracked when I did this 🙁
No, never had that problem. But I always make sure the water is hot. Though I've heard about people adding ice cubes to hot Dutch ovens, but that's not something I'm willing to try!
Really sorry to hear your Dutch oven cracked. Was it cast iron? I'm in a few sourdough groups on Facebook, and it's not common to hear about Dutch ovens cracking, unlike glass trays, which seem to shatter quite often...