Same Day Sourdough Bread

Are you craving the delightful aroma of freshly baked bread without the wait? Look no further! This easy same day sourdough bread recipe will have you enjoying a delicious loaf of bread in just a matter of hours.
With a few simple ingredients and a little bit of patience, you'll achieve that beautiful golden-brown crust and airy crumb you've been dreaming of- without compromising the taste or the fermentation benefits of sourdough bread. AND it is totally appropriate for a beginner baker- just like my skillet sourdough naan recipe!

Summarize & Adapt This Recipe On:
If you've always been intimidated by the idea of making your own sourdough, you're going to love this recipe. It's really easy to put together, you can plan it around your schedule and is actually quite forgiving too!
If you're super into bread baking and you mill your own flour at home (like I do!), here's a fresh milled same day sourdough bread recipe you need to check out!

Free resource
Get all 3 when you subscribe
Bake beautiful bread that fits Your life - not the other way around
Recipe Quick Look
- Prep time: 2 hours.
- Cook time: 45 mins.
- Servings: 15 slices.
- Main ingredients: Flour, sourdough starter, water, salt.
- Cooking method: Combine water, starter and salt 🡢 add flour 🡢 mix, cover and rest 🡢 do 1 set of stretch and folds 🡢 cover and rest for 20 minutes 🡢 do 1 more set of stretch and folds 🡢 shape into a ball, cover and let rise for 3-4 hours 🡢 shape dough ball 🡢 rise again and score 🡢 transfer to parchment paper and into a Dutch oven 🡢 bake for 30-40 minutes 🡢 cool, slice and serve.
- Difficulty: Medium.
- Serving ideas: Serve a slice of the crusty sourdough with a bowl of your favorite soup, or use it as a bowl to make broccoli cheddar soup in a sourdough bowl.
Jump to:
- Summarize & Adapt This Recipe On:
- Recipe Quick Look
- Important Ingredients
- Substitutions & Variations
- How to Make Same Day Sourdough Bread
- Baking Schedule
- Crucial Success Tips
- Recipe FAQs
- More Easy Sourdough Recipes
- Same Day Sourdough Bread
- Need Help Tweaking This Recipe?
- Other Sourdough Recipes You'll Love
- Neapolitan-Style Sourdough Pizza Dough
- Sourdough Semolina Pizza Dough (Crispy, Chewy, and Full of Flavor)
- Italian Semolina Sourdough Bread
Important Ingredients
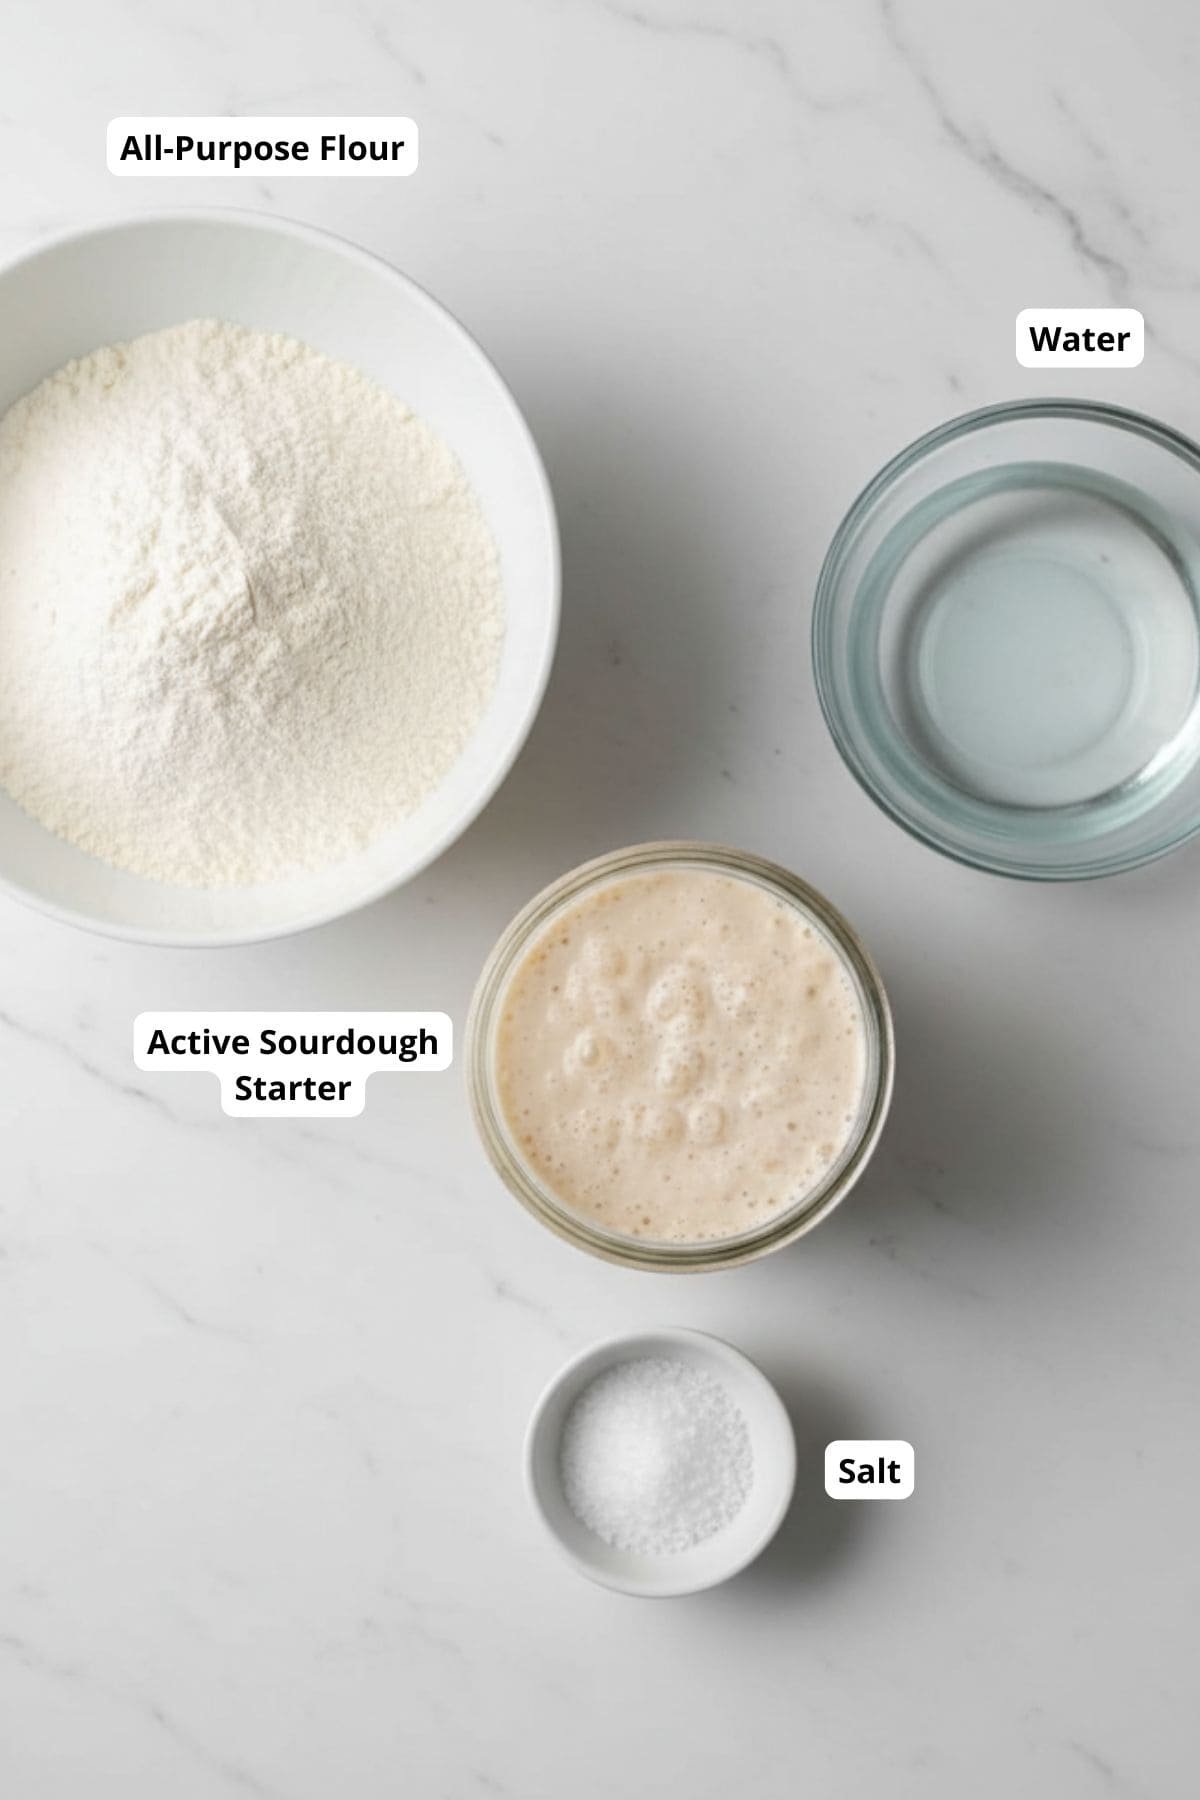
- Active sourdough starter: For that signature tang and lift. If you don't have this at hand, follow my easy recipe that teaches you how to make sourdough starter from scratch.
- Water: To hydrate the dough and activate the starter for fermentation.
- Salt: To enhance the flavor and strengthen the dough structure.
- All-purpose flour: The base of your dough creating structure and texture for the loaf.
See recipe card for quantities. I included a baking schedule at the end, so you'll have an easier time calculating when to feed your starter and start the whole process.
Also, a Dutch oven is a must if you ask me. There are ways of baking bread that don't require you to have it, but having it makes everything much simpler!
Substitutions & Variations
- You can swap up to 20% of the all purpose flour you're using here for a different kind of flour like rye flour or bread flour to create different versions of the bread. If you want to bake your sourdough using whole wheat flour, I suggest you check out my no-knead rustic whole wheat sourdough bread recipe.
- You can also top the bread with some seeds for a bit of extra texture and deliciousness. Sesame seeds, poppy seeds, pumpkin seeds, and sunflower seeds are all great options.
- For that hint of golden yellow color, you can also add some turmeric powder into the mix. I usually about 1 teaspoon at the beginning to my water, starter, and salt mixture to ensure it is evenly distributed.
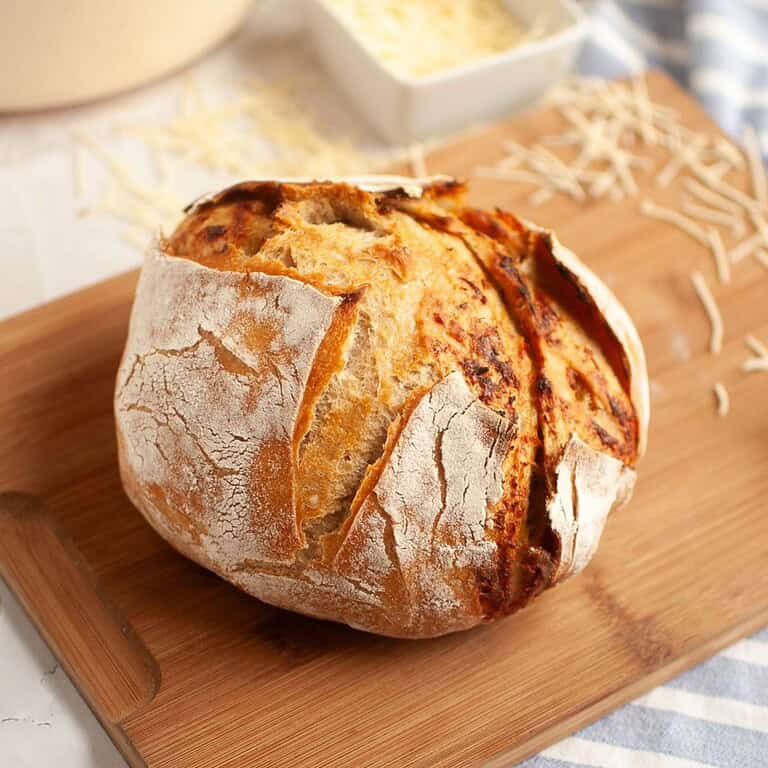
- To make a cheesy loaf, add a cup of shredded cheese into the dough during the last series of stretch and folds. This one's sure to be a total crowd pleaser- just like my roasted garlic and Parmesan sourdough bread.
How to Make Same Day Sourdough Bread

In a large bowl, combine water, starter, and salt. I like mixing those up first so the starter and the salt have a chance to disperse in the water

Add the flour and mix well. I usually do this with a spoon and finish with my hands to break up all the flour. Cover with something airtight (plastic wrap, aluminum foil, plastic bag, even a shower cap works!) and let rest for 30 minutes.

After 30 minutes, do a set of stretch and folds. Grab the edge of the dough, stretch it up, and fold it under on the other side. Rotate your bowl for 90 degrees and repeat 3 more times. We're going for 4 sets of stretch and folds in total. Cover again and leave to rest for 20 minutes and do another set of stretch and folds. Repeat this process until you do 4 sets of stretch and folds (which should take 1 hour in total). Be sure to cover your dough with something airtight in-between sets of stretch and folds to prevent the dough from drying out! After that's done, let the dough ball rise for 3 - 4 hours at room temperature.

Once it looks almost double in volume, transfer your dough to a lightly floured surface. It's now time to shape the dough! Grab the opposite ends of the dough and pinch them together on top. Repeat with the other two opposites. Prepare your bread basket (or banneton basket) so that you line it with a lightly floured tea towel.

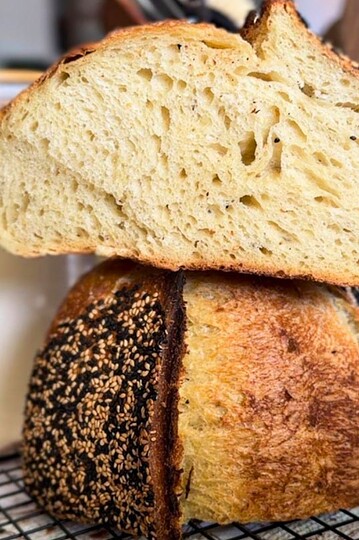
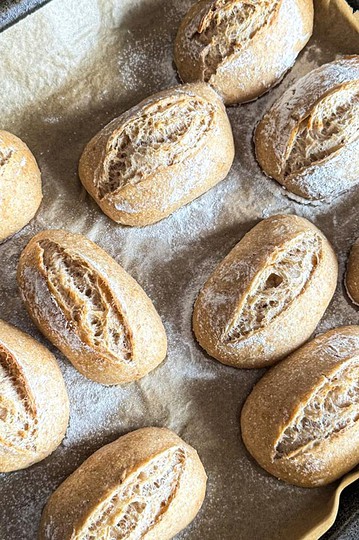
Carefully transfer your dough ball into a tea towel-lined basket. The pinched parts should be facing upwards. Preheat your oven and prepare a piece of parchment paper. Transfer your dough from the basket to the parchment paper, so the floured bottom of the dough is now the top of the dough up. Score your dough with a razor blade or a sharp knife; make two deep cuts so you get a crisis cross pattern.

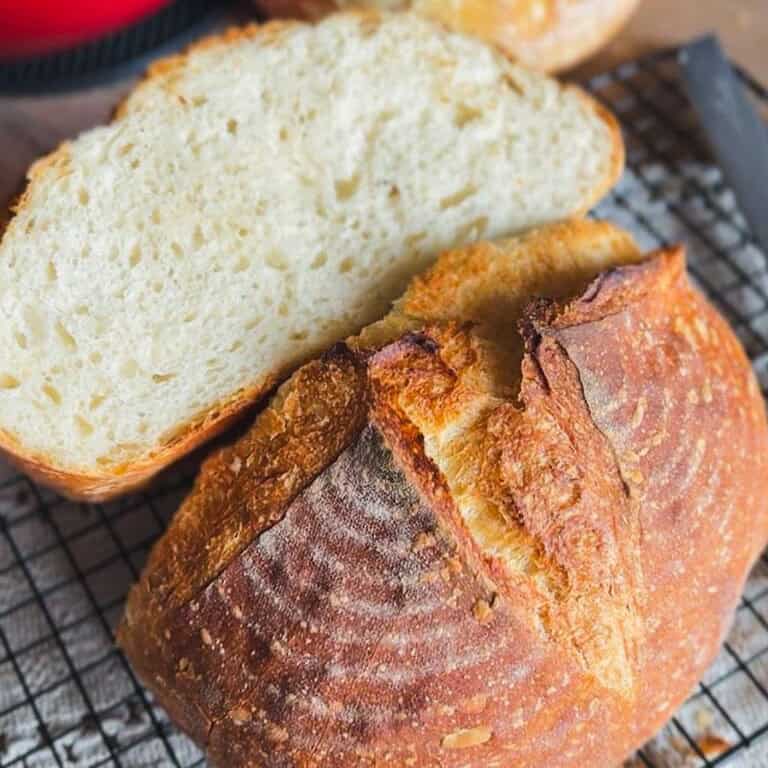
Transfer your parchment paper with a dough on it into a hot Dutch oven. Splash just a bit of water between the parchment paper and Dutch oven to create some steam and cover quickly to capture it inside. Put the bread in the oven for 30 minutes at 460°F (238°C). Take the lid off and bake for an additional 10 minutes with the lid off at 440°F (227°C) to get that golden brown color. Transfer to a cooling rack, cover with a damp kitchen towel and cool for at least an hour before you slice into it.
Pro Tip: Use a HEAVY bowl for mixing the dough and doing stretch and folds. I love using this natural ceramic bowl from Amazon (also in the pictures above!). When I stretch the dough, no matter how dense it is, the bowl stays on the counter. And I can make big amounts of dough in it when I'm batch baking sourdough bread.
Baking Schedule
OPTION 1: Feed the starter the day before, have bread for dinner the next day.
- 8.00: Mix up the dough.
- 8.30: Start stretch and folds.
- 9.30 - 12.30: Bulk rise.
- 12.30: Shaping and second rise.
- 13.30: Bread goes in the oven.
- 14.15: Bread comes out of the oven to cool down.
OPTION 2: Feed the starter in the morning, have bread for late dinner or the next day.
- 8.00: Feed starter.
- 13.00: Mix up the dough.
- 13.30: Start stretch and folds.
- 14.30 - 17.30: Bulk rise.
- 17.30: Shaping and second rise.
- 18.30: Bread goes in the oven.
- 19.15: Bread comes out of the oven to cool down.
Crucial Success Tips
- The temperature of your kitchen plays a big role in how fast your dough will rise. If you want to speed your process up a little, proof your dough in a warmer spot if you have one.
- For best results, wet your fingers with water to prevent the dough from sticking to your hands when you handle the dough. It will still stick a bit (because we're dealing with medium to high-hydration dough, but wetting your hands really helps! Use this tip especially when doing the sets of stretch and folds.
- It is normal for the dough to be very sticky the first time you do stretch and folds- don't panic. Just keep going.
- If you're adding seeds to your same day sourdough bread, sprinkle them in during the last series of stretch and folds.
- Wrap your cooled sourdough bread in a clean cloth or paper bag. This allows the bread to breathe slightly and helps maintain its crust's texture.
- Avoid storing sourdough bread in plastic bags, as they can trap moisture and make the crust soft. However, if you want to keep the crust softer for a longer time, you can use a plastic bag but leave it open or puncture a few holes in it.
- If you have a bread box, it can be an excellent option for storing your sourdough bread. A bread box provides a slightly humid environment that can help keep the bread's crust from becoming too hard.
Recipe FAQs
Check the size of the dough. If it has nearly doubled in size, it has proofed. You can also perform a "poke test." When you poke the bread dough, your finger should leave a dent behind, but the dent should slowly start to fill up again.
Absolutely! A (mature) starter is usually ready to use in baking after 4 - 6 hours after feeding. If you look at the first baking schedule below, you'll see that it calls for feeding your starter in the morning and having the bread baked in the late afternoon.
Although sourdough bread can last up to a week at room temperature, it's best to eat it within the first three days.
After three days, consider freezing it. If it goes stale before you have a chance to eat or freeze it, you can always turn it into bread pudding, stuffing, breadcrumbs, etc.
More Easy Sourdough Recipes
Looking for other recipes like this? Try these:

If you tried this same day sourdough bread or any other recipe on my blog please leave a 🌟 star rating and let me know how it went in the 📝 comments below! Happy Baking!

Same Day Sourdough Bread
Jump to VideoEquipment
Ingredients
- 410 grams all-purpose flour
- 290 grams water
- 160 grams starter
- 8 grams salt
Instructions
- In a large bowl, mix together your water, starter, and salt. I like mixing those up first so the starter and the salt have a chance to disperse in the water.
- Add the flour and mix well. I usually do this with a spoon and finish with my hands to break up all the flour. Cover with something airtight (plastic wrap, aluminum foil, plastic bag, even a shower cap works!) and let rest for 30 minutes. I find putting a plastic bag over top is the most practical.
- After 30 minutes, do a set of stretch and folds. That means that you grab the edge of the dough, stretch it up, and fold it under on the other side. Rotate your bowl for 90 degrees and repeat 3 more times. We're going for 4 sets of stretch and folds in total. Cover again and leave to rest for 20 minutes and so another set of stretch and folds.
- Repeat this process until you do 4 sets of stretch and folds (which should take 1 hour in total). Be sure to cover your dough with something airtight in-between sets of stretch and folds to prevent the dough from drying out!
- After you are finished with stretch and folds, cover the dough again (it should resemble a smooth ball by now) and let the dough rise for 3 - 4 hours at room temperature (I usually just leave it on the counter). It should almost double in volume.
- After the bulk fermentation, transfer your dough to a lightly floured surface. We are going to shape your dough. The way to do that is to grab the opposite ends of the dough and pinch them together on top. Repeat with the other two opposites.
- Prepare your bread basket (or banneton basket) so that you line it with a lightly floured tea towel. Carefully transfer your dough ball into a tea towel-lined basket. The pinched parts should be facing upwards. If your dough is extra wobbly, you can help yourself with a dough scraper.
- Cover the dough again (I use the same plastic bag as before) and let it do its final rise for 2 hours at room temperature. About an hour in, you can turn your oven on to preheat it.
- When your dough puffed up a bit and your dutch oven and oven are both sufficiently preheated, prepare a piece of parchment paper. Transfer your dough from the basket to the parchment paper, so the floured bottom of the dough is now the top of the dough. Score your dough with a razor blade or a sharp knife; make two deep cuts so you get a crisis cross pattern.
- Transfer your parchment paper with a dough on it into a hot dutch oven. Splash just a bit of water between the parchment paper and dutch oven to create some steam and cover quickly to capture it inside. Put the bread in the oven for 30 minutes at 460°F (238°C). Take the lid off and bake for an additional 10 minutes with the lid off at 440°F (227°C) to get that golden brown color. Bake time depends on the strength of your oven, so you can adjust it a bit after. After taking the bread out of the oven, put it on a cooling rack, cover it with a damp kitchen towel and leave it to cool for at least an hour before you slice into it.
Video
Notes
- Wet your fingers with water before doing the stretch and folds. This will help prevent the dough from sticking to your fingers.
- Allow the dough to proof until almost double in size.
- Add your mix-ins like seeds, spices and cheese during the last series of stretch and folds.


Hi, I think it will be too late for me to bake it tonight…… is it possible to put it in the fridge until baking in the morning? If so, at what point?
Hi Shauna,
yes, you can put it in the fridge. The most "perfect" time for putting it in the fridge would be right after the first rise. Then it can do a second rise in the fridge, anywhere from 8 - 24 hours for best results (I've done up to 3 days and it was still fine!).
If you already had it in the fridge for the second rise and you took it out to bake it and then changed your mind, you can simply put it back. It will wait for you.
The fridge slows down the fermentation so the dough will rise a tiny bit, but not much, that's why it can be in there for quite some time 🙂
Clearly I’m not very smart at converting grams to cups. I looked it up and it was still a pain. Anyway you could convert for me? Thank you!
Hi Ashlyn,
I'm actually in the process of adding US units to my recipes, but haven't yet come to this one!
Here are the conversions:
Certainly! Here are the conversions for all the ingredients:
- 290 grams water ≈ 1.2 cups (about 1 cup + 3 tbsp)
- 160 grams starter ≈ 0.7 cups (about 1/2 cup + 3 tbsp)
- 8 grams salt ≈ 1.5 teaspoons
- 410 grams all-purpose flour ≈ 3.4 cups (about 3 cups + 1/3 cup)
This was excellent! Thick crusted, light on the inside. It was bakery style! We LOVED it. I ate avocado toast with it every morning. I put lunch and dinner on it also. I live at 6225ft elevation and did not adjust measurements. My starter has been passed through families since the 90s so it is very hearty and I feel it complimented this sourdough bread perfectly. I am making another loaf this week.
Thank you for taking the time to comment! =D I'm so glad it turned out great for you. It's my go-to recipe as well when I want something super basic, but the best!
MY FIRST SUCCESSFUL LOAF!!
I will only use this recipe from now on. Most recipes require days of work & honestly who has time for that? This recipe is not intimidating AT ALL and so simple to follow. I’m so glad I found this!
I'm SO glad to hear it! =D
Can we do a cold retard for this recipe?
Yes, you can! I do it quite often actually! Just keep in mind that this recipe does use quite a lot of starter, so I wouldn't have it in the fridge for more than 2 days (that's the longest I've gone), as it will get a bit more sour after that. But one night is completely fine.
Hi Chandler!
You absolutely can! I should include that options with my baking schedules, so thanks for pointing that out.
The way to di it is simply instead of doing the second (final) rise for 2 hours at room temperature, do it in the fridge for 6+ hours. Overnight is usually what I do.
You can also leave the dough in the fridge for longer, but I wouldn't go past 48 hours because this recipe has quite a large amount of starter and after 3 days in the fridge, the taste will be more sour. But if you like that, go for it! The longest I did was 3 days and the bread was still good in my opinion, just with more of a tang 🙂
Can you use a Pyrex bowl to bake with in the oven.
Yes, you can! Although I never did, I'm constantly seeing tutorial on how to do it. The main takeaway is that you cannot bake it at a vary high temperature, so make sure you know what the heat limit is on your bowl. Here's a tutorial I found, and I think it would work with my recipe: https://www.youtube.com/watch?app=desktop&v=DxZAFv98fug
I don't have dutch oven, can i modify this to use in loaf pan?
Hi Tawny!
Yes, you can! But baking time will probably be a bit different, and I would absolutely lower the temperature, otherwise the bread will burn on the top.
I would use the same baking time and temperature as you would for sandwich bread. If you haven't baked a sandwich loaf before, you can try to bake it for about 25-35 minutes at 400°F (about 205°C), until the crust turns a rich golden brown and the loaf sounds hollow when tapped. That would work I think!
And if you want the bread to rise well in the oven, it would be great if you have a chance to create some steam. My go-to way to do that is to simply boil some water in a cast iron skillet and putting that skillet (full of very hot/boiling water) inside the oven when I have the bread.
If you remember to, I would love to hear back from you and offer more suggestions if you have any more questions! =D
I made this today and the recipe was so easy to follow and it turned out delicious! I baked it at the temperatures and times but I feel like the sides of the bread could have been more crispy. The top and bottom were perfect. Should I bake it longer when the lid is off?
Hi Nicole,
thank you so much for taking the time to leave a comment, I love to getting feedback!
Regarding your loaf, I would extend the baking time with a lid ON next time by about 3-4 minutes. If the top and the bottom were perfect now, you are risking burning the top if you bake it with a lid off longer (I think). So I would rather try t bake it with a lid on for a bit longer...
But as with anything sourdough - it's trial and error! If it turned out delicious, you are only a few tweaks away from perfecting your "everyday bread" recipe! =D
My dough did not became manageable after the first 30 minutes . It was stick to the hand could not do the stretching and fold . Do you know why?
I'm so sorry the recipe didn't work for you (yet!). Sourdough can be really tricky sometimes. There are a bunch of things that can affect your dough (and how wet it is), like how warm your kitchen is, the kind of flour you're using, and even the unique properties of your own sourdough starter.
To answer your question about why your dough wasn't manageable and a bit too sticky: it sounds like there might have been too much water compared to flour.
Next time, try adding a bit more flour to get the dough just right. After letting it rest for 30 minutes, you should be able to stretch and fold it, even if it's still a tad sticky. Do not be afraid to add flour even after 30 minutes, if you find your dough to be impossible to handle. Just add flour and wait another 15-20 minutes again. Then continue with the recipe as usual.
A tip: wet your hands when you do this. It really helps!
And if you're a beginner, don't be afraid to add a bit more flour, like 30-60 grams. This should make the dough easier to handle, and your bread will still taste amazing. Keep at it, and remember, sourdough is all about learning as you go!
I was using a different recipe and I wasn’t pleased with it. I tried yours and my gosh it’s amazing!!
10/10 🙂
I'm so happy to hear that! With sourdough, I find it really helpful that the recipe is very detailed, because technique matters so much (at least for me!).
My very first sourdough bread and it turned out amazing! Delicious and easy. Making more tomorrow!
That is so great to hear!
I am new to sourdough bread baking, but found this recipe and absolutely love it. The only thing I do differently is put mine in the refrigerator in my bread basket overnight. I’ve also added pickled jalapeños and cheddar which was amazing too! Thank you so much for sharing this recipe, I am sharing it with my friends when I give them my starter.
Polly,
thank you for taking your time to comment. Honestly, comments like yours always remind me why I starter a blog with such passion in the first place <3
When you took it out to bake it how long did you let it sit out before baking? Or did you pop in the oven right away?
Hi Danielle!
I just pop it in the oven right from the fridge. I find that I can score it more easily that way, and the dough has a bit better rise in the oven if I bake it from cold.
But if (for any reason) you end up delaying the baking, it will wait for you on the counter for about an hour or two, no problem. I wouldn't go past 2 hours, just so it doesn't overferment.
Advice using bread flour vs ap flour, started this sourdough adventure and thought it could just be replaced but it instantly created a dough ball. Not runny at all like in the pic. Can I still go feo. Here?
Hi Kathleen,
Bread flour can be more absorbent than all-purpose flour, but the difference you are experiencing is not that common.
If your dough forms a dough ball right after you mix the ingredients, I would just add a splash of water to get a more shaggy dough. But even if you do not do that, you should have no problem making and baking the bread. It will probably be a bit denser and harder to handle (the dough will become quite stiff after the stretching and folding), but not at all inedible! The only thing to note when working with a stiffer dough is that it usually takes just a but longer to ferment, so maybe let it rise an hour extra.
For future endeavors, if you like o work with bread flour, experiment with adding a bit more water when you are mixing the ingredients together if you follow the recipe that calls for all-purpose flour. You will soon get a feeling about how much more water your bread flour needs and will be able to tweak the recipes to get the perfect ratio.
The great thing about bread is that we usually bake it often, so we are able to learn how to bake it well fast! Maybe the first few loaves will not be ideal, but you should soon get the hang of it!
Could I replace the all purpose flour to whole wheat flour?
Thank you!
Yes, you can absolutely use whole wheat flour for sourdough bread! Your bread might turn out a bit heavier, and you'll need to add a little more water.
It's hard to say exactly how much more water, so if you're new to this, it's a good idea to use a recipe that's made for whole wheat sourdough. If you've made sourdough before, you can probably guess how much extra water to add.
Another tip: try using some whole wheat flour, but not all. Replace about one-fifth (20%) of the regular flour with whole wheat.
A brief explanation of why you can't simply substitute different types of flour in sourdough recipes: This is because different flours soak up water differently, which can change how your bread turns out. Whole wheat flour needs more water than regular flour. For me, I've noticed that my sourdough starter reacts a bit differently with whole wheat flour, but it's not a big deal. The main thing to remember is how much water the flour absorbs.
If you want to try a recipe that uses a lot of whole wheat flour, check out the Rustic Whole Wheat Sourdough recipe on my blog. It mainly uses whole wheat with a bit of bread flour. I don't use all whole wheat because the bread gets too heavy for my taste, but there are many recipes out there that do!
And I'm thinking of making a new recipe for 100% whole wheat sourdough that you can make in one day!
Excited to try this!
This recipe was so easy to follow! I didn’t have quite enough starter so I halved the entire recipe to make a smaller loaf and it turned out perfect! Was my first artisan loaf and I’m so excited! Added some herbs and sharp cheddar and tasted great. Wish I would have added more but there’s always next time!
I also often halve this recipe, if I know we won't be able to eat the whole thing! The only thing I do differently if I do halve it is that I bake it a bit less. But if your loaf turned out great, that's perfect.
And herbs + cheddar is a great idea, I haven't actually tried that combination yet...but I have to soon!
What ratio to feed starter for this bread works best? Excited to try it. New at this ☺️
Hi Kim,
I'm glad you're starting on this journey! Honestly, starters are very adaptable and once you have some experience, you'll see you can pretty much do anything as long as you understand the process. For this recipe, you need an active starter, that's all. It doesn't matter what the feeding ratio was.
Of course, there is a difference in starters depending on what ratio they were fed with, but it's mainly about how sour they are and how quickly they doubled. When we're mixing the starter with water and flour to make bread, we're essentially creating a new feeding ratio - that's called "hydration" of the dough.
Without complicating this too much for you, just know that as long as you have an active starter that doubled anywhere in 6-24 hours, you can use it in this recipe. 🙂
(Just a note: even if you use discard straight from the fridge, the recipe will work, but you'd have to adjust the rising times, because discard needs a bit more time to raise the bread. But just pointing out how truly versatile and incredible the starter is, active or not!)