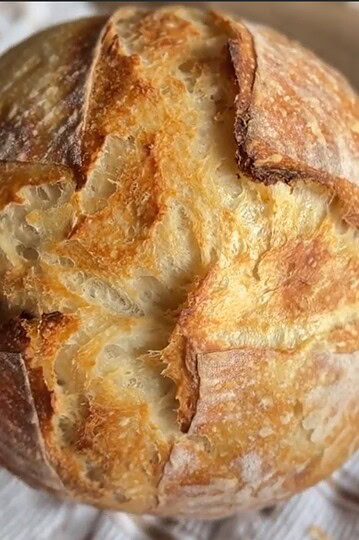
Same Day Sourdough Bread

Are you craving the delightful aroma of freshly baked bread without the wait? Look no further! This easy same day sourdough bread recipe will have you enjoying a delicious loaf of bread in just a matter of hours.
With a few simple ingredients and a little bit of patience, you'll achieve that beautiful golden-brown crust and airy crumb you've been dreaming of- without compromising the taste or the fermentation benefits of sourdough bread. AND it is totally appropriate for a beginner baker- just like my skillet sourdough naan recipe!

Summarize & Adapt This Recipe On:
If you've always been intimidated by the idea of making your own sourdough, you're going to love this recipe. It's really easy to put together, you can plan it around your schedule and is actually quite forgiving too!
If you're super into bread baking and you mill your own flour at home (like I do!), here's a fresh milled same day sourdough bread recipe you need to check out!

Free resource
Get all 3 when you subscribe
Bake beautiful bread that fits Your life - not the other way around
Recipe Quick Look
- Prep time: 2 hours.
- Cook time: 45 mins.
- Servings: 15 slices.
- Main ingredients: Flour, sourdough starter, water, salt.
- Cooking method: Combine water, starter and salt 🡢 add flour 🡢 mix, cover and rest 🡢 do 1 set of stretch and folds 🡢 cover and rest for 20 minutes 🡢 do 1 more set of stretch and folds 🡢 shape into a ball, cover and let rise for 3-4 hours 🡢 shape dough ball 🡢 rise again and score 🡢 transfer to parchment paper and into a Dutch oven 🡢 bake for 30-40 minutes 🡢 cool, slice and serve.
- Difficulty: Medium.
- Serving ideas: Serve a slice of the crusty sourdough with a bowl of your favorite soup, or use it as a bowl to make broccoli cheddar soup in a sourdough bowl.
Jump to:
- Summarize & Adapt This Recipe On:
- Recipe Quick Look
- Important Ingredients
- Substitutions & Variations
- How to Make Same Day Sourdough Bread
- Baking Schedule
- Crucial Success Tips
- Recipe FAQs
- More Easy Sourdough Recipes
- Same Day Sourdough Bread
- Need Help Tweaking This Recipe?
- Other Sourdough Recipes You'll Love
- Neapolitan-Style Sourdough Pizza Dough
- Sourdough Semolina Pizza Dough (Crispy, Chewy, and Full of Flavor)
- Italian Semolina Sourdough Bread
Important Ingredients
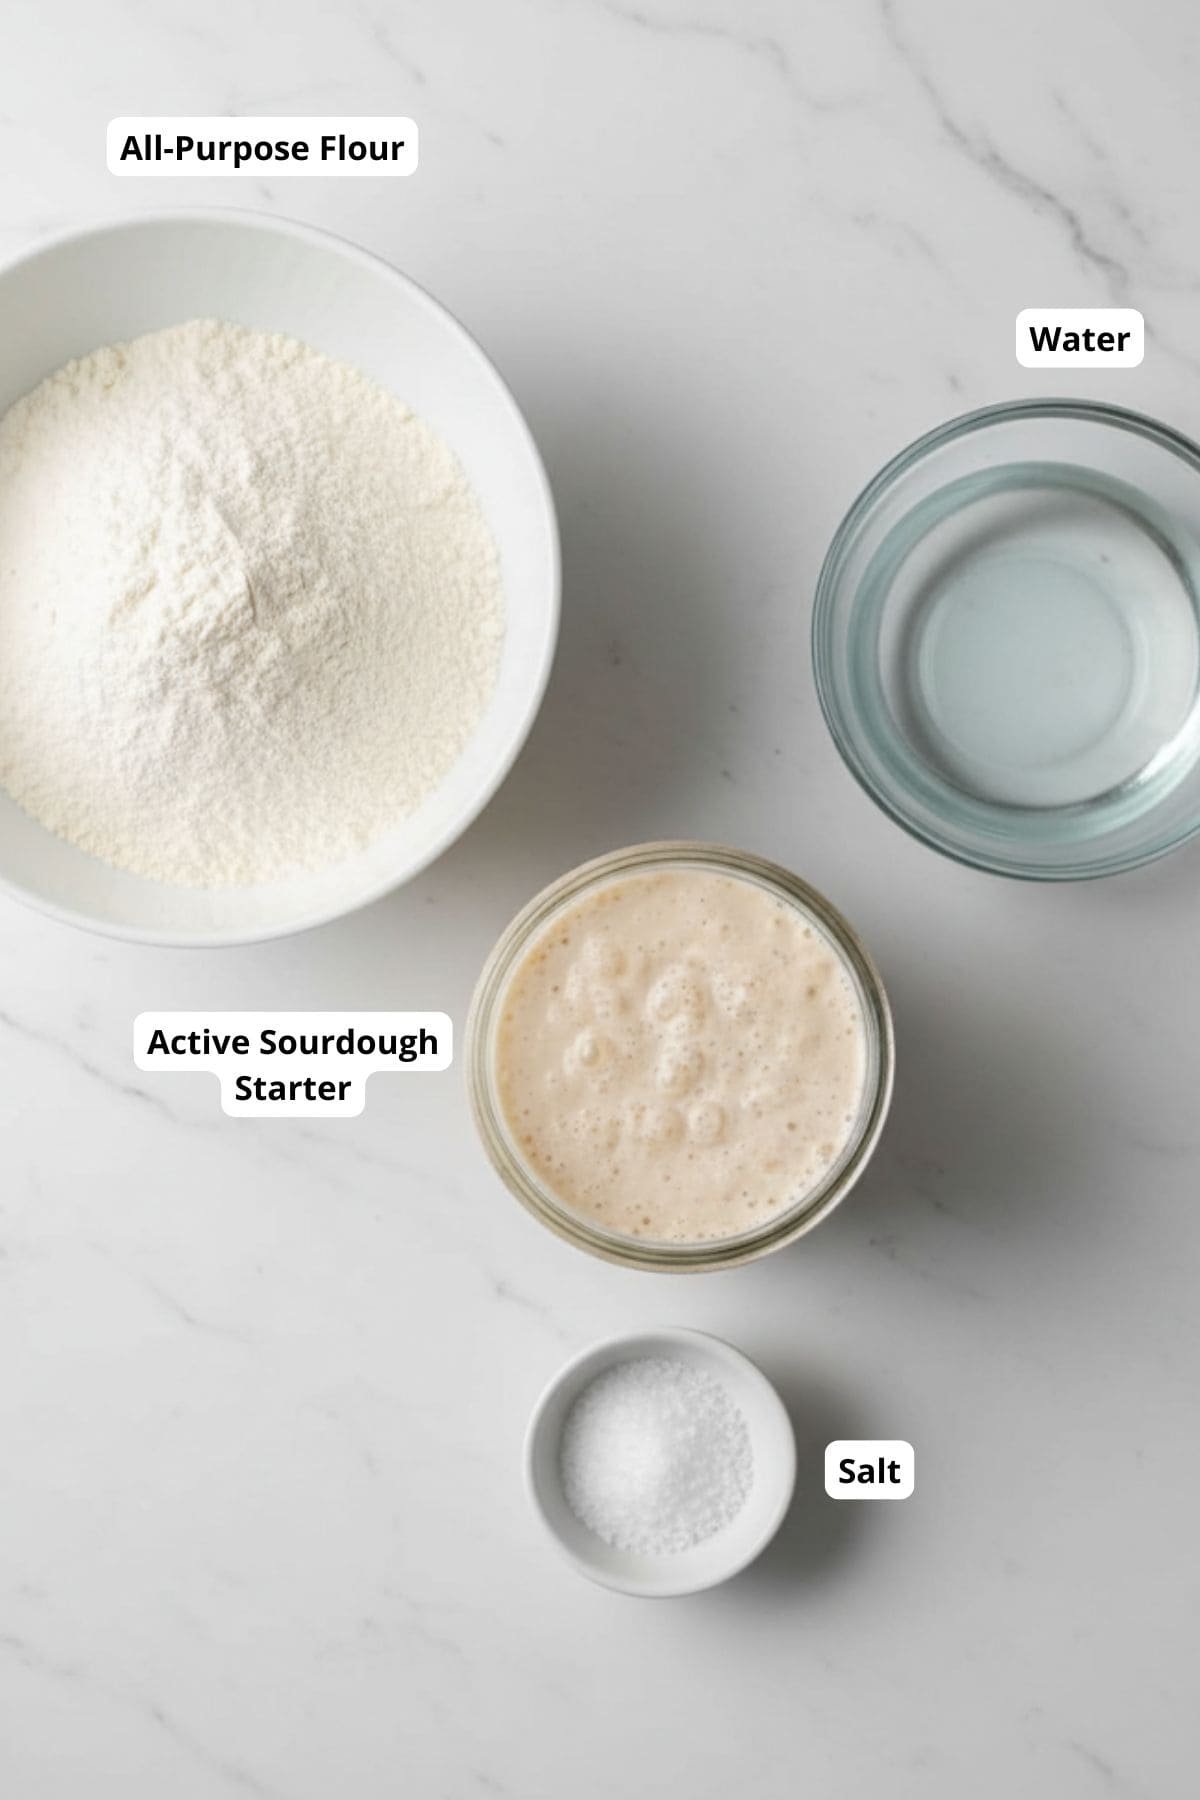
- Active sourdough starter: For that signature tang and lift. If you don't have this at hand, follow my easy recipe that teaches you how to make sourdough starter from scratch.
- Water: To hydrate the dough and activate the starter for fermentation.
- Salt: To enhance the flavor and strengthen the dough structure.
- All-purpose flour: The base of your dough creating structure and texture for the loaf.
See recipe card for quantities. I included a baking schedule at the end, so you'll have an easier time calculating when to feed your starter and start the whole process.
Also, a Dutch oven is a must if you ask me. There are ways of baking bread that don't require you to have it, but having it makes everything much simpler!
Substitutions & Variations
- You can swap up to 20% of the all purpose flour you're using here for a different kind of flour like rye flour or bread flour to create different versions of the bread. If you want to bake your sourdough using whole wheat flour, I suggest you check out my no-knead rustic whole wheat sourdough bread recipe.
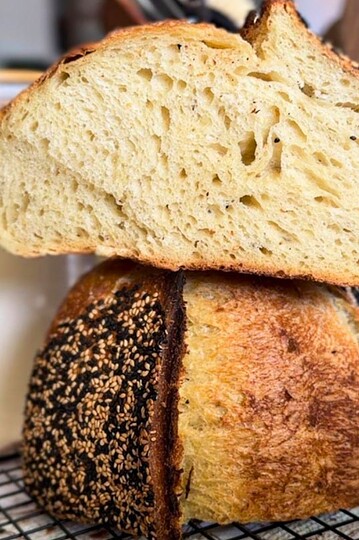
- You can also top the bread with some seeds for a bit of extra texture and deliciousness. Sesame seeds, poppy seeds, pumpkin seeds, and sunflower seeds are all great options.
- For that hint of golden yellow color, you can also add some turmeric powder into the mix. I usually about 1 teaspoon at the beginning to my water, starter, and salt mixture to ensure it is evenly distributed.
- To make a cheesy loaf, add a cup of shredded cheese into the dough during the last series of stretch and folds. This one's sure to be a total crowd pleaser- just like my roasted garlic and Parmesan sourdough bread.
How to Make Same Day Sourdough Bread

In a large bowl, combine water, starter, and salt. I like mixing those up first so the starter and the salt have a chance to disperse in the water

Add the flour and mix well. I usually do this with a spoon and finish with my hands to break up all the flour. Cover with something airtight (plastic wrap, aluminum foil, plastic bag, even a shower cap works!) and let rest for 30 minutes.

After 30 minutes, do a set of stretch and folds. Grab the edge of the dough, stretch it up, and fold it under on the other side. Rotate your bowl for 90 degrees and repeat 3 more times. We're going for 4 sets of stretch and folds in total. Cover again and leave to rest for 20 minutes and do another set of stretch and folds. Repeat this process until you do 4 sets of stretch and folds (which should take 1 hour in total). Be sure to cover your dough with something airtight in-between sets of stretch and folds to prevent the dough from drying out! After that's done, let the dough ball rise for 3 - 4 hours at room temperature.

Once it looks almost double in volume, transfer your dough to a lightly floured surface. It's now time to shape the dough! Grab the opposite ends of the dough and pinch them together on top. Repeat with the other two opposites. Prepare your bread basket (or banneton basket) so that you line it with a lightly floured tea towel.

Carefully transfer your dough ball into a tea towel-lined basket. The pinched parts should be facing upwards. Preheat your oven and prepare a piece of parchment paper. Transfer your dough from the basket to the parchment paper, so the floured bottom of the dough is now the top of the dough up. Score your dough with a razor blade or a sharp knife; make two deep cuts so you get a crisis cross pattern.

Transfer your parchment paper with a dough on it into a hot Dutch oven. Splash just a bit of water between the parchment paper and Dutch oven to create some steam and cover quickly to capture it inside. Put the bread in the oven for 30 minutes at 460°F (238°C). Take the lid off and bake for an additional 10 minutes with the lid off at 440°F (227°C) to get that golden brown color. Transfer to a cooling rack, cover with a damp kitchen towel and cool for at least an hour before you slice into it.
Pro Tip: Use a HEAVY bowl for mixing the dough and doing stretch and folds. I love using this natural ceramic bowl from Amazon (also in the pictures above!). When I stretch the dough, no matter how dense it is, the bowl stays on the counter. And I can make big amounts of dough in it when I'm batch baking sourdough bread.
Baking Schedule
OPTION 1: Feed the starter the day before, have bread for dinner the next day.
- 8.00: Mix up the dough.
- 8.30: Start stretch and folds.
- 9.30 - 12.30: Bulk rise.
- 12.30: Shaping and second rise.
- 13.30: Bread goes in the oven.
- 14.15: Bread comes out of the oven to cool down.
OPTION 2: Feed the starter in the morning, have bread for late dinner or the next day.
- 8.00: Feed starter.
- 13.00: Mix up the dough.
- 13.30: Start stretch and folds.
- 14.30 - 17.30: Bulk rise.
- 17.30: Shaping and second rise.
- 18.30: Bread goes in the oven.
- 19.15: Bread comes out of the oven to cool down.
Crucial Success Tips
- The temperature of your kitchen plays a big role in how fast your dough will rise. If you want to speed your process up a little, proof your dough in a warmer spot if you have one.
- For best results, wet your fingers with water to prevent the dough from sticking to your hands when you handle the dough. It will still stick a bit (because we're dealing with medium to high-hydration dough, but wetting your hands really helps! Use this tip especially when doing the sets of stretch and folds.
- It is normal for the dough to be very sticky the first time you do stretch and folds- don't panic. Just keep going.
- If you're adding seeds to your same day sourdough bread, sprinkle them in during the last series of stretch and folds.
- Wrap your cooled sourdough bread in a clean cloth or paper bag. This allows the bread to breathe slightly and helps maintain its crust's texture.
- Avoid storing sourdough bread in plastic bags, as they can trap moisture and make the crust soft. However, if you want to keep the crust softer for a longer time, you can use a plastic bag but leave it open or puncture a few holes in it.
- If you have a bread box, it can be an excellent option for storing your sourdough bread. A bread box provides a slightly humid environment that can help keep the bread's crust from becoming too hard.
Recipe FAQs
Check the size of the dough. If it has nearly doubled in size, it has proofed. You can also perform a "poke test." When you poke the bread dough, your finger should leave a dent behind, but the dent should slowly start to fill up again.
Absolutely! A (mature) starter is usually ready to use in baking after 4 - 6 hours after feeding. If you look at the first baking schedule below, you'll see that it calls for feeding your starter in the morning and having the bread baked in the late afternoon.
Although sourdough bread can last up to a week at room temperature, it's best to eat it within the first three days.
After three days, consider freezing it. If it goes stale before you have a chance to eat or freeze it, you can always turn it into bread pudding, stuffing, breadcrumbs, etc.
More Easy Sourdough Recipes
Looking for other recipes like this? Try these:

If you tried this same day sourdough bread or any other recipe on my blog please leave a 🌟 star rating and let me know how it went in the 📝 comments below! Happy Baking!

Same Day Sourdough Bread
Jump to VideoEquipment
Ingredients
- 410 grams all-purpose flour
- 290 grams water
- 160 grams starter
- 8 grams salt
Instructions
- In a large bowl, mix together your water, starter, and salt. I like mixing those up first so the starter and the salt have a chance to disperse in the water.
- Add the flour and mix well. I usually do this with a spoon and finish with my hands to break up all the flour. Cover with something airtight (plastic wrap, aluminum foil, plastic bag, even a shower cap works!) and let rest for 30 minutes. I find putting a plastic bag over top is the most practical.
- After 30 minutes, do a set of stretch and folds. That means that you grab the edge of the dough, stretch it up, and fold it under on the other side. Rotate your bowl for 90 degrees and repeat 3 more times. We're going for 4 sets of stretch and folds in total. Cover again and leave to rest for 20 minutes and so another set of stretch and folds.
- Repeat this process until you do 4 sets of stretch and folds (which should take 1 hour in total). Be sure to cover your dough with something airtight in-between sets of stretch and folds to prevent the dough from drying out!
- After you are finished with stretch and folds, cover the dough again (it should resemble a smooth ball by now) and let the dough rise for 3 - 4 hours at room temperature (I usually just leave it on the counter). It should almost double in volume.
- After the bulk fermentation, transfer your dough to a lightly floured surface. We are going to shape your dough. The way to do that is to grab the opposite ends of the dough and pinch them together on top. Repeat with the other two opposites.
- Prepare your bread basket (or banneton basket) so that you line it with a lightly floured tea towel. Carefully transfer your dough ball into a tea towel-lined basket. The pinched parts should be facing upwards. If your dough is extra wobbly, you can help yourself with a dough scraper.
- Cover the dough again (I use the same plastic bag as before) and let it do its final rise for 2 hours at room temperature. About an hour in, you can turn your oven on to preheat it.
- When your dough puffed up a bit and your dutch oven and oven are both sufficiently preheated, prepare a piece of parchment paper. Transfer your dough from the basket to the parchment paper, so the floured bottom of the dough is now the top of the dough. Score your dough with a razor blade or a sharp knife; make two deep cuts so you get a crisis cross pattern.
- Transfer your parchment paper with a dough on it into a hot dutch oven. Splash just a bit of water between the parchment paper and dutch oven to create some steam and cover quickly to capture it inside. Put the bread in the oven for 30 minutes at 460°F (238°C). Take the lid off and bake for an additional 10 minutes with the lid off at 440°F (227°C) to get that golden brown color. Bake time depends on the strength of your oven, so you can adjust it a bit after. After taking the bread out of the oven, put it on a cooling rack, cover it with a damp kitchen towel and leave it to cool for at least an hour before you slice into it.
Video
Notes
- Wet your fingers with water before doing the stretch and folds. This will help prevent the dough from sticking to your fingers.
- Allow the dough to proof until almost double in size.
- Add your mix-ins like seeds, spices and cheese during the last series of stretch and folds.


Can’t wait to try the same day sourdough recipe! But I have a question: why do you use all-purpose flour instead of bread flour? Thank you!
Hi Lyinda!
I use all-purpose mostly because it’s cheaper and easy to get locally. Bread flour will give you a “stronger” dough—it’s more elastic and smooth, so technically even easier to shape. But that doesn’t mean all-purpose is hard to work with! It’s still way easier than whole wheat, rye, or fresh milled flours. The main difference is that bread flour gives you a more structured loaf, while all-purpose gives you a softer, fluffier bread. Both work—just depends on the amount of softness you like in your bread! And for some really difficult doughs (like ciabatta or other very "wet" doughs), you'll really want to use bread flour. For all the "standard" recipes, all purpose works great, at least in my opinion.
Hi Tina - can I ask please why a tea towel is used in the banneton basket? I thought a floured basket was used, to give the lined pattern on the dough. Thanks 😊
Hi Sue!
Great question! You're totally right—if you flour the banneton directly, you'll get those pretty ring lines on the crust. I just use a tea towel most of the time because it's easier to clean, and I don't risk the dough sticking (especially with wetter doughs). So both ways work—it's just about what you prefer!
The best recipe I’ve used so far. The bread is SO soft!
Thank you so much Megan, these comments mean the world to me!
This is such a great recipe. I love how simple and same day it is! I’ve done this recipe twice now and done double loaves and added inclusions in this. It is amazing and delicious.
Hi Julia!
Thank you so much for your comment, it means a lot!
I have been trying to get my starter to double in size for over a month now… feeding 2 x a day
Discarding, moving it around my house to find the warmest spot,
I am using unbleached organic flour, bottled water, adding a little organic whole wheat… i am ready to stop this whole thing… help
Hi Diana,
I'm sorry to hear about the trouble with your starter! It can be really tough to figure out what's going wrong without seeing it though :/
However, is there a chance that you might be able to get some starter from someone else? Starting with a mature starter can be a lot easier, especially when you're new to sourdough. It might help you get a feel for what a healthy starter looks like and how it should act. Once you're more comfortable, you could try again from scratch if you want. I'd really strongly encourage you to try that!
And whatever you do, don't quit. Sourdough can be tricky in the beginning but it's also very rewarding once you get the hang of it!
Diana, I had the same problem, changed to a different brand of bottled water and had better results, hope this helps ~ so many factors to consider
This has become my favorite recipe. I’ve made a few recommendations recently too. It’s basically “stupid proof”. Your instructions are very easily understood. I’ve done a Jalapeno Cheddar with this recipe and added the inclusions during the shaping process. Thanks for sharing!
Hi Terri,
I'm so glad to hear this and that you've found it easy to follow! Jalapeno Cheddar sounds like an amazing addition. I'm glad the instructions were clear that's the best compliment for my. Thanks for sharing your success with me! =D
I have made this today and it’s the best one ever! I started my sourdough journey in November last year and for the first time today, I found a recipe that works for me. The bread was so soft and the crumb was great! Definitely a keeper! Thank you!😊
Hi Anna!
I'm so so glad to hear that, that's the purpose of my blog and I'm so happy to receive comments like that =D Thanks for sharing!
I want to do 3 or 4 mini loaves! Not sure how long to bake? Advice! I’ve used this for reg loaf and turned out great!
Hi Terri!
Great to hear you've had success with the regular loaf! For mini loaves, you'll generally want to reduce the baking time since they will bake faster because they are smaller size.
As a starting point, try baking the mini loaves for about 20 minutes at 460°F (238°C) with the lid on to capture the steam, then remove the lid and bake for another 5-10 minutes at 440°F (227°C) to get a nice golden brown crust. Keep an eye on them as ovens can vary, and the smaller size might need adjustments - there's really no other way than to experiment a bit 🙂
Let me know how they turn out if you remember it! =D
Hi Tina!
As a newbie to the sourdough game, I absolutely love this recipe! I have made it multiple times and it always turns out great.
My issue, is that my dough is ALWAYS sticky and it doesn’t seem to rise like I feel it should. So that also means I’m not able to “shape” it because it’s just so sticky. I always feed my starter the night before, then leave it out on the counter. It appears to be active as it’s very Bubly when I go to use it. What am I doing wrong here??
Hi Brandi!
I'm glad you're enjoying the recipe! Sourdough dough tends to be sticky because it has a lot of water in it (at least this one does). If your dough is too sticky and doesn't rise well, it might be because of the type of flour you're using or even things like humidity, elevation...
Since your starter is active and bubbly, that's great! To help with the stickiness, try adding a little more flour next time—about 10-20 grams should do. This might make the dough easier to handle and shape. Don't be afraid to experiment!
And don't hesitate to reach out if you have more questions!
Hi! Do you have the conversions from grams to cups for the flour, water, starter and salt? My starter is ready to go. It’s my first loaf!
Hi Christina!
Great to hear your starter is ready! Here's how you can measure your ingredients using cups:
All-purpose flour: 410 grams is about 3¼ cups.
Water: 290 grams is roughly 1¼ cups.
Starter: 160 grams is around 2/3 cup.
Salt: 8 grams is about 1½ teaspoons.
Using cups works fine, but for the best results, especially with sourdough, weighing your ingredients with a scale can make a big difference. It keeps everything precise!
Happy baking, and I can't wait to hear how your first loaf turns out!
For some reason I could not leave a 5 star rating....but it is 5 stars.
Question: If I feed my starter tonight and begin the baking process tomorrow...where do I put the starter? Back in the fridge or on a counter? Should it be kept cool or warm?
Carol
Hi Carol,
I'm sorry to hear you couldn't leave a rating—I'll check into it to fix it. Thanks for letting me know!
Regarding your starter, if you feed it tonight and plan to bake tomorrow, it's best to leave it out on the counter. This will allow it to become active and bubbly by the time you start baking. Keeping it in the fridge would slow down the fermentation process too much for an overnight period. Room temperature is ideal to get your starter ready for baking.
I've used this recipe a few times already and love it! I do add 450g of flour instead because I like just a bit more incase. But my husband absolutely loves this. Now I have a question, can I bake it in a bread pan? And for about how long and what temperature?
Hi Ashley!
I often bake in a loaf pan too! If you have two loaf pans, using one to cover the other is a great option. In that case, I'd bake for 30 minutes covered at 465°F (240°C), then remove the top pan and bake for an additional 10 minutes at 430°F (220°C) until golden brown. If you only have one loaf pan, you can bake it at 430°F (220°C) for about 30 minutes, then cover the top with aluminum foil to prevent it from getting too brown and bake for another 10-15 minutes. However, ovens can vary, so you might need to adjust timings based on how your oven performs. I hope this gives you a good starting point! Here's a post where I talk more about the two pan method if you're interested: https://stretchandfolds.com/sourdough-bread-in-a-loaf-pan-two-pan-method/. If your long term plan is to bake in loaf pans a lot, I highly recommend it! 🙂
At 63, I have cooked and baked from scratch since I was a toddler, in the kitchen with my grandmother. I bake bread ALL the time, and didn't think anything of taking this on. Well... this was WAY out of my wheelhouse! Completely different experience! Took a week to make my starter, just used the first recipe I saw because this is my first experience with this kind of bread making and just wanted to start my "trial and error". I had every intent of having bread for dinner last night and didn't do enough prep to know what I needed to do. Watched enough you tube, finally found yours, and everything hit me, and away we go. Things I didn't learn anywhere or maybe I skipped over - since I was too late for dinner, I started the process anyway. Did several stretch and folds, then tucked the covered bowl away in my fridge. Monday is a work day, and my work days are about 12 hours long. I began to debate with myself, do I take it out, leave it in the extra cold bowl, hope for the best, and bake when I get home..... OR, leave in fridge, remove while I'm heating my dutch oven and hope it will turn out? Option 1 won out. When I got home, dough had outgrown the bowl and pushed the lid way up. I got fresh parchment paper, did another stretch and fold while my dutch oven was heating, when it was ready I baked it off and OH MY, PERFECTION! I was so excited because I have no reason to believe it should have turned out at all. And my husband loved it. I'm guessing I will get better as I practice, and that this very forgiving dough and method of making bread will become a new favorite at my home! Thank you!!!
Hi Jamie!
I'm so so happy that your bread turned out perfectly, especially under those circumstances, and that your husband loved it too. That's the reason I post recipes here in the first place 🙂
Yes, with each batch you’ll find yourself getting more comfortable and your bread even better. Keep up the great work, and I'm here if you have any questions or need tips along the way. Thank you for sharing your success!
Simple for a newbie like me.. thank you for sharing because I feel like a pro with all the accolades from my family and friends!
Hi JB,
Thank you for taking the time to leave a comment! And I'm so glad you have such supportive family and friends. Their praise means the world to me too.
I love this recipe and have been using it for a while. I know I can make it in one day or can also put the dough in the refrigerator over night for the final proof. It comes out perfect either way, every time! Yesterday after the BF I gently stretched it into a rectangular shape, brushed on a little milk and added brown sugar mixed with cinnamon, rolled it up, put it in a loaf pan and in the fridge overnight. Baked it this morning and it came out amazing!!
Hi Kim!
It means so much that you took the time to write the comment! That really gives meaning to posting recipes on the internet - knowing people actually use them! =D
I'm really glad the recipe works for you and as for doing inclusions with it I do it too! It's the perfect base!